Easy Ghost Shaped Banana Treats

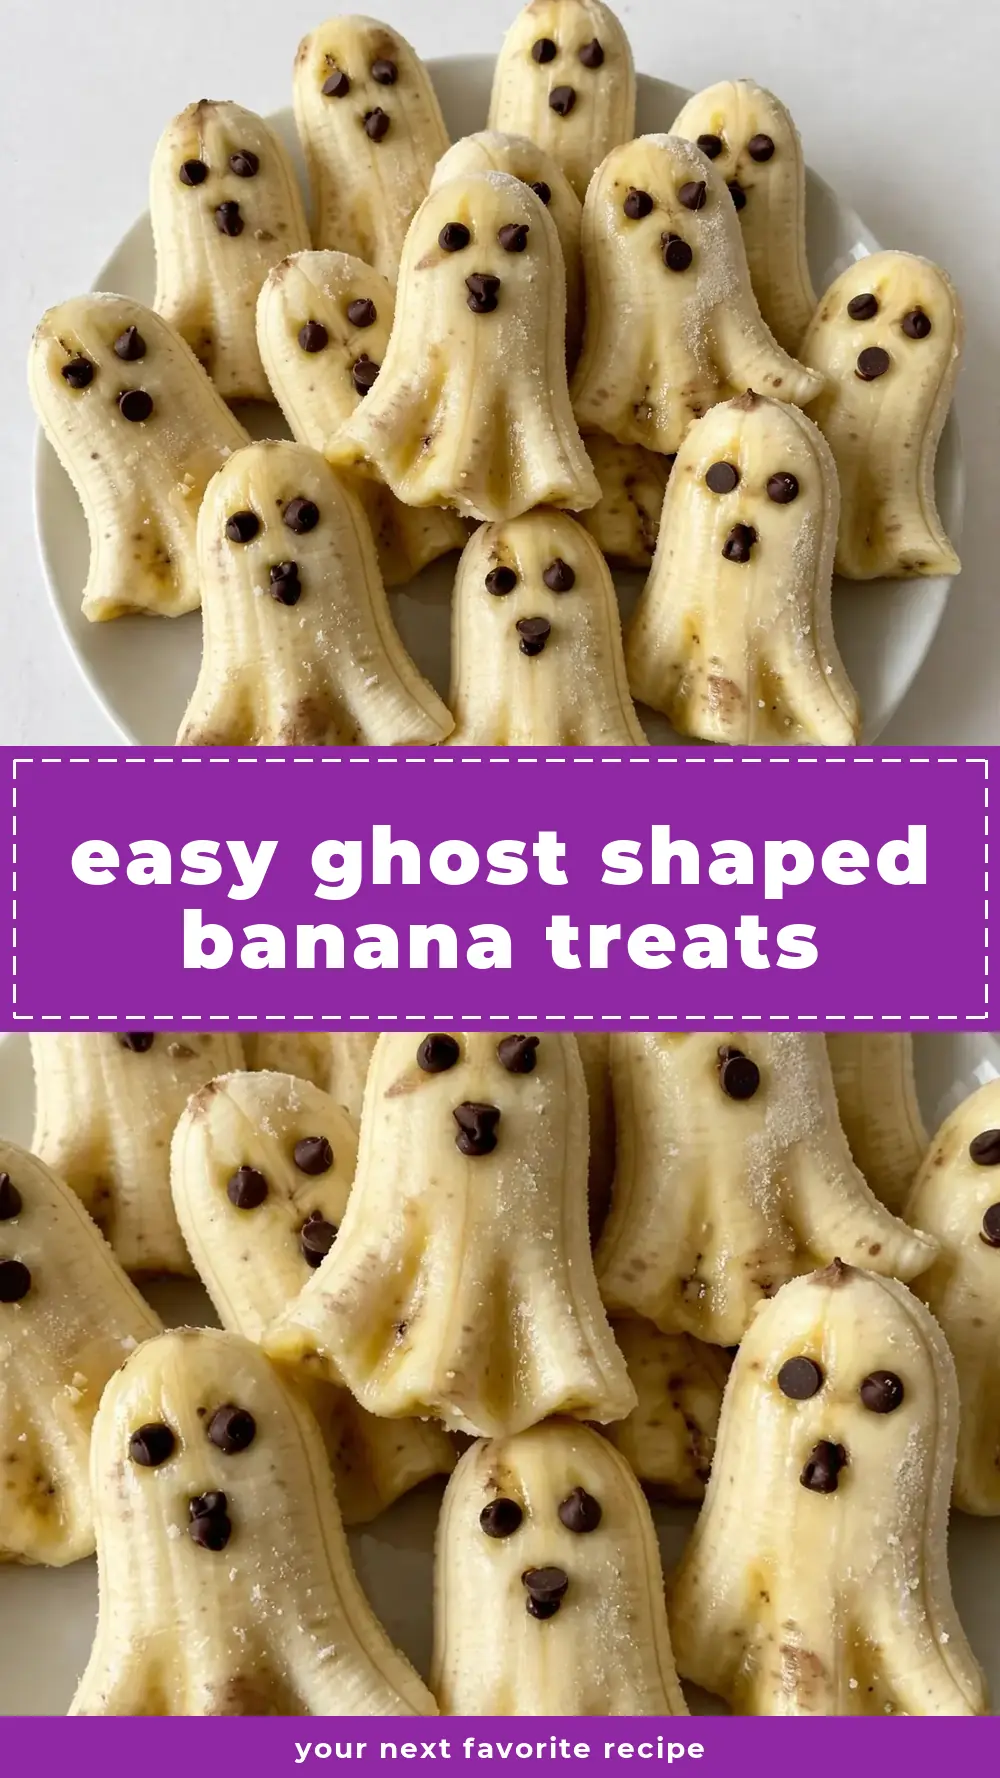
Ghost-shaped banana treats are exactly what they sound like—bite-sized pieces of banana cut into ghost silhouettes, dipped in a cloak of white chocolate, and finished with tiny dark-chocolate features. They come together in about 20 minutes of active work, need only a handful of everyday ingredients, and deliver a Halloween snack that actually tastes of real fruit rather than just sugar. Below you will find a straightforward recipe, the reasoning behind each step, and answers to the questions that usually pop up when making these at home.
Recipe Overview
- Prep time: 15 minutes
- Chill time: 45 minutes (includes freezing the banana slices)
- Total time: 1 hour
- Servings: Makes about 20–24 individual ghosts (depending on banana size and cookie-cutter size)
- Difficulty: Beginner-friendly
Why You’ll Love These Ghost Shaped Banana Treats
- They use real fruit as the base. The banana gives a soft, naturally sweet centre that contrasts beautifully with the crisp shell of white chocolate, so you are not relying on artificial flavours or excessive sugar.
- The method is genuinely quick. From peeling the bananas to the final chill, you are looking at roughly an hour—most of which is hands-off time in the freezer or fridge.
- No special equipment is required. A small ghost-shaped cookie cutter is nice to have, but a sharp knife and a steady hand work just as well for cutting the silhouette freehand.
- They keep well for a day or two. Stored correctly in the fridge, these treats hold their shape and flavour without turning mushy or weeping liquid.
- Children can help with the decorating stage, making them a perfect Halloween activity, much like Quick Halloween Candy Corn Popcorn Balls. Placing the chocolate-chip eyes and mouths is fiddly enough to feel like a craft activity, yet simple enough for small fingers to manage with minimal frustration.

Ingredients You’ll Need
- 3 large ripe but firm bananas (look for yellow skins with just a few brown speckles—overly soft bananas are difficult to cut cleanly)
- 200 g white chocolate (use a good-quality block or callets; cheap white chocolate often seizes when melted)
- 1 tsp coconut oil (optional, but it thins the chocolate and gives a glossier finish)
- 40 g dark chocolate chips (for the eyes and mouths; you need about 60–70 individual chips, so buy a small bag)
- 1 tbsp desiccated coconut (optional, for a snowy effect on the finished ghosts)
Tip: If you prefer a dairy-free version, use a plant-based white chocolate that melts smoothly and a refined coconut oil. The banana itself is naturally vegan, so the only non-vegan component is the chocolate coating.
How to Make Ghost Shaped Banana Treats
- Prepare the bananas. Peel the bananas and slice each one into rounds roughly 1 cm thick. You should get about 7–9 slices per banana. Lay the slices flat on a cutting board and use a small ghost-shaped cookie cutter (about 3–4 cm tall) to press out a ghost from each round. If you do not have a ghost cutter, use a small knife to trim the round into a ghost silhouette—round top, two small indentations for the shoulders, and a straight base. You will feel the banana give gently under the cutter; the edges should be clean, not ragged.
- Freeze the banana ghosts. Line a baking tray with greaseproof paper. Arrange the cut banana ghosts in a single layer, making sure they are not touching. Slide the tray into the freezer and leave for 30 minutes. The bananas should feel firm to the touch and look slightly pale on the surface. This step is essential: frozen bananas hold their shape when dipped and help the chocolate set almost instantly.
- Melt the white chocolate. Break the white chocolate into even pieces and place it in a heatproof bowl together with the coconut oil (if using). Set the bowl over a saucepan of barely simmering water—make sure the bottom of the bowl does not touch the water. Stir gently with a dry spoon every 30 seconds. The chocolate will look dull at first, then slowly turn glossy and fluid. Once it is completely smooth and runs off the spoon in a thick ribbon, remove the bowl from the heat. Do not let any steam or water droplets get into the bowl, or the chocolate will seize into a grainy mess.
- Dip the frozen banana ghosts. Take the tray of frozen banana ghosts out of the freezer. Working with one piece at a time, drop a ghost into the melted white chocolate. Use a fork to gently turn it until every surface is coated. Lift the fork and tap it lightly against the rim of the bowl so the excess chocolate drips off. You will see the chocolate firm up almost immediately against the cold banana. Place the coated ghost back on the greaseproof paper. Repeat with the remaining pieces, but work quickly—once the chocolate in the bowl starts to thicken, re-warm it gently over the saucepan for a few seconds.
- Add the faces. While the chocolate coating is still wet, press two dark chocolate chips into each ghost for eyes and one slightly lower down for a mouth. Press them in just far enough so they stay put—if you push too hard, the chocolate shell may crack. The chips should sit flush with the surface, not buried. Work in batches of 4–5 ghosts at a time so the coating does not set before you finish adding the features.
- Chill until firm. Return the tray to the refrigerator (not the freezer) and leave for at least 20 minutes. The white chocolate will harden to a snappy shell, and the banana inside will soften back to its original texture as it thaws gently. If you sprinkle desiccated coconut over the top for a snowy look, do it immediately after adding the chocolate chips, while the coating is still tacky.
Practical Tips
- Choose bananas that are ripe but firm. Bananas with green patches are too starchy and taste chalky when frozen; overripe bananas with大面积 brown spots are too soft to hold a clean cutter shape. The sweet spot is a yellow banana with a few tiny brown flecks—it slices neatly and tastes sweet without being mushy.
- Freeze the banana ghosts for the full 30 minutes. This is not a step you want to rush. A frozen banana core stays rigid when dipped, so the chocolate sets in a thin, even layer rather than pooling at the bottom or sliding off. If the bananas are only chilled (not frozen), the warmth of the melted chocolate will soften them and cause the coating to slip.
- Use a dry bowl and a dry spoon for the chocolate. White chocolate is notoriously sensitive to moisture. Even a single drop of water can cause it to seize into a stiff, lumpy paste that cannot be smoothed out. Make sure your bowl, spoon, and the surface of your worktop are completely dry before you begin melting.
- Work in small batches when adding the chocolate chips. If you dip all 24 ghosts at once and then try to add the faces, the chocolate on the first few will already be set. Dip 4–5 ghosts, add their eyes and mouths, then move on to the next batch. This keeps the coating tacky long enough for the chips to stick.
- Store the finished treats in the fridge, not at room temperature. The banana inside will soften after a few hours at room temperature, and the chocolate may develop a dull white bloom (fat bloom) if it gets too warm. Keep them in a single layer in an airtight container lined with kitchen paper to absorb any condensation, and they will stay neat for up to two days.
Equipment You’ll Need
- Small ghost-shaped cookie cutter (about 3–4 cm tall) or a sharp paring knife for cutting silhouettes freehand
- Baking tray that fits flat in your freezer
- Greaseproof paper or baking parchment
- Heatproof bowl (glass or stainless steel) that sits snugly over a saucepan
- Saucepan for the bain-marie
- Fork for dipping
- Dry spoon or silicone spatula for stirring the chocolate
- Airtight container for storage
Common Mistakes to Avoid
- Overcrowding the pan: If you place the banana ghosts too close together on the tray before freezing, they will stick to one another as they freeze, and you will have to pry them apart—which damages the shape. Leave at least 1 cm of space between each piece. If you need more room, use a second tray.
- Wrong temperature: Melting white chocolate over high heat or in a microwave without stirring frequently can scorch it. The chocolate will turn thick, lumpy, and slightly brown. Keep the heat low (barely simmering water) and stir every 30 seconds. If you prefer a microwave, use 50% power and stir every 20 seconds, stopping as soon as the chocolate is mostly melted—the residual heat will finish the job.
- Skipping the rest time: It is tempting to serve the treats as soon as the chocolate looks set (about 5–10 minutes in the fridge), but the banana inside is still partially frozen at that point. Give them the full 20-minute chill so the banana can thaw to its natural creamy texture. Eating them too cold mutes the banana flavour and gives a hard, icy bite rather than a soft one.
What to Serve With Ghost Shaped Banana Treats
- A bowl of warm Carrot Halwa Recipe Indian Dessert for a contrast in temperature and texture—the creamy, cardamom-scented halwa pairs surprisingly well with the cool banana ghosts.
- Alongside a platter of Buffalo Chicken Sliders Recipe Spicy for a savoury-sweet Halloween spread that covers both mains and dessert in one go.
- A glass of cold oat milk or a simple fruit punch with no added sugar, so the sweetness of the white chocolate remains the star of the show.
Frequently Asked Questions
ghost shaped banana treats
Ingredients
Method
-
Prepare the bananas. Peel the bananas and slice each one into rounds roughly 1 cm thick. You should get about 7–9 slices per banana. Lay the slices flat on a cutting board and use a small ghost-shaped cookie cutter (about 3–4 cm tall) to press out a ghost from each round. If you do not have a ghost cutter, use a small knife to trim the round into a ghost silhouette—round top, two small indentations for the shoulders, and a straight base. You will feel the banana give gently under the cutter; the edges should be clean, not ragged.
-
Freeze the banana ghosts. Line a baking tray with greaseproof paper. Arrange the cut banana ghosts in a single layer, making sure they are not touching. Slide the tray into the freezer and leave for 30 minutes. The bananas should feel firm to the touch and look slightly pale on the surface. This step is essential: frozen bananas hold their shape when dipped and help the chocolate set almost instantly.
-
Melt the white chocolate. Break the white chocolate into even pieces and place it in a heatproof bowl together with the coconut oil (if using). Set the bowl over a saucepan of barely simmering water—make sure the bottom of the bowl does not touch the water. Stir gently with a dry spoon every 30 seconds. The chocolate will look dull at first, then slowly turn glossy and fluid. Once it is completely smooth and runs off the spoon in a thick ribbon, remove the bowl from the heat. Do not let any steam or water droplets get into the bowl, or the chocolate will seize into a grainy mess.
-
Dip the frozen banana ghosts. Take the tray of frozen banana ghosts out of the freezer. Working with one piece at a time, drop a ghost into the melted white chocolate. Use a fork to gently turn it until every surface is coated. Lift the fork and tap it lightly against the rim of the bowl so the excess chocolate drips off. You will see the chocolate firm up almost immediately against the cold banana. Place the coated ghost back on the greaseproof paper. Repeat with the remaining pieces, but work quickly—once the chocolate in the bowl starts to thicken, re-warm it gently over the saucepan for a few seconds.
-
Add the faces. While the chocolate coating is still wet, press two dark chocolate chips into each ghost for eyes and one slightly lower down for a mouth. Press them in just far enough so they stay put—if you push too hard, the chocolate shell may crack. The chips should sit flush with the surface, not buried. Work in batches of 4–5 ghosts at a time so the coating does not set before you finish adding the features.
-
Chill until firm. Return the tray to the refrigerator (not the freezer) and leave for at least 20 minutes. The white chocolate will harden to a snappy shell, and the banana inside will soften back to its original texture as it thaws gently. If you sprinkle desiccated coconut over the top for a snowy look, do it immediately after adding the chocolate chips, while the coating is still tacky.
Notes

You might also like these recipes
Pear and Cranberry Crisp: Cozy Autumn Dessert
The first time you pull a pear and cranberry crisp from the oven, you notice…
Mouthwatering Cinnamon Sugar Churros with Chocolate
If you have ever stood at a market stall watching a paper cone of hot,…
Quick Halloween Candy Corn Popcorn Balls
A handful of candy corn, half-melted and glossy, clings to a warm popcorn cluster, creating…
Autumn Oat Topped Apple Crisp
The finest apple crisp with oat topping begins not with the oats, but with the…
Mouthwatering Apple Pie with Cheddar Crust
There’s something quietly magical about a slice of warm apple pie with cheddar crust —…
Cozy Fall Caramel Apple Cheesecake Bars
When autumn arrives and the shops fill with British apples, there’s one dessert I find…