Crispy Baked Halloumi Fries with Honey Chili Dip
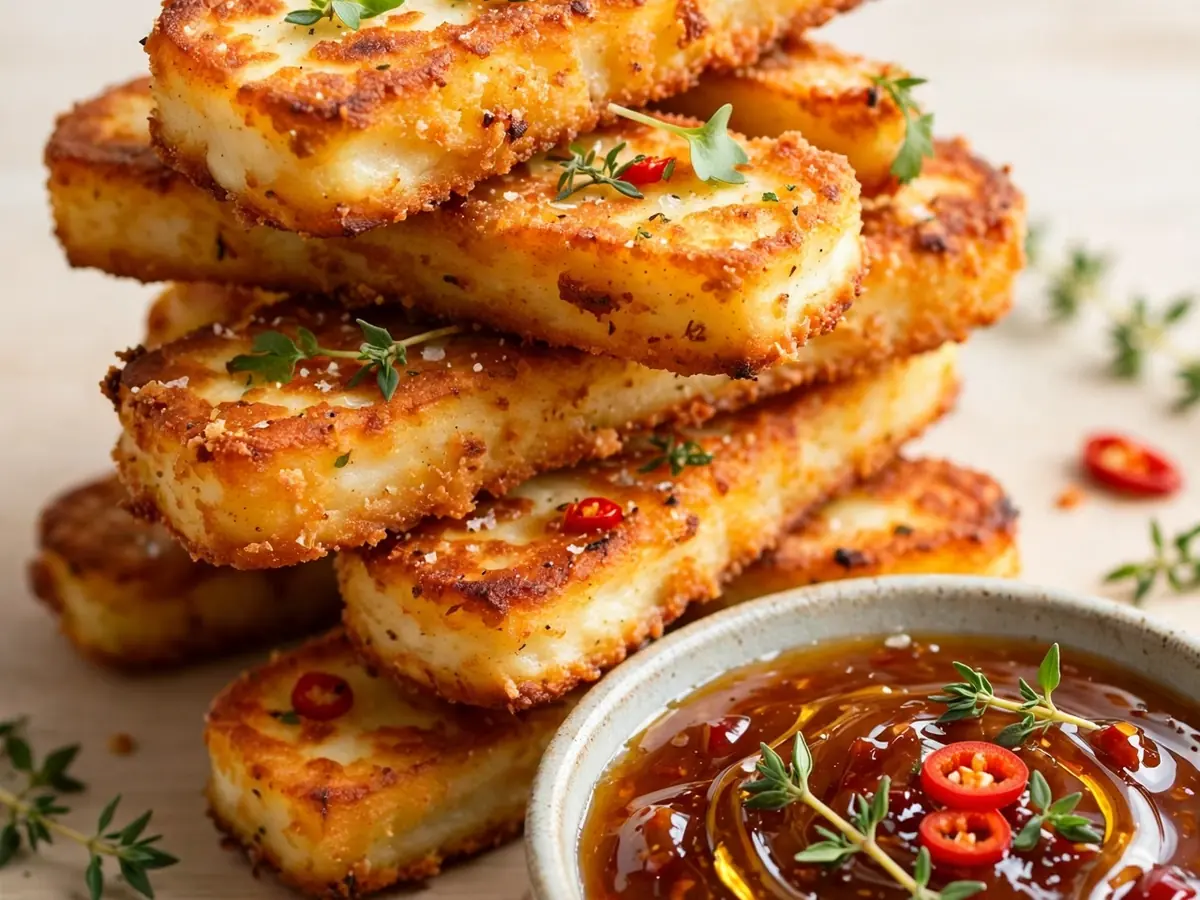
Halloumi has a well-earned reputation as the cheese that refuses to melt, which makes it a natural candidate for the oven. Instead of turning to puddles on a baking sheet, it firms up, bronzes at the edges, and develops a shell that cracks between your teeth before giving way to a warm, squeaky interior. These crispy baked halloumi fries lean into that quality with a light coating that encourages browning without deep frying, and they are paired with a honey chili dip that balances sweetness, heat, and a little tang. The whole thing comes together in well under half an hour, uses one baking sheet and a couple of shallow bowls, and works equally well as a snack for two, a party platter for a crowd, or a side dish next to a big salad. If you have never baked halloumi before, this is a forgiving place to start: the coating protects the surface, the timing is short, and the dip can be mixed in a single bowl while the oven preheats.
Why Baking Works So Well for Halloumi
Halloumi is a semi-hard, brined cheese traditionally made with a mix of sheep’s and goat’s milk, though many supermarket versions use cow’s milk. Its defining trait is a high melting point, which means it holds its shape under direct heat. Pan-frying is the classic preparation, but it requires standing at the stove and watching each side. Baking spreads the heat evenly across the whole batch and frees you to make the dip, set the table, or tidy the kitchen. A thin coating of flour, egg, and seasoned breadcrumbs or panko creates a crisp exterior that mimics the browned crust of fried cheese while keeping the interior soft. The key is to keep the coating light. Heavy breading steams the cheese and turns soggy; a sparse, even layer browns quickly and stays crunchy for several minutes after leaving the oven.
One important note: halloumi is salty on its own. Do not add salt to the coating or the dip until you have tasted both. A little black pepper, smoked paprika, and garlic powder go a long way without pushing the overall seasoning over the edge. If you are sensitive to salt, look for a reduced-salt halloumi or blanch the block in simmering water for two minutes before slicing, then pat it very dry.
Ingredients
Serves 4 as a snack or starter (about 20 to 24 fries)
For the halloumi fries
- 2 blocks (about 225 g / 8 oz each) halloumi, total roughly 450 g / 16 oz
- 40 g / 1/3 cup all-purpose flour
- 1 large egg
- 1 tablespoon milk or water
- 60 g / 2/3 cup panko breadcrumbs
- 20 g / 1/4 cup finely grated Parmesan or pecorino (optional but recommended for extra browning)
- 1/2 teaspoon smoked paprika
- 1/2 teaspoon garlic powder
- 1/4 teaspoon freshly ground black pepper
- 1/4 teaspoon dried oregano
- 2 tablespoons olive oil, for drizzling
For the honey chili dip
- 120 g / 1/2 cup plain Greek yogurt (full-fat or 2%)
- 2 tablespoons mayonnaise
- 2 tablespoons runny honey
- 1 to 2 teaspoons chili flakes or chili crisp, to taste
- 1 teaspoon freshly squeezed lemon juice
- 1/4 teaspoon smoked paprika
- 1 small garlic clove, finely grated or pressed
- Pinch of fine salt, only if needed after tasting
Equipment
- Rimmed baking sheet (roughly 45 x 30 cm / 18 x 12 inches)
- Parchment paper or a silicone baking mat
- Three shallow bowls or dishes (for flour, egg, and crumbs)
- Wire cooling rack (optional, for keeping the fries crisp)
- Box grater or microplane, for the Parmesan and garlic
- Small mixing bowl and whisk or fork, for the dip
- Sharp knife and cutting board
- Paper towels
Preparation and Cooking Instructions
- Preheat the oven and line the pan. Set a rack in the middle of the oven and preheat to 220°C / 425°F (200°C / 400°F fan). Line the baking sheet with parchment paper. If you have a wire rack that fits inside the sheet, set it on top of the parchment; this lets hot air circulate under the fries and keeps the undersides crisp.
- Dry the halloumi thoroughly. Remove both blocks from their packaging and pat them completely dry with paper towels. Moisture is the enemy of crispness, so take an extra minute here. If the blocks feel very wet or salty, rinse them briefly under cold water and dry again.
- Cut the fries. Slice each block into planks about 1 cm (just under 1/2 inch) thick, then cut each plank into batons roughly 1 cm wide and 6 to 7 cm long. Aim for consistent sizes so they brown at the same rate. You should end up with 20 to 24 batons.
- Set up the coating station. Put the flour in the first shallow bowl. Beat the egg with the milk or water in the second bowl until smooth. In the third bowl, combine the panko, grated Parmesan if using, smoked paprika, garlic powder, black pepper, and oregano. Stir well.
- Coat the fries in three stages. Working with a few batons at a time, toss them in the flour until lightly dusted, shaking off the excess. Dip them in the egg, letting the excess drip back into the bowl. Finally, press them into the panko mixture, turning to coat all sides. Handle them gently so the coating adheres without compacting. Place each coated fry on the prepared baking sheet with a little space between them.
- Drizzle and bake. Lightly drizzle the fries with olive oil, about 2 tablespoons total, or spray them with cooking spray. Bake for 12 minutes, then remove the pan and carefully turn each fry with tongs or a thin spatula. Return to the oven and bake for another 6 to 10 minutes, until the coating is deep golden brown and the edges of the cheese peek through. Total baking time is 18 to 22 minutes. Watch closely in the final few minutes, as panko can go from golden to dark quickly.
- Make the dip while the fries bake. In a small bowl, whisk together the Greek yogurt, mayonnaise, honey, chili flakes or chili crisp, lemon juice, smoked paprika, and grated garlic. Taste and add a pinch of salt only if the dip needs it. The dip should be pourable but thick enough to cling to a fry. If it seems too thick, loosen it with a teaspoon of water or lemon juice. Set aside at room temperature until serving.
- Rest and serve. Let the fries sit on the pan for 2 minutes after baking, then transfer them to a serving plate or a wire rack set over the pan. Serve immediately with the honey chili dip alongside, either in a small bowl or drizzled over the top of the fries. If drizzling, do it at the table so the coating stays crisp.
Tips for the Crispiest Results
- Dry, dry, dry. Pat the halloumi until the paper towels come away almost dry. Any surface moisture will turn the coating gummy.
- Keep the coating thin. A light press of panko is enough. If you pack the crumbs on, the coating steams and slides off in the oven.
- Use panko, not fine dry breadcrumbs. Panko’s larger flakes create airy pockets that crisp faster and stay crunchy longer.
- Don’t crowd the pan. Space the fries at least 1 cm apart. If your baking sheet is small, bake in two batches rather than overlapping them.
- Turn once, at the right time. Flip the fries at the 12-minute mark, when the underside has set. Turning too early tears the coating.
- Grate your own Parmesan. Pre-shredded cheese often contains anti-caking agents that inhibit browning.
- Serve hot. Baked halloumi fries are at their best within 10 minutes of leaving the oven. If you must hold them, keep them on a wire rack in a 90°C / 200°F oven with the door slightly ajar so steam can escape.
Practical Substitutions
Cheese: Halloumi is the star here, but if you cannot find it, look for another grill-friendly cheese such as bread cheese (juustoleipa) or a firm, low-moisture cheese like queso de freír. Avoid mozzarella, feta, or fresh cheeses, which will melt or crumble.
Flour: For a gluten-free version, use a 1:1 gluten-free all-purpose blend in place of the wheat flour and gluten-free panko. Check that the halloumi packaging does not list wheat-derived ingredients.
Panko: Crushed cornflakes or coarse dry breadcrumbs work in a pinch, though the texture will be slightly denser. Crushed pork rinds make an excellent low-carb alternative.
Parmesan: Nutritional yeast (about 1 tablespoon) adds a savory note for a dairy-free coating, though the halloumi itself is dairy.
Yogurt: Sour cream or a thick plant-based yogurt can replace the Greek yogurt. If using a thin yogurt, strain it for 15 minutes first.
Mayonnaise: Swap in an extra 2 tablespoons of yogurt for a lighter dip, or use a vegan mayonnaise if needed.
Honey: Maple syrup or hot honey both work. If using hot honey, reduce the chili flakes to 1/2 teaspoon.
Chili: Chili crisp, sriracha, gochujang, or a pinch of cayenne all bring heat in different ways. Start small and adjust after tasting.
Make-Ahead and Storage Guidance
Make ahead: The dip can be mixed up to 3 days in advance and stored covered in the refrigerator. Let it sit at room temperature for 15 minutes before serving so it loosens up. The coating station can be set up an hour ahead, but do not coat the fries until you are ready to bake; coated fries sitting out will weep moisture and lose their crunch. For a party, cut the halloumi into batons up to 4 hours ahead, pat dry, and refrigerate in a single layer covered with paper towels.
Refrigerating leftovers: Baked halloumi fries do not keep well once cold, but if you have leftovers, store them in an airtight container in the refrigerator for up to 2 days. The dip keeps for up to 4 days.
Reheating: The oven is the best route back to crispness. Arrange the fries on a parchment-lined baking sheet and reheat at 200°C / 400°F for 5 to 7 minutes, flipping once. Avoid the microwave, which will make the coating rubbery. A air fryer at 190°C / 375°F for 3 to 4 minutes also works well. Reheated fries will be slightly drier than freshly baked, so serve them with extra dip.
Freezing: Freeze coated, unbaked fries on a tray until solid, then transfer to a freezer bag for up to 1 month. Bake from frozen at 220°C / 425°F, adding 4 to 6 minutes to the total time and flipping at the 14-minute mark.
Serving Suggestions
These fries make a satisfying starter with a simple green salad dressed in lemon and olive oil, or a side for grilled chicken or lamb. For a party spread, arrange them on a platter with the dip in the center and scatter over fresh herbs such as parsley or mint, a few extra chili flakes, and a drizzle of honey. They also pair well with a crisp lager, a dry cider, or a light red wine. If you enjoy the sweet-heat combination, the honey chili dip echoes the flavors in a spicy hot honey cream cheese dip, and a platter of crispy oven baked sweet potato fries alongside makes a nice contrast in color and texture. For a more elaborate cheese board moment, a pistachio honey baked brie wreath offers a warm, shareable centerpiece that complements the halloumi’s salty bite.
Frequently Asked Questions
Can I make these halloumi fries in an air fryer instead of the oven?
Yes. Preheat the air fryer to 200°C / 400°F. Coat the fries as directed, then arrange them in a single layer in the basket without overcrowding, working in batches if needed. Cook for 8 to 10 minutes, shaking the basket gently at the halfway point, until the coating is golden and crisp. Air fryers vary in power, so check at 8 minutes the first time. Do not use parchment paper in the air fryer unless your model’s manual explicitly allows it, as loose paper can be pulled into the heating element.
Why did my coating slide off in the oven?
The most common causes are excess moisture on the cheese, too much egg, or an over-packed coating. Pat the halloumi bone dry before slicing, let the excess egg drip back into the bowl, and press the panko on lightly rather than compacting it. Also make sure the oven is fully preheated and the pan is not crowded; a hot oven sets the coating quickly, while a lukewarm one gives the egg time to weep and release. If the coating still slips, try a brief 10-minute rest in the refrigerator after coating, which helps it adhere.
Is halloumi very salty, and can I reduce the salt?
Halloumi is a brined cheese and is noticeably salty, which is why this recipe adds no salt to the coating and only a pinch, if any, to the dip. To reduce the saltiness, blanch whole blocks in simmering water for 2 minutes, then drain and pat very dry before slicing. You can also look for reduced-salt halloumi at larger supermarkets. Taste the dip before adding any salt, and remember that the Parmesan in the coating contributes salt as well.
Can I prepare the fries ahead of time for a party?
You can cut and dry the halloumi up to 4 hours ahead and refrigerate it in a single layer covered with paper towels. The dip can be made up to 3 days ahead. Coating should be done just before baking, because coated fries release moisture and lose their crisp potential if they sit. For a large batch, set up two baking sheets and rotate them halfway through baking, swapping top and bottom racks, so everything browns evenly.
What can I use instead of panko if I don’t have any?
Coarse dry breadcrumbs are the closest substitute, though the result will be a bit denser. Crushed cornflakes give a similar light crunch, and crushed plain potato chips work in a pinch but brown quickly, so reduce the oven temperature to 200°C / 400°F and check at 12 minutes. For a low-carb option, finely crushed pork rinds or a mix of almond flour and grated Parmesan can replace the panko, though the browning will be faster and more uneven.
How spicy is the honey chili dip, and how can I adjust it?
With 1 teaspoon of chili flakes, the dip has a gentle warmth that most people find mild to medium. For more heat, use 2 teaspoons of chili flakes, add a teaspoon of chili crisp, or stir in a few drops of hot sauce. For a milder version, use 1/2 teaspoon of chili flakes or replace them with a pinch of sweet paprika. The honey and yogurt soften the heat, so taste after mixing and adjust before serving. The dip can also be made without chili entirely for a simple honey-mustard-style sauce.