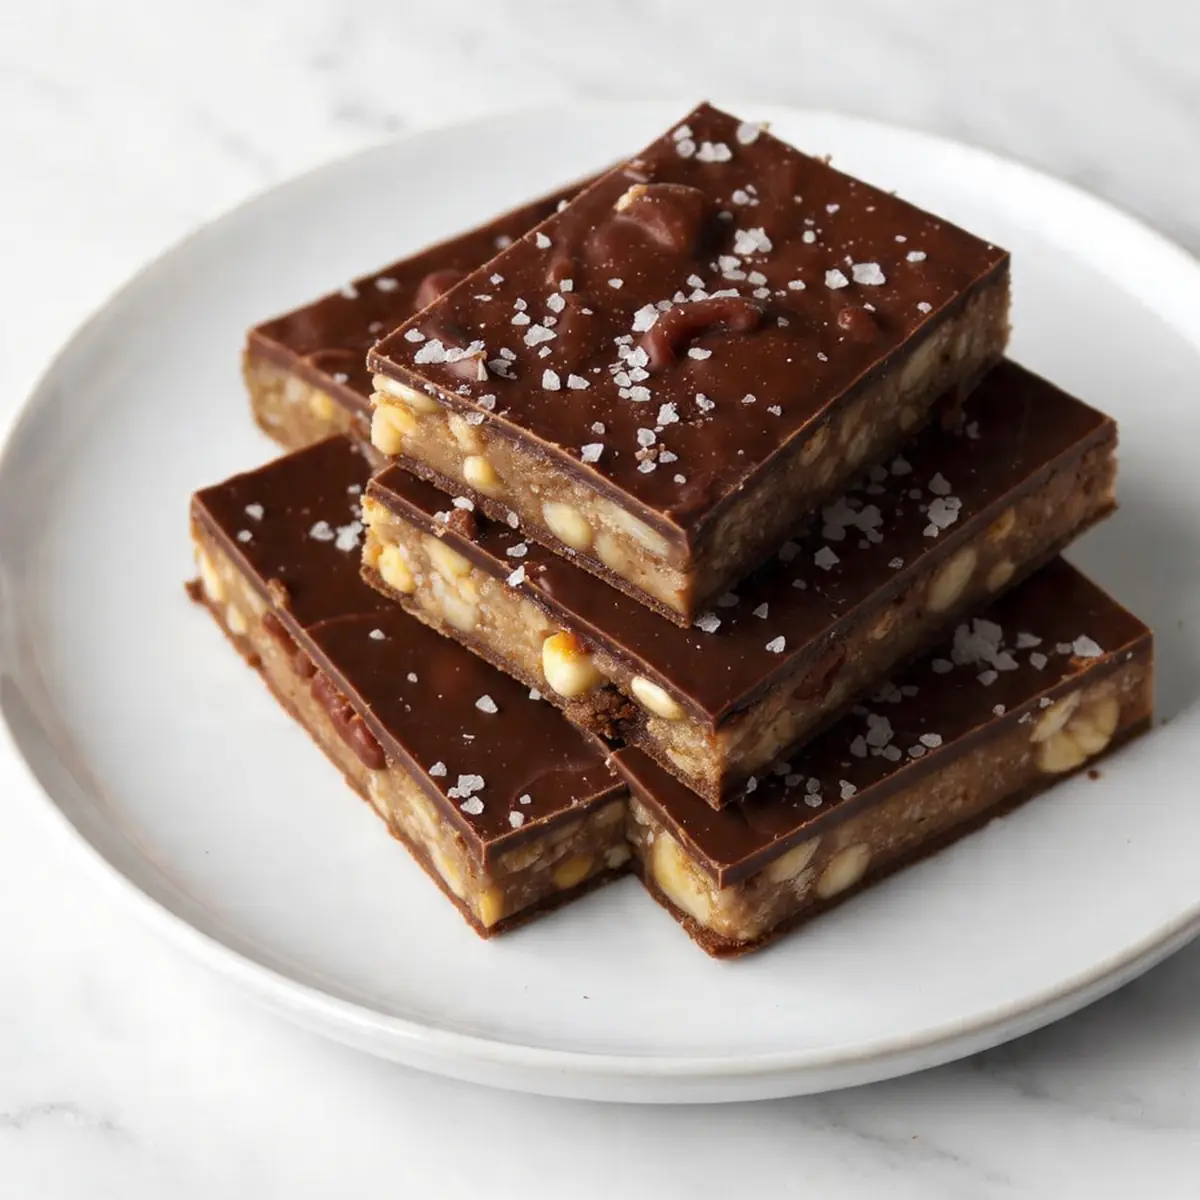
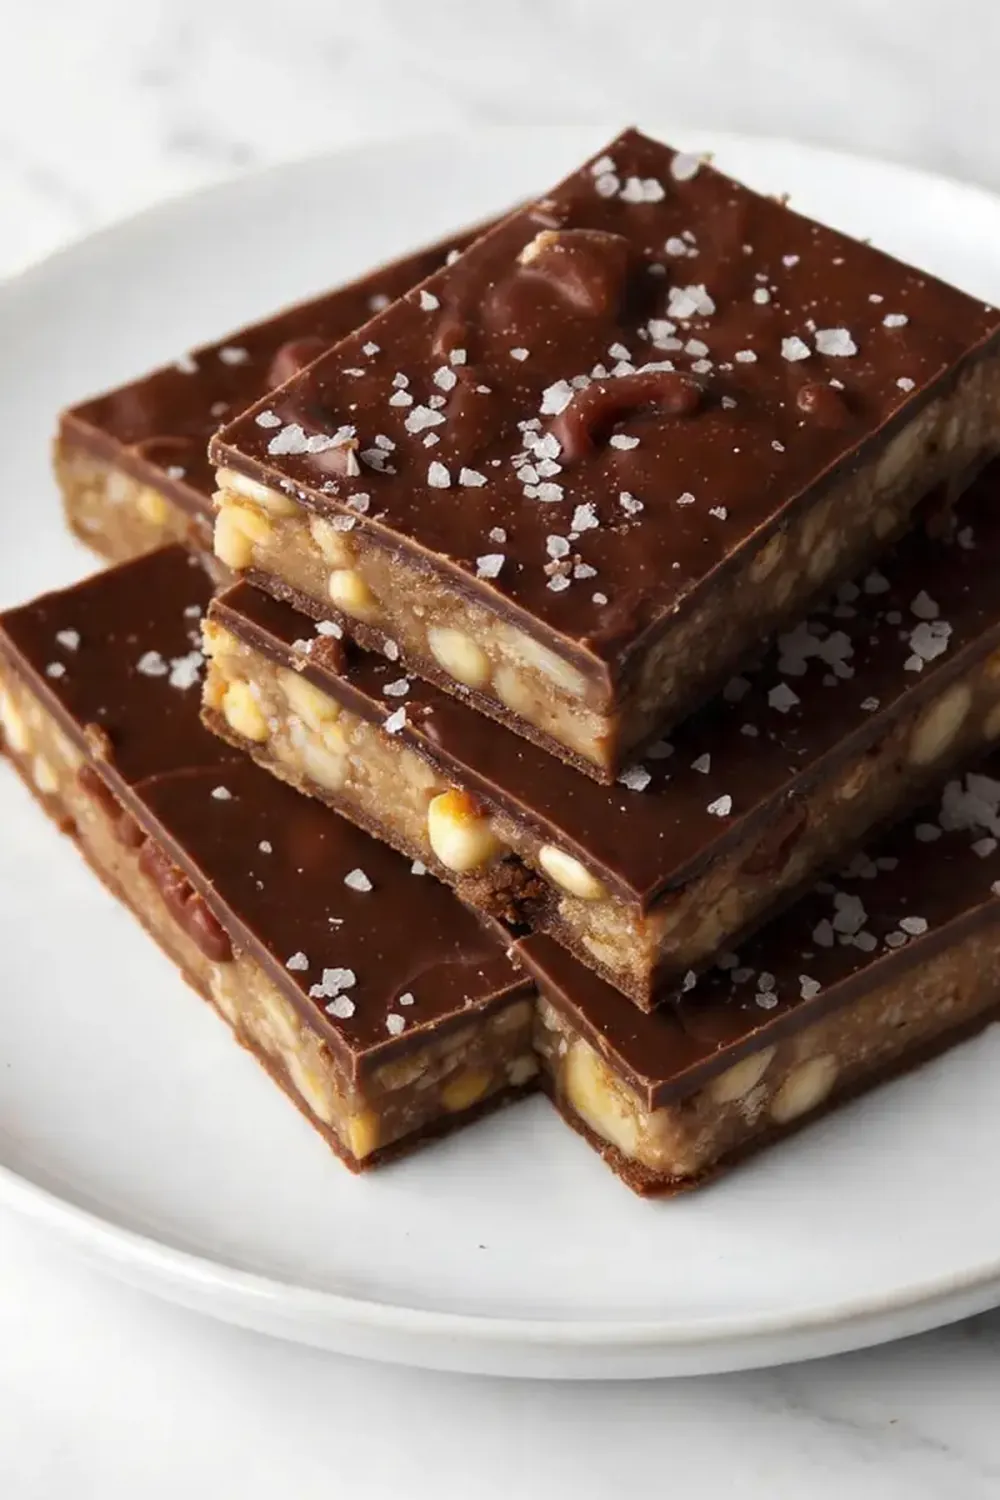
Homemade Dark Chocolate Sea Salt Nut Bars (Kind Copycat)
There’s something truly satisfying about creating wholesome, delicious treats right in your own kitchen, especially when they rival your favourite shop-bought versions. These Homemade Dark Chocolate Sea Salt Nut Bars are a testament to that joy, offering a delightful crunch and rich flavour in every bite.
I remember the first time I set out to recreate these bars. My eldest, Liam, had developed a real fondness for a particular brand of nut bar, and while I appreciated the convenience, I knew I could make something just as good, if not better, with ingredients I carefully selected myself. It became a bit of a weekend project, experimenting with different nut combinations and sweeteners until I landed on this winning formula. This is my go-to recipe when I need something quick but impressive, whether it’s for lunchbox snacks or a post-dinner treat, alongside an Easy Frozen S’Mores Sandwiches Dessert.
What I adore about these bars is their versatility and the sheer goodness packed into them. They’re robust enough to satisfy a mid-afternoon craving, yet elegant enough to serve with a cup of tea. The combination of crunchy nuts, chewy dried fruit, deep dark chocolate, and a hint of sea salt is simply irresistible. My kids absolutely devour this every time I make it, and honestly, so do I!
Recipe Overview
- Prep time: 20 minutes
- Cook time: 25-30 minutes
- Total time: 45-50 minutes (plus cooling and chilling)
- Servings: 12 bars
- Difficulty: Easy
Why You’ll Love This Homemade Dark Chocolate Sea Salt Nut Bars (KIND Copycat)
- Wholesome Goodness: You control every ingredient, ensuring a snack free from unnecessary additives and packed with natural energy from nuts and seeds.
- Customisable Flavours: Easily adapt the nuts, seeds, and dried fruits to suit your personal preferences or whatever you have lurking in the cupboard.
- Economical Alternative: Making these at home is significantly more budget-friendly than regularly buying pre-made nut bars, without compromising on quality or taste.
- Satisfying Texture & Taste: Enjoy the perfect balance of crunchy nuts, chewy fruit, rich dark chocolate, and a subtle salty finish that truly elevates the experience.
- Versatile Snacking: These bars are ideal for a quick breakfast on the go, a midday energy boost, a post-workout refuel, or even a delightful dessert alongside a warm drink.
Ingredients You’ll Need
- 200g mixed nuts (e.g., almonds, cashews, pecans, walnuts, pistachios – unsalted)
- 50g pumpkin seeds
- 50g sunflower seeds
- 50g rolled oats (gluten-free if preferred)
- 100g dried cranberries or chopped dates
- 60g runny honey or maple syrup
- 60g light brown sugar
- 60g smooth nut butter (e.g., peanut butter, almond butter – ensure no added sugar/oil)
- 5ml vanilla extract
- 1g fine sea salt (for the bar mixture)
- 150g dark chocolate (70% cocoa solids or higher, chopped)
- 2g flaky sea salt (for sprinkling)
- 15ml coconut oil (optional, for melting chocolate)
Tip: Feel free to adjust the ratio of nuts and seeds based on what you enjoy most. For the best flavour and texture, always opt for fresh, unsalted nuts.
How to Make Homemade Dark Chocolate Sea Salt Nut Bars (KIND Copycat)
- Prepare Your Tin: Preheat your oven to 160°C (140°C fan/Gas Mark 3). Line a 20x20cm square baking tin with baking parchment, leaving an overhang on all sides. This will make lifting the finished bars out much easier.
- Toast the Nuts and Seeds: Spread the mixed nuts, pumpkin seeds, and sunflower seeds evenly on a large baking tray. Pop them into the preheated oven for 8-10 minutes, until they smell wonderfully fragrant and have a slight golden tint. Keep a close eye on them to prevent burning. Once toasted, remove from the oven and allow them to cool slightly. Their aroma will fill your kitchen with a nutty warmth.
- Combine Dry Ingredients: In a large mixing bowl, combine the toasted nuts and seeds, rolled oats, dried cranberries (or chopped dates), and the fine sea salt. Give everything a good stir with a wooden spoon until all the elements are evenly distributed. You’ll see a vibrant mix of colours and textures.
- Create the Sticky Binder: In a small saucepan over medium heat, gently warm the honey (or maple syrup), light brown sugar, and nut butter. Stir constantly with a spatula until the sugar has completely dissolved and the mixture is smooth and glossy, with a rich caramel hue. It should look like a thick, bubbling syrup and smell subtly sweet. Remove from the heat and stir in the vanilla extract.
- Bind and Press: Pour the warm, sticky binder over the dry nut mixture in the large bowl. Stir thoroughly with your wooden spoon, ensuring every nut, seed, and oat flake is coated in the sweet, glossy syrup. The mixture will feel quite sticky and cohesive. Transfer this entire mixture into your prepared baking tin. Using the back of a spoon or a piece of parchment paper, press the mixture down firmly and evenly into the tin. This is a crucial step for well-formed bars; press until it’s tightly packed and level across the surface.
- Bake and Cool: Return the tin to the oven and bake for 15-20 minutes, or until the edges are lightly golden brown and the top feels firm to the touch. The kitchen will smell glorious with toasted nuts and caramel notes. Once baked, remove the tin from the oven and let it cool completely in the tin on a wire rack. This cooling period is vital; resist the urge to cut them warm, as they need to firm up.
- Add the Dark Chocolate Layer: Once the nut mixture is completely cool, melt the dark chocolate. You can do this in a heatproof bowl set over a saucepan of simmering water (bain-marie) or in the microwave in short bursts, stirring frequently. If you prefer a thinner, glossier chocolate, stir in the coconut oil. Once smooth and shimmering, pour the melted chocolate over the cooled nut base, spreading it evenly with a spatula.
- Chill and Cut: Immediately sprinkle the flaky sea salt generously over the melted chocolate. Place the tin in the refrigerator for at least 1-2 hours, or until the chocolate is completely set and firm to the touch. Once chilled, lift the slab out of the tin using the parchment paper overhang. Place it on a cutting board and, using a sharp, warm knife (run it under hot water and wipe dry), carefully cut it into 12 bars. Each cut will reveal the distinct layers and crunchy texture.
Tips From My Kitchen
- Toasting is Key: Don’t skip toasting the nuts and seeds. This step might seem minor, but it profoundly deepens their flavour, giving them a richer, more complex taste and a delightful crunch. The heat releases their natural oils, enhancing their aroma and making them truly shine in the bars.
- Press Firmly: When pressing the nut mixture into the baking tin, use as much pressure as you can. A firmly packed base means your bars will hold together beautifully and won’t crumble when you cut or eat them. I often use a piece of parchment paper on top and then press down with another tin or my hands to ensure maximum compaction.
- Cool Completely Before Cutting: Patience is a virtue here! Cutting the bars before they are fully cooled and the chocolate is completely set will result in a messy, crumbly outcome. The cooling process allows the binder to firm up and the chocolate to harden, ensuring clean, neat cuts and stable bars. Pop them in the fridge for an hour or two to speed this up.
- Adjust Sweetness to Taste: The amount of honey/maple syrup and brown sugar provides a balanced sweetness that works well with dark chocolate. However, if you prefer a less sweet bar, you can slightly reduce the sugar by 10-20g. If using very sweet dried fruits like dates, you might also consider a slight reduction.
- Quality Dark Chocolate Matters: The chocolate layer is a star here, so choose a good quality dark chocolate with at least 70% cocoa solids. A higher cocoa percentage offers a deeper, more sophisticated bitterness that beautifully complements the sweetness of the other ingredients and the salt, creating a truly rich experience.
- Sharp, Warm Knife for Cutting: To achieve clean, crisp edges when cutting through the chocolate and nut layers, use a very sharp knife. For an even smoother cut, warm the knife under hot water for a few seconds and wipe it dry between each cut. This helps the blade glide through the chocolate without cracking it.
Equipment You’ll Need
- Large frying pan or skillet
- Sharp knife and cutting board
- Mixing bowls
- Wooden spoon or spatula
- 20x20cm square baking tin
- Baking parchment
- Small saucepan
- Wire cooling rack
Common Mistakes to Avoid
- Overcrowding the pan: When toasting nuts and seeds, spreading them in a single layer on a large baking tray is crucial. If they are piled up, they will steam rather than toast, leading to a less crispy texture and an underdeveloped flavour. Use two trays if necessary to ensure even toasting.
- Wrong temperature for binder: Cooking the binder (honey, sugar, nut butter) at too high a heat can cause the sugar to crystallise or burn, resulting in a gritty texture or a bitter taste. Always warm it gently over medium-low heat, stirring constantly until smooth and combined, ensuring the sugar fully dissolves without scorching.
- Skipping the rest time: Allowing the baked nut mixture to cool completely and the chocolate to set firmly in the refrigerator is non-negotiable. This chilling period allows the binder to solidify and the chocolate to harden, preventing the bars from crumbling and ensuring clean, well-defined slices. Patience here guarantees success.
Delicious Variations to Try
- Spicy Version: For a warming kick, add a pinch of cayenne pepper or a tiny dash of chilli powder to the nut mixture along with the fine sea salt. This subtle heat will beautifully contrast with the dark chocolate and sweetness.
- Vegetarian/Vegan Option: These bars are already vegetarian! To make them vegan, simply substitute the honey with an equal amount of maple syrup or agave nectar. Ensure your dark chocolate is also dairy-free, as many brands offer delicious vegan alternatives.
- Different Protein: While nuts provide ample protein, you could boost it further. Consider adding a tablespoon or two of a neutral-flavoured protein powder (like pea or rice protein) to the dry mixture. Alternatively, incorporate different nuts like Brazil nuts or even roasted chickpeas for an extra crunch and protein.
What to Serve With Homemade Dark Chocolate Sea Salt Nut Bars (KIND Copycat)
- A strong cup of freshly brewed coffee or a soothing herbal tea.
- A glass of cold milk or a dairy-free alternative like almond milk.
- Alongside a bowl of fresh berries or sliced apple for a balanced snack.
- As a sweet treat after a wholesome meal, perhaps following a Green Goddess Chicken Recipe Herby dinner.
- Packed into lunchboxes for a delightful midday energy boost.
Frequently Asked Questions
Homemade Dark Chocolate Sea Salt Nut Bars (KIND Copycat)
Ingredients
Method
-
Prepare Your Tin: Preheat your oven to 160°C (140°C fan/Gas Mark 3). Line a 20x20cm square baking tin with baking parchment, leaving an overhang on all sides. This will make lifting the finished bars out much easier.
-
Toast the Nuts and Seeds: Spread the mixed nuts, pumpkin seeds, and sunflower seeds evenly on a large baking tray. Pop them into the preheated oven for 8-10 minutes, until they smell wonderfully fragrant and have a slight golden tint. Keep a close eye on them to prevent burning. Once toasted, remove from the oven and allow them to cool slightly. Their aroma will fill your kitchen with a nutty warmth.
-
Combine Dry Ingredients: In a large mixing bowl, combine the toasted nuts and seeds, rolled oats, dried cranberries (or chopped dates), and the fine sea salt. Give everything a good stir with a wooden spoon until all the elements are evenly distributed. You’ll see a vibrant mix of colours and textures.
-
Create the Sticky Binder: In a small saucepan over medium heat, gently warm the honey (or maple syrup), light brown sugar, and nut butter. Stir constantly with a spatula until the sugar has completely dissolved and the mixture is smooth and glossy, with a rich caramel hue. It should look like a thick, bubbling syrup and smell subtly sweet. Remove from the heat and stir in the vanilla extract.
-
Bind and Press: Pour the warm, sticky binder over the dry nut mixture in the large bowl. Stir thoroughly with your wooden spoon, ensuring every nut, seed, and oat flake is coated in the sweet, glossy syrup. The mixture will feel quite sticky and cohesive. Transfer this entire mixture into your prepared baking tin. Using the back of a spoon or a piece of parchment paper, press the mixture down firmly and evenly into the tin. This is a crucial step for well-formed bars; press until it’s tightly packed and level across the surface.
-
Bake and Cool: Return the tin to the oven and bake for 15-20 minutes, or until the edges are lightly golden brown and the top feels firm to the touch. The kitchen will smell glorious with toasted nuts and caramel notes. Once baked, remove the tin from the oven and let it cool completely in the tin on a wire rack. This cooling period is vital; resist the urge to cut them warm, as they need to firm up.
-
Add the Dark Chocolate Layer: Once the nut mixture is completely cool, melt the dark chocolate. You can do this in a heatproof bowl set over a saucepan of simmering water (bain-marie) or in the microwave in short bursts, stirring frequently. If you prefer a thinner, glossier chocolate, stir in the coconut oil. Once smooth and shimmering, pour the melted chocolate over the cooled nut base, spreading it evenly with a spatula.
-
Chill and Cut: Immediately sprinkle the flaky sea salt generously over the melted chocolate. Place the tin in the refrigerator for at least 1-2 hours, or until the chocolate is completely set and firm to the touch. Once chilled, lift the slab out of the tin using the parchment paper overhang. Place it on a cutting board and, using a sharp, warm knife (run it under hot water and wipe dry), carefully cut it into 12 bars. Each cut will reveal the distinct layers and crunchy texture.
Notes
There you have it – a truly delightful and satisfying recipe for Homemade Dark Chocolate Sea Salt Nut Bars. I hope you enjoy making and devouring these as much as my family and I do. They really are a testament to how simple, wholesome ingredients can come together to create something truly special. Do let me know in the comments below if you tried any fun variations or if you have any questions!