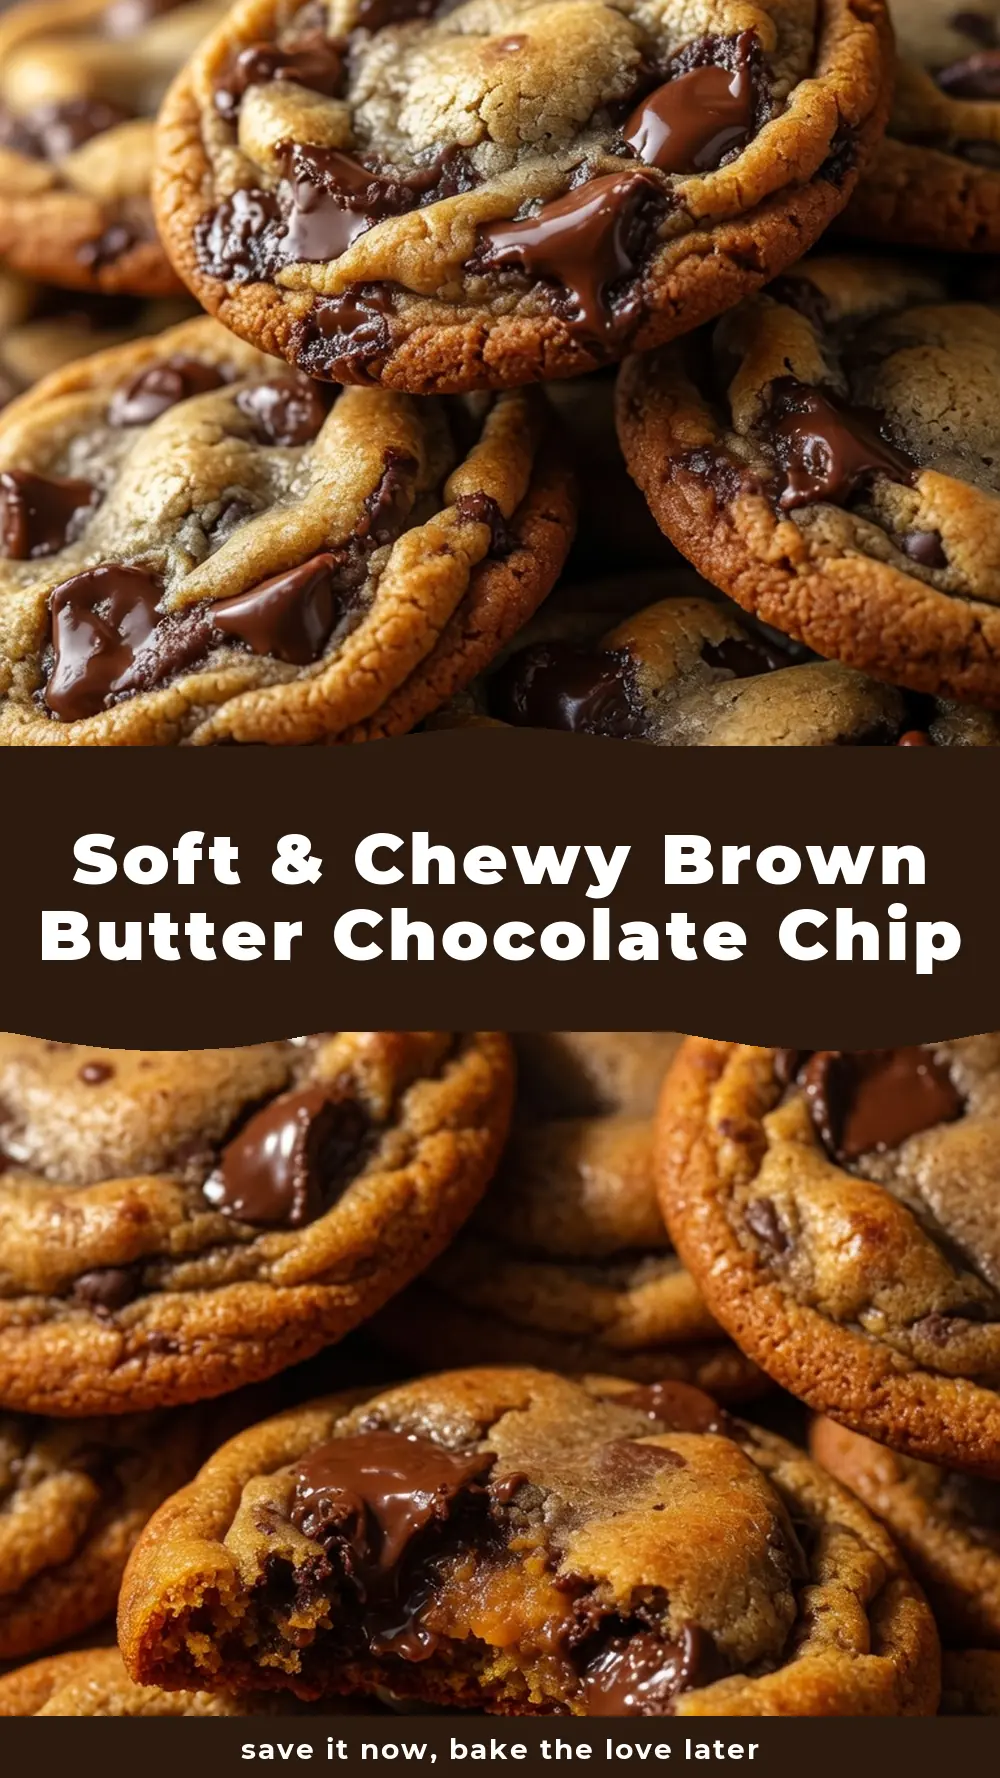
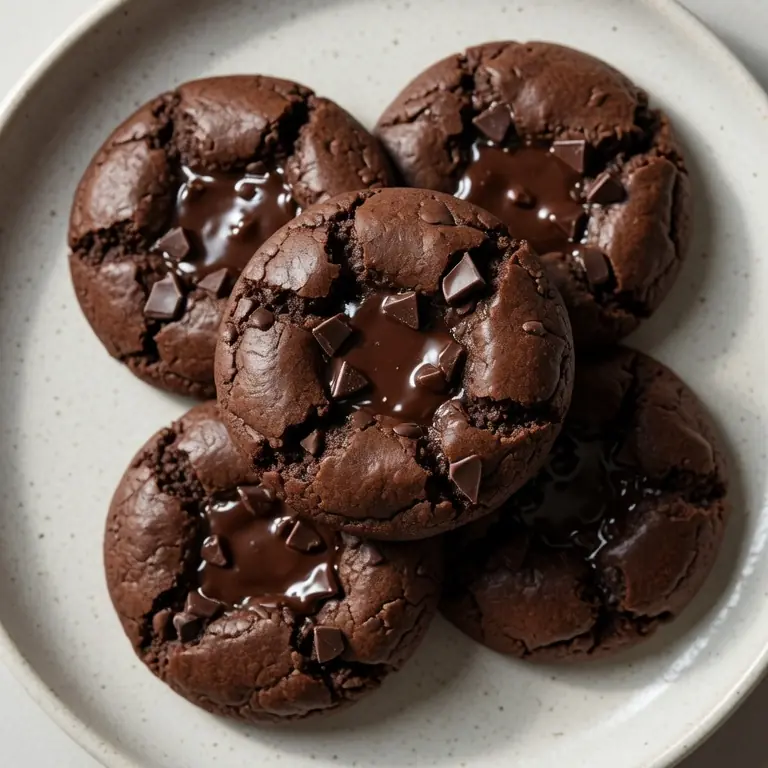
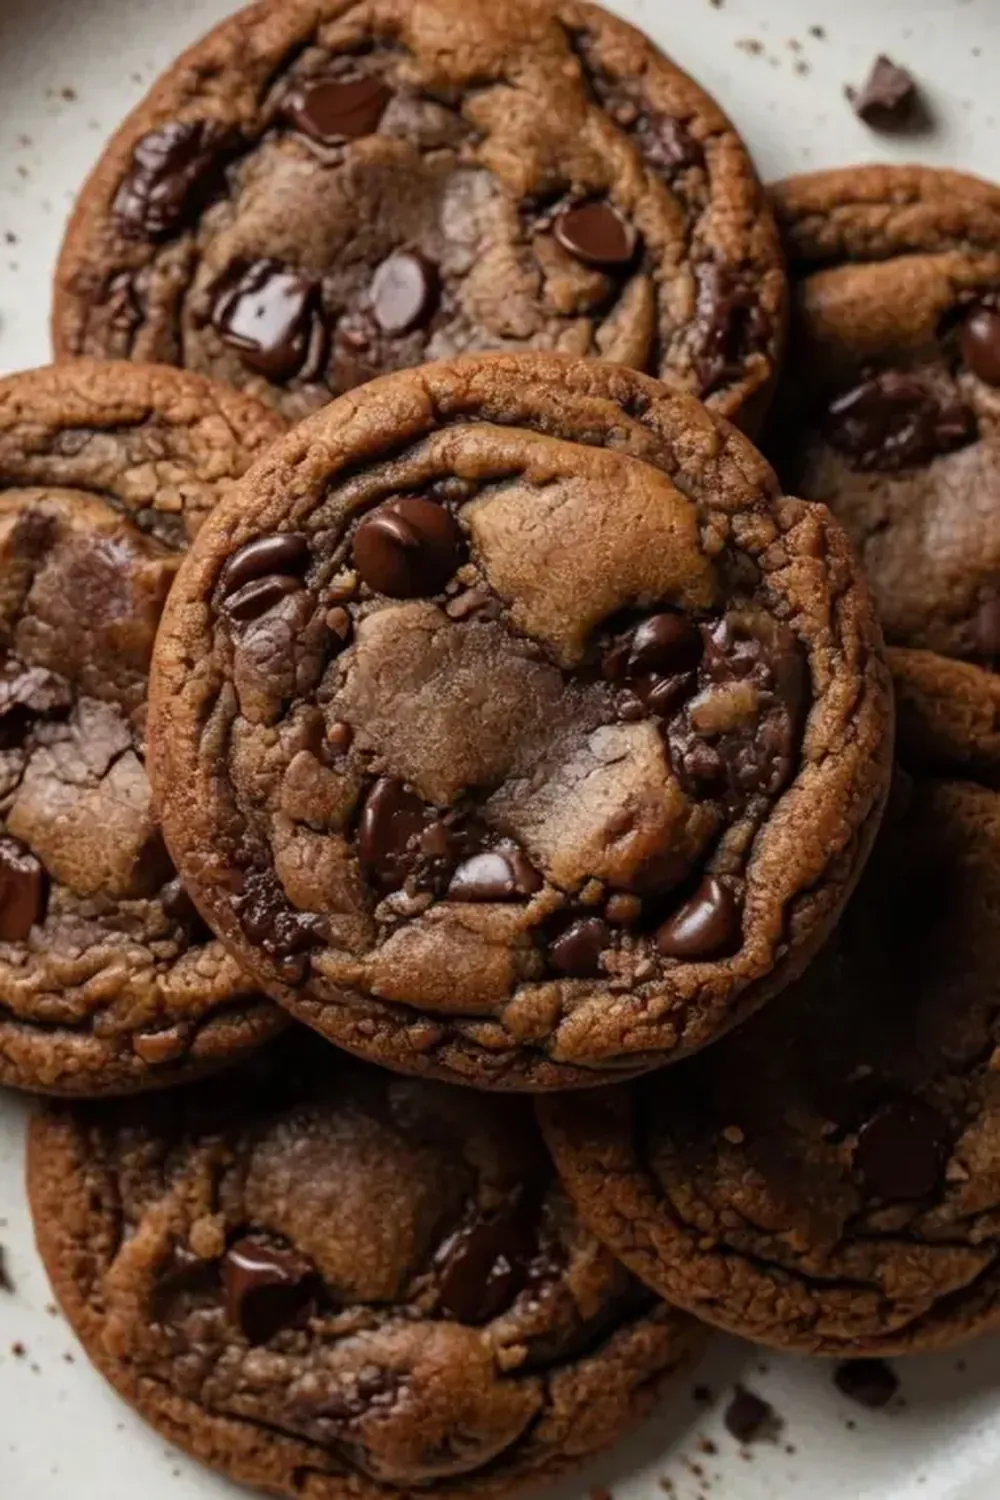
Soft & Chewy Brown Butter Chocolate Chip Cookies

There’s nothing quite like the aroma of freshly baked cookies filling the kitchen, and these soft & chewy brown butter chocolate chip cookies are here to transform your baking experience. This recipe isn’t just about making a dessert; it’s about crafting a moment of pure, unadulterated bliss.
I remember the first time I truly understood the magic of brown butter. It was a rather grey, blustery afternoon here in the UK, and I was feeling a bit uninspired in the kitchen. I’d been making chocolate chip cookies for years, always good, but never quite hitting that ‘wow’ factor I craved. Then, I stumbled upon the idea of browning the butter first. The nutty, caramelised scent that filled my kitchen was utterly captivating, and I knew I was onto something special. My husband, who’s usually quite discerning when it comes to sweet treats like Homemade Dark Chocolate Sea Salt Nut Bars (Kind Copycat) or an Easy Frozen S’Mores Sandwiches Dessert, took one bite of those first brown butter cookies and immediately asked for seconds – a true testament to their deliciousness!cookingenious.com/homemade-dark-chocolate-sea-salt-nut-bars-kind-copycat/”>Homemade Dark Chocolate Sea Salt Nut Bars (Kind Copycat), took one bite of those first brown butter cookies and immediately asked for seconds – a true testament to their deliciousness!
This isn’t just another chocolate chip cookie recipe; it’s a revelation. The technique of browning the butter infuses the dough with an incredible depth of flavour, giving these cookies a complex, almost toffee-like note that regular butter simply can’t achieve. Paired with a thoughtful blend of sugars and a precise baking method, you get a cookie that boasts a gloriously crisp edge, a wonderfully soft and chewy centre, and pools of melted chocolate that practically sing. It’s a recipe I’ve refined over countless batches, ensuring that every time you bake them, you’re creating something truly extraordinary.
Recipe Overview
- Prep time: 20 minutes
- Chill time: 30 minutes (minimum)
- Cook time: 10-12 minutes
- Total time: 1 hour 2 minutes
- Servings: Approximately 18-20 cookies
- Difficulty: Moderate
Why You’ll Love This Soft & Chewy Brown Butter Chocolate Chip Cookies
- Unmatched Flavour Depth: The brown butter adds a rich, nutty, and caramelised note that elevates these beyond ordinary chocolate chip cookies.
- Perfect Texture Harmony: Expect gloriously crisp edges giving way to a wonderfully soft, chewy, and tender centre with every bite.
- Satisfying Chocolate Distribution: Generous chunks and chips ensure delightful pockets of melted chocolate throughout, offering a bittersweet counterpoint.
- A Rewarding Baking Experience: While it involves a few extra steps, the process is incredibly satisfying, leading to truly exceptional results that impress everyone.
- Incredible Aroma: The scent of browning butter and baking cookies will fill your home with an inviting, comforting fragrance that’s simply irresistible.
Ingredients You’ll Need
- 225g unsalted butter, softened
- 150g light brown sugar, packed
- 100g caster sugar
- 2 large eggs, at room temperature
- 1 teaspoon vanilla extract
- 270g plain flour
- 1 teaspoon bicarbonate of soda
- ½ teaspoon fine sea salt
- 150g milk chocolate chips or chunks
- 100g dark chocolate chips or chunks (at least 60% cocoa)
- Flaky sea salt, for sprinkling (optional)
Tip: Using a mix of milk and dark chocolate creates a beautiful balance of sweetness and intensity, ensuring every bite is dynamic and exciting. Don’t be shy with good quality chocolate here!
How to Make Soft & Chewy Brown Butter Chocolate Chip Cookies
- Brown the Butter: In a light-coloured saucepan, melt the 225g unsalted butter over medium heat. It will bubble and foam. Continue cooking, stirring occasionally, until golden brown flecks appear at the bottom of the pan and a deep, nutty aroma fills your kitchen. This process usually takes about 5-8 minutes. Pour the browned butter, including the browned bits, into a heatproof bowl and let it cool for about 10-15 minutes until it’s just warm, not hot.
- Cream Sugars and Butter: In a large mixing bowl, combine the cooled brown butter with the 150g light brown sugar and 100g caster sugar. Beat with an electric mixer on medium speed for 2-3 minutes until the mixture is light, fluffy, and a pale caramel colour. The sugars should be well incorporated, creating a creamy texture.
- Add Eggs and Vanilla: Crack in the 2 large eggs, one at a time, beating well after each addition until fully incorporated. Add the 1 teaspoon vanilla extract and beat for another minute until the mixture looks smooth and glossy, with a lovely pale yellow hue.
- Combine Dry Ingredients: In a separate medium bowl, whisk together the 270g plain flour, 1 teaspoon bicarbonate of soda, and ½ teaspoon fine sea salt until thoroughly combined. The mixture should appear uniform with no lumps.
- Mix Wet and Dry: Gradually add the dry ingredients to the wet ingredients, mixing on low speed until just combined. Be careful not to overmix; stop as soon as no streaks of flour are visible and the dough forms a soft, pliable ball. Gently fold in the 150g milk chocolate chips and 100g dark chocolate chips until evenly distributed throughout the dough, which will have a rich, deep golden-brown colour.
- Chill the Dough: Cover the bowl with cling film and refrigerate the dough for at least 30 minutes. This chilling time is crucial for the texture and helps the flavours meld beautifully. When you press it gently, the dough will feel firmer and less sticky.
- Preheat and Scoop: Preheat your oven to 180°C (160°C fan/Gas Mark 4). Line a baking tray with parchment paper. Scoop rounded tablespoons of dough onto the prepared tray, leaving about 5cm between each cookie to allow for spreading. I often use an ice cream scoop for consistent sizing.
- Bake the Cookies: Bake for 10-12 minutes, or until the edges are golden brown and set, but the centres still look slightly soft and puffed. When you remove them, they’ll smell heavenly, with a deep, buttery chocolate aroma. For an extra touch, sprinkle a tiny pinch of flaky sea salt on top immediately after they come out of the oven.
- Cool and Enjoy: Let the cookies cool on the baking tray for 5 minutes before transferring them to a wire cooling rack to cool completely. This allows them to set properly, ensuring that delightful chewy texture.
Tips From My Kitchen
- Don’t Rush the Brown Butter: Browning butter is a transformative step, so take your time. Use a light-coloured pan so you can clearly see the butter solids turning golden brown, preventing burning. The nutty, caramelised aroma is your cue. If you rush it, you might not develop the full depth of flavour, or worse, burn the solids, leading to a bitter taste. The goal is a rich, amber hue and a distinctive nutty scent.
- Measure Your Flour Accurately: Flour is often scooped too densely, leading to too much in the recipe. I always recommend weighing flour using kitchen scales for precise results. If you don’t have scales, spoon the flour into your measuring cup and then level it off with a knife. Too much flour will result in dry, crumbly cookies, while too little can make them spread excessively and become too flat.
- Room Temperature Eggs Are Key: This isn’t just a fussy step! Room temperature eggs emulsify much better with the butter and sugar, creating a smoother, more cohesive dough. This improved emulsion results in a more evenly textured cookie. If you forget to take them out, place them in a bowl of warm water for 5-10 minutes.
- Chill Your Dough: I used to struggle with cookies spreading too much until I discovered the critical importance of chilling the dough. This step isn’t just for flavour development; it allows the butter to re-solidify, preventing the cookies from spreading too thinly in the oven. A well-chilled dough will yield thicker, chewier cookies with that desirable crisp edge. Even 30 minutes makes a noticeable difference, but an hour or more is even better.
- Don’t Overbake: For that truly soft & chewy brown butter chocolate chip cookie texture, pull them out of the oven when the edges are set and golden but the centres still look slightly underbaked and puffed. They will continue to cook and set on the hot baking tray, which is why the 5-minute resting period there is so important. Overbaking leads to a harder, drier cookie.
- Flaky Sea Salt Finish: A sprinkle of flaky sea salt on top of the warm cookies after baking isn’t just for looks; it really enhances the flavour. The salt crystals provide a delightful textural contrast and cut through the sweetness, highlighting the rich chocolate and nutty brown butter notes.
Equipment You’ll Need
- Stand mixer or hand mixer
- Baking tray
- Parchment paper
- Wire cooling rack
- Light-coloured saucepan
- Heatproof bowl
- Kitchen scales
Common Mistakes to Avoid
- Overcrowding the pan: Placing too many cookie dough balls on one baking tray prevents proper air circulation around each cookie. This can lead to uneven baking, where some cookies are underdone and others are overdone, and they might merge into one giant cookie. Always leave at least 5cm (2 inches) between each cookie to ensure even heat distribution and beautiful, individual cookies.
- Wrong temperature: An oven that’s too hot will cause the cookies to brown too quickly on the outside while remaining raw in the middle, or burn the edges before the centre is cooked. An oven that’s too cool will cause them to spread too much and become flat. Always preheat your oven to the specified 180°C (160°C fan/Gas Mark 4) and consider using an oven thermometer to verify its accuracy, as oven temperatures can vary.
- Skipping the rest time: The dough chilling time is vital for several reasons. It allows the flour to fully hydrate, developing flavour and preventing a gritty texture. More importantly, it re-solidifies the butter, which controls spread during baking and contributes to that desirable chewy texture. Skipping this step often results in flat, greasy cookies that lack depth of flavour.
Delicious Variations to Try
- Spicy Version: For a warming kick, add ½ teaspoon of ground cinnamon and a pinch of cayenne pepper to the dry ingredients. The subtle heat from the cayenne beautifully complements the rich chocolate and nutty brown butter, adding an unexpected layer of complexity.
- Vegetarian/Vegan Option: For a plant-based alternative, substitute the butter with a high-quality plant-based butter alternative (ensure it browns well, some brands are better than others for this) and replace the eggs with flax eggs (1 tablespoon ground flaxseed mixed with 3 tablespoons water, let sit for 5 minutes). Make sure your chocolate chips are dairy-free.
- Different Protein: While this recipe doesn’t directly call for a protein, you could consider adding chopped nuts like pecans or walnuts for an extra textural and flavour dimension. For a more substantial dessert, serve these cookies alongside a scoop of homemade vanilla ice cream, perhaps made with a touch of cardamom for an exotic twist, or even a side of a creamy dessert like our Blackberry Cheesecake Recipe Creamy.
What to Serve With Soft & Chewy Brown Butter Chocolate Chip Cookies
- A cold glass of milk or a warm mug of tea.
- A scoop of vanilla bean ice cream for an indulgent treat.
- Alongside a rich Instant Coffee Iced Coffee or a hot latte.
- As a comforting end to a family meal, perhaps after a hearty Chicken Curry Recipe Spicy Dinner.
Frequently Asked Questions
Soft & Chewy Brown Butter Chocolate Chip Cookies
Ingredients
Method
-
Brown the Butter: In a light-coloured saucepan, melt the 225g unsalted butter over medium heat. It will bubble and foam. Continue cooking, stirring occasionally, until golden brown flecks appear at the bottom of the pan and a deep, nutty aroma fills your kitchen. This process usually takes about 5-8 minutes. Pour the browned butter, including the browned bits, into a heatproof bowl and let it cool for about 10-15 minutes until it’s just warm, not hot.
-
Cream Sugars and Butter: In a large mixing bowl, combine the cooled brown butter with the 150g light brown sugar and 100g caster sugar. Beat with an electric mixer on medium speed for 2-3 minutes until the mixture is light, fluffy, and a pale caramel colour. The sugars should be well incorporated, creating a creamy texture.
-
Add Eggs and Vanilla: Crack in the 2 large eggs, one at a time, beating well after each addition until fully incorporated. Add the 1 teaspoon vanilla extract and beat for another minute until the mixture looks smooth and glossy, with a lovely pale yellow hue.
-
Combine Dry Ingredients: In a separate medium bowl, whisk together the 270g plain flour, 1 teaspoon bicarbonate of soda, and ½ teaspoon fine sea salt until thoroughly combined. The mixture should appear uniform with no lumps.
-
Mix Wet and Dry: Gradually add the dry ingredients to the wet ingredients, mixing on low speed until just combined. Be careful not to overmix; stop as soon as no streaks of flour are visible and the dough forms a soft, pliable ball. Gently fold in the 150g milk chocolate chips and 100g dark chocolate chips until evenly distributed throughout the dough, which will have a rich, deep golden-brown colour.
-
Chill the Dough: Cover the bowl with cling film and refrigerate the dough for at least 30 minutes. This chilling time is crucial for the texture and helps the flavours meld beautifully. When you press it gently, the dough will feel firmer and less sticky.
-
Preheat and Scoop: Preheat your oven to 180°C (160°C fan/Gas Mark 4). Line a baking tray with parchment paper. Scoop rounded tablespoons of dough onto the prepared tray, leaving about 5cm between each cookie to allow for spreading. I often use an ice cream scoop for consistent sizing.
-
Bake the Cookies: Bake for 10-12 minutes, or until the edges are golden brown and set, but the centres still look slightly soft and puffed. When you remove them, they’ll smell heavenly, with a deep, buttery chocolate aroma. For an extra touch, sprinkle a tiny pinch of flaky sea salt on top immediately after they come out of the oven.
-
Cool and Enjoy: Let the cookies cool on the baking tray for 5 minutes before transferring them to a wire cooling rack to cool completely. This allows them to set properly, ensuring that delightful chewy texture.
Notes
There you have it – my tried and tested recipe for Soft & Chewy Brown Butter Chocolate Chip Cookies. I truly hope you enjoy baking and sharing these as much as I do. There’s something incredibly rewarding about creating something so delicious from scratch. Let me know in the comments below if you try this recipe, and what your favourite part of the process was!