Tropical Hawaiian Carrot Pineapple Cake
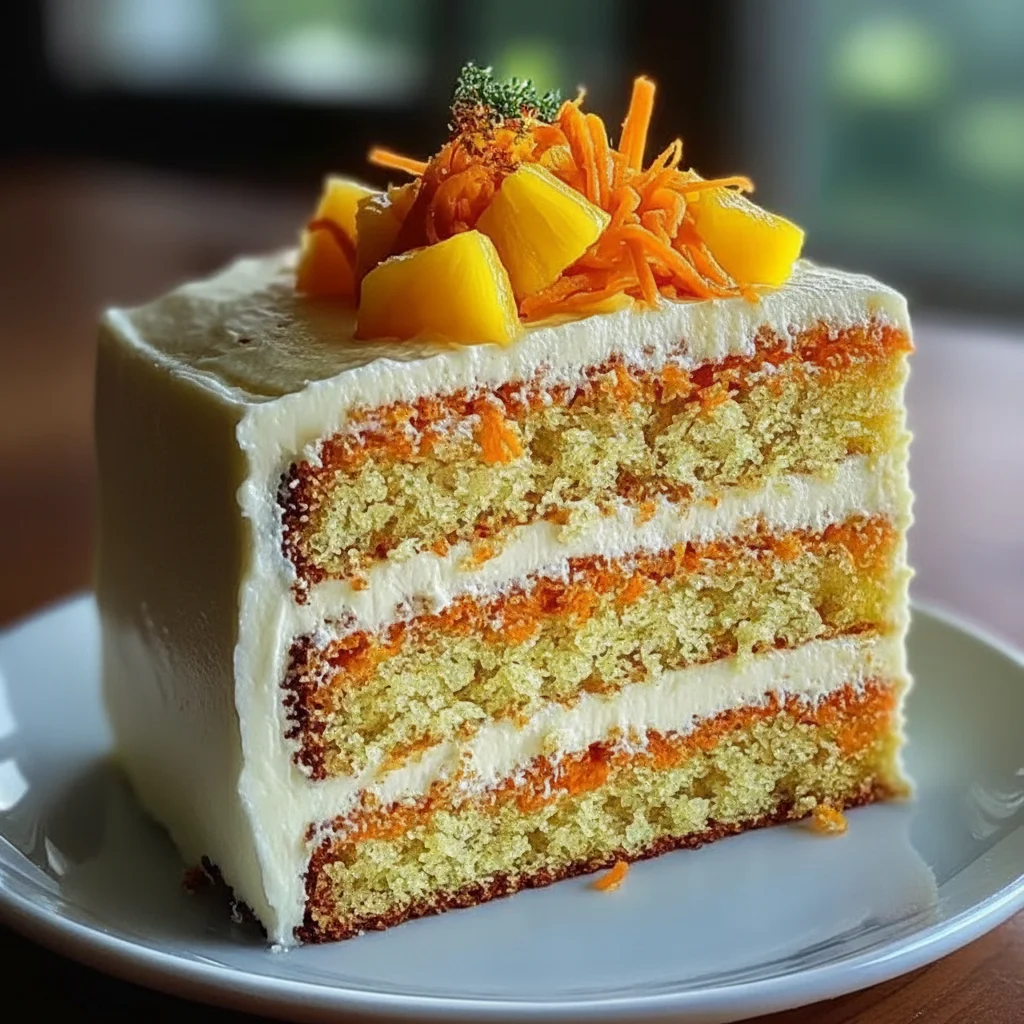
There are some bakes that feel like a little dose of sunshine, and this Hawaiian Carrot Pineapple Cake is absolutely one of them. For years, I was content with standard carrot cake, but I always felt it was missing a certain something. I stumbled upon the combination of pineapple and coconut by accident when clearing out my pantry one weekend, and it’s been a complete game-changer in my kitchen ever since. It transforms the familiar, spiced warmth of a carrot cake into something altogether more vibrant and special – a truly memorable tropical dessert.
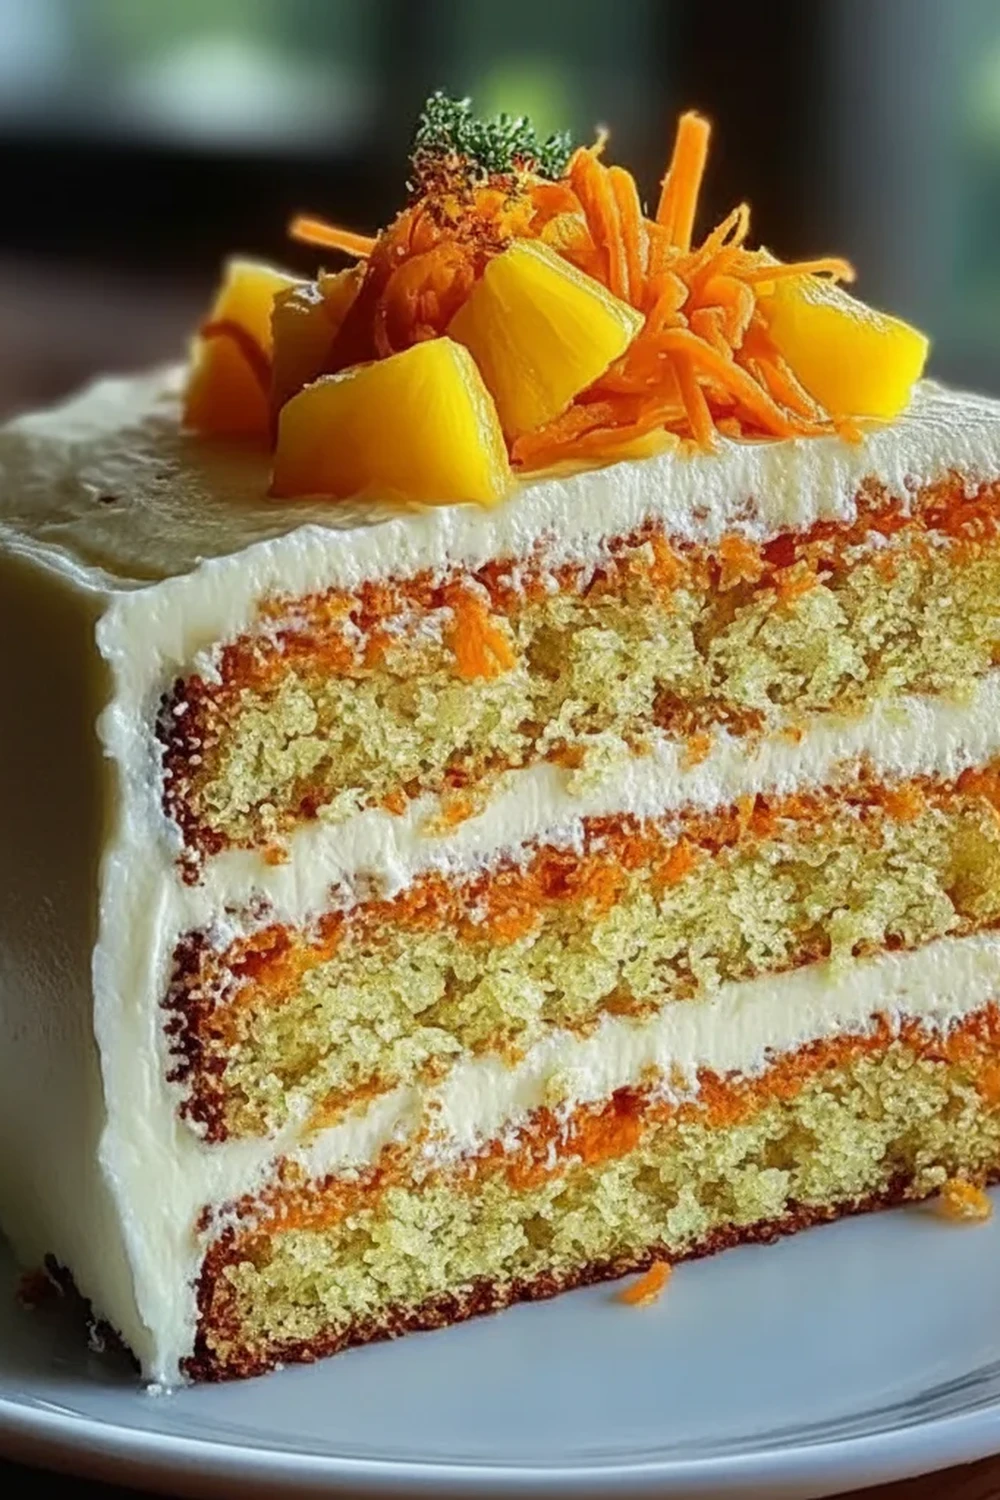
What we have here is not just a cake; it’s an experience. The crumb is incredibly moist, thanks to the crushed pineapple which releases its sweet juice right into the batter as it bakes. You get the gentle sweetness from the carrots, a tangy burst from the pineapple, and a subtle, chewy texture from desiccated coconut. We then top the whole thing with a rich, tangy cream cheese frosting that perfectly balances the sweetness of the sponge. It’s the kind of cake that works beautifully for a weekend treat, a family gathering, or just a Tuesday afternoon when you need a little lift.
Recipe Overview
This Hawaiian cake recipe builds on the foundation of a classic carrot cake but elevates it with tropical notes. The result is a wonderfully moist cake with a tender crumb, studded with sweet carrots, juicy pineapple, and chewy coconut. The cream cheese frosting is the essential final touch, providing a luscious, tangy counterpoint. I’ve tested this with both tinned and fresh pineapple, and find that tinned, crushed pineapple in juice gives the most consistent, moist result every time.
- Prep Time: 25 minutes
- Cook Time: 35-40 minutes
- Total Time: 1 hour 5 minutes (plus cooling)
- Servings: 12 slices
- Difficulty: Medium
Why You’ll Love This Hawaiian Carrot Pineapple Cake
- Sublime Texture and Flavour: The combination of soft-baked carrots and juicy pineapple pieces creates an exceptionally moist cake. The warm notes of cinnamon and nutmeg are lifted by the tropical sweetness, making every bite interesting.
- Ready in Just Over an Hour: From gathering your bowls to pulling the baked cake from the oven, the active process is straightforward and takes just about an hour, leaving you with a spectacular dessert.
- A Forgiving Recipe: This cake is quite adaptable. You can swap the walnuts for pecans, add a handful of rum-soaked raisins, or even dial up the spice with a pinch of ginger or allspice to make it your own.
- Ideal for Afternoon Tea: This cake is a showstopper for a special afternoon tea, a birthday, or an Easter gathering. It slices beautifully and holds up well, making it great for sharing. A friend even served it at her summer garden party, and it vanished.
- Family Tested and Approved: My entire family adores this version. My youngest, who usually turns his nose up at vegetables in desserts, always asks for a second slice of this “sunshine cake.”
Ingredients You’ll Need
For this recipe, we’re using standard pantry staples. The one thing I’d recommend is using full-fat cream cheese for the frosting; I find that brands like Philadelphia give the richest, creamiest texture that low-fat versions just can’t replicate. Ensure your eggs are at room temperature as it helps them incorporate into the batter more smoothly.
- For the Cake:
- 250g plain flour
- 2 tsp baking powder
- 1 tsp bicarbonate of soda
- 2 tsp ground cinnamon
- ½ tsp ground nutmeg
- ½ tsp salt
- 200g light brown soft sugar
- 3 large free-range eggs, at room temperature
- 180ml sunflower oil or other neutral vegetable oil
- 1 tsp vanilla extract
- 250g carrots, peeled and finely grated
- 227g tin of crushed pineapple in juice, well-drained
- 80g desiccated coconut
- 100g walnuts or pecans, roughly chopped
- For the Cream Cheese Frosting:
- 150g unsalted butter, softened
- 300g icing sugar, sifted
- 300g full-fat cream cheese, cold from the fridge
- 1 tsp vanilla extract
Ashley’s Tip: Don’t be tempted to use pre-grated carrots from a bag. They are often dry and thicker than what you can achieve at home. Grating them yourself on the fine side of a box grater ensures they melt into the cake, providing maximum moisture and sweetness.
How to Make Hawaiian Carrot Pineapple Cake
The process for this pineapple cake is quite straightforward. We use the all-in-one method for the batter, which means less washing up and a quicker prep time. The key is to mix until just combined to ensure a tender, not tough, final bake.
- Preheat and Prepare: First, preheat your oven to 180°C (160°C fan). Grease and line two 20cm (8-inch) round cake tins with baking parchment.
- Combine Dry Ingredients: In a large mixing bowl, sift together the plain flour, baking powder, bicarbonate of soda, cinnamon, nutmeg, and salt. Add the light brown sugar and give it a quick whisk to break up any lumps.
- Mix Wet Ingredients: In a separate jug or bowl, whisk the eggs, sunflower oil, and vanilla extract until they are well combined.
- Create the Batter: Pour the wet ingredients into the dry ingredients. Mix with a spatula or wooden spoon until just combined. Be careful not to overmix at this stage. A few floury streaks are fine.
- Fold in the Good Stuff: Gently fold in the grated carrots, well-drained crushed pineapple, desiccated coconut, and chopped walnuts. I find that using a large metal spoon or a spatula with a figure-of-eight motion works best for this, as it keeps the batter light.
- Bake the Cakes: Divide the batter evenly between your two prepared tins and smooth the tops. Bake on the middle shelf of the preheated oven for 35-40 minutes. The cakes are ready when a skewer inserted into the centre comes out clean and the sponges spring back when gently pressed.
- Cool Completely: Let the cakes cool in their tins for about 10 minutes before carefully turning them out onto a wire rack to cool completely. It is crucial they are fully cool before you attempt to frost them.
- Make the Frosting: While the cakes cool, make the frosting. In a large bowl, beat the softened butter with an electric mixer until pale and creamy. Gradually add the sifted icing sugar, beating well after each addition. Add the vanilla, then add the cold cream cheese all at once. Beat on a medium-low speed for just a minute or so, until the frosting is smooth and thick. Do not overbeat, or it may become runny.
- Assemble Your Cake: Place one cake layer on your serving plate or cake stand. Spread about half of the frosting evenly over the top. Place the second cake layer on top and spread the remaining frosting over the top and sides, creating smooth or rustic swirls as you prefer. You can decorate with extra chopped walnuts or a sprinkle of toasted coconut.
Tips From My Kitchen
- Room Temperature is Key: For the cake batter, having your eggs at room temperature is essential. They emulsify better with the oil, creating a smoother batter and a more uniform texture in the final bake. Just take them out of the fridge 30 minutes before you start.
- The Draining Secret: For the most moist cake that isn’t soggy, you must drain the pineapple well. I learned that pressing the crushed pineapple against a sieve with the back of a spoon gets rid of excess liquid that can weigh down the batter. This was a technique that solved my early issues with dense pineapple cakes.
- Make-Ahead Method: The cake sponges can be baked a day in advance. Once fully cooled, wrap them tightly in cling film and store them at room temperature. The frosting can also be made ahead and kept in an airtight container in the fridge for up to 3 days. Just let it soften slightly at room temperature and give it a quick beat before using.
- Storage: Once assembled, this cake should be stored in the refrigerator because of the cream cheese frosting. Keep it in an airtight container, and it will stay fresh and delicious for up to 4 days. Let it sit at room temperature for 20-30 minutes before serving for the best flavour and texture.
Common Mistakes to Avoid
- Overmixing the Batter: When you combine the wet and dry ingredients, you’re starting to develop gluten. If you mix for too long after the flour is added, you’ll get a tough, dense, and chewy cake instead of a light and tender one. Mix only until you no longer see big streaks of dry flour.
- Frosting a Warm Cake: This is a classic baking error! Even a slightly warm cake will melt the cream cheese frosting into a runny, greasy mess. Patience is your best friend here. Ensure the cakes are completely, 100% cool to the touch before you even think about getting the frosting out.
- Not Draining the Pineapple: As mentioned, pineapple holds a lot of water. If you tip the whole can, juice and all, into your batter, you will alter the cake’s chemistry. It will be too wet, may not rise properly, and could have a gummy texture. Squeeze out that juice!
Delicious Variations to Try
Once you’ve mastered the base recipe, feel free to get creative. This Hawaiian-style carrot cake is a wonderful canvas for other flavours. If you enjoy playing with carrot recipes, you might also like this traditional Carrot Halwa for a different take.
- Extra Spice: Add ½ teaspoon of ground ginger and a ¼ teaspoon of ground allspice along with the cinnamon and nutmeg for a deeper, spicier warmth that complements the tropical fruit.
- Nut-Free & Vegan Options: For a nut-free version, simply omit the walnuts. To make this cake vegan, you can use flax eggs (1 tbsp ground flaxseed mixed with 3 tbsp water per egg), a plant-based block butter substitute in the frosting, and a good quality vegan cream cheese.
- Fruity & Nutty Add-ins: Try swapping the walnuts for toasted macadamia nuts for an even more tropical feel. A handful of dried mango, finely chopped, or some rum-soaked raisins also adds a lovely chewy texture and concentrated sweetness.
What to Serve With Your Hawaiian Carrot Pineapple Cake
This cake is a magnificent standalone dessert, but a few simple pairings can make it even more special.
- A Dollop of Cream: While it has frosting, a simple spoonful of softly whipped double cream or even clotted cream on the side cuts through the richness beautifully.
– Fresh Fruit: A small bowl of fresh tropical fruit, like mango slices or passion fruit pulp, echoes the cake’s flavours and adds a lovely fresh contrast.
– A Good Cuppa: This cake is wonderful with a strong cup of black tea, like an English Breakfast or Earl Grey. For a cooler option on a warm day, it pairs surprisingly well with a refreshing Iced Coffee.
Frequently Asked Questions
Hawaiian Carrot Pineapple Cake
Ingredients
Method
- Preheat and Prepare: First, preheat your oven to 180°C (160°C fan). Grease and line two 20cm (8-inch) round cake tins with baking parchment.
- Combine Dry Ingredients: In a large mixing bowl, sift together the plain flour, baking powder, bicarbonate of soda, cinnamon, nutmeg, and salt. Add the light brown sugar and give it a quick whisk to break up any lumps.
- Mix Wet Ingredients: In a separate jug or bowl, whisk the eggs, sunflower oil, and vanilla extract until they are well combined.
- Create the Batter: Pour the wet ingredients into the dry ingredients. Mix with a spatula or wooden spoon until just combined. Be careful not to overmix at this stage. A few floury streaks are fine.
- Fold in the Good Stuff: Gently fold in the grated carrots, well-drained crushed pineapple, desiccated coconut, and chopped walnuts. I find that using a large metal spoon or a spatula with a figure-of-eight motion works best for this, as it keeps the batter light.
- Bake the Cakes: Divide the batter evenly between your two prepared tins and smooth the tops. Bake on the middle shelf of the preheated oven for 35-40 minutes. The cakes are ready when a skewer inserted into the centre comes out clean and the sponges spring back when gently pressed.
- Cool Completely: Let the cakes cool in their tins for about 10 minutes before carefully turning them out onto a wire rack to cool completely. It is crucial they are fully cool before you attempt to frost them.
- Make the Frosting: While the cakes cool, make the frosting. In a large bowl, beat the softened butter with an electric mixer until pale and creamy. Gradually add the sifted icing sugar, beating well after each addition. Add the vanilla, then add the cold cream cheese all at once. Beat on a medium-low speed for just a minute or so, until the frosting is smooth and thick. Do not overbeat, or it may become runny.
- Assemble Your Cake: Place one cake layer on your serving plate or cake stand. Spread about half of the frosting evenly over the top. Place the second cake layer on top and spread the remaining frosting over the top and sides, creating smooth or rustic swirls as you prefer. You can decorate with extra chopped walnuts or a sprinkle of toasted coconut.
Notes
I truly hope you enjoy baking and eating this Hawaiian Carrot Pineapple Cake as much as my family and I do. It’s a bake that brings a little bit of tropical warmth to any occasion, and it always gets wonderful compliments. If you give it a try, please let me know how it turned out in the comments below. I love hearing about your kitchen adventures! Happy baking, Ashley.