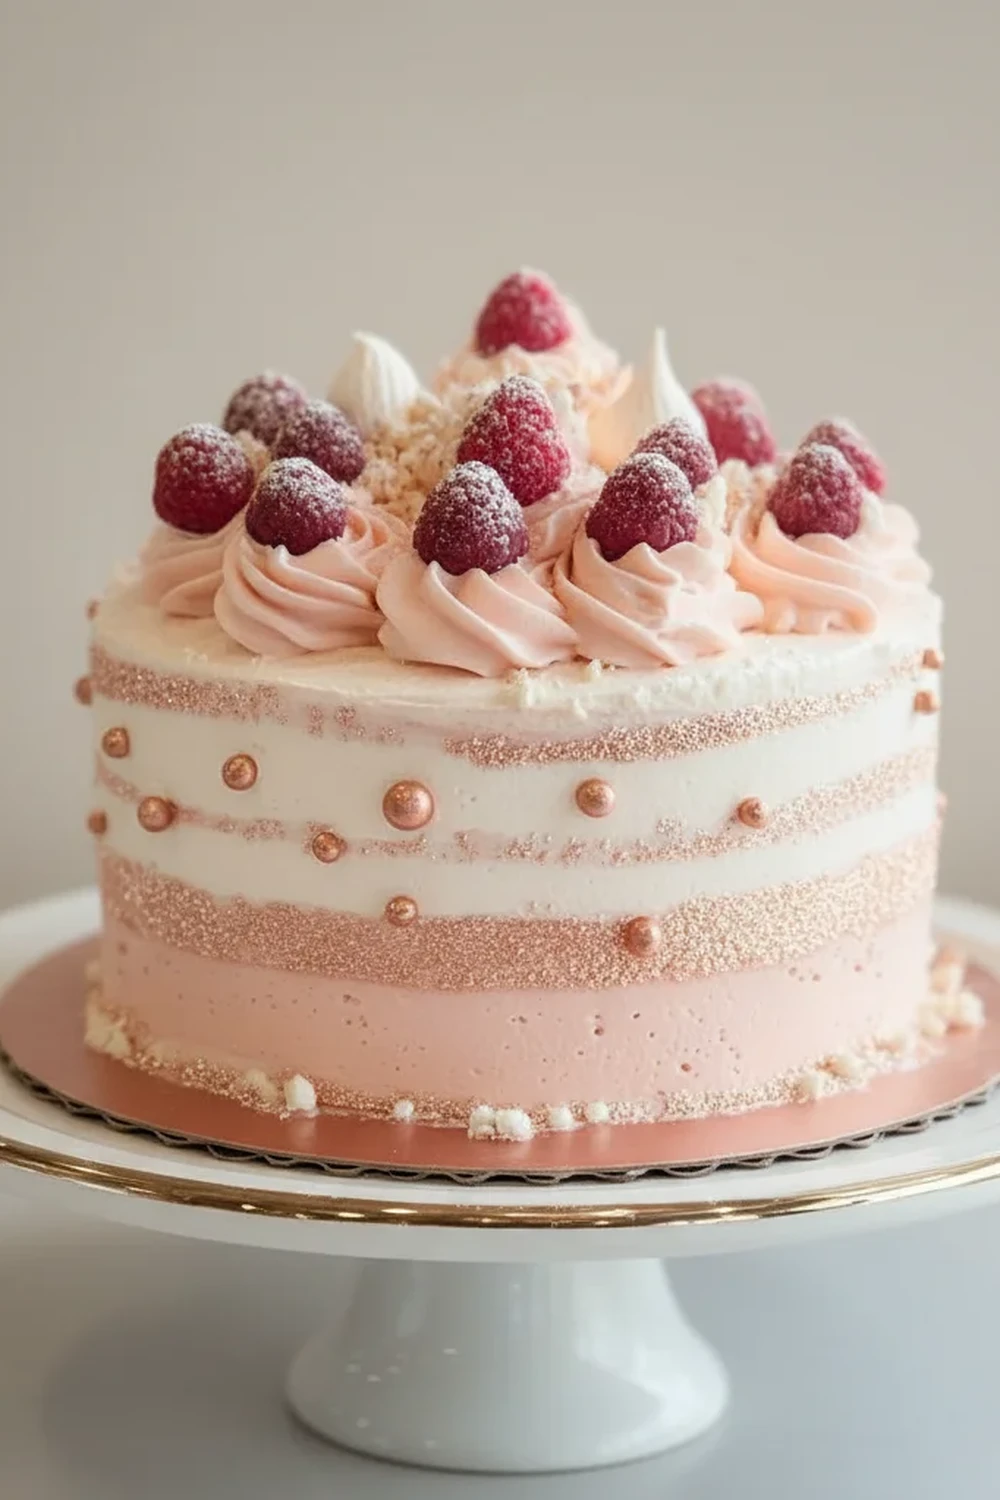
Rose Gold Cake Recipe Elegant Dessert
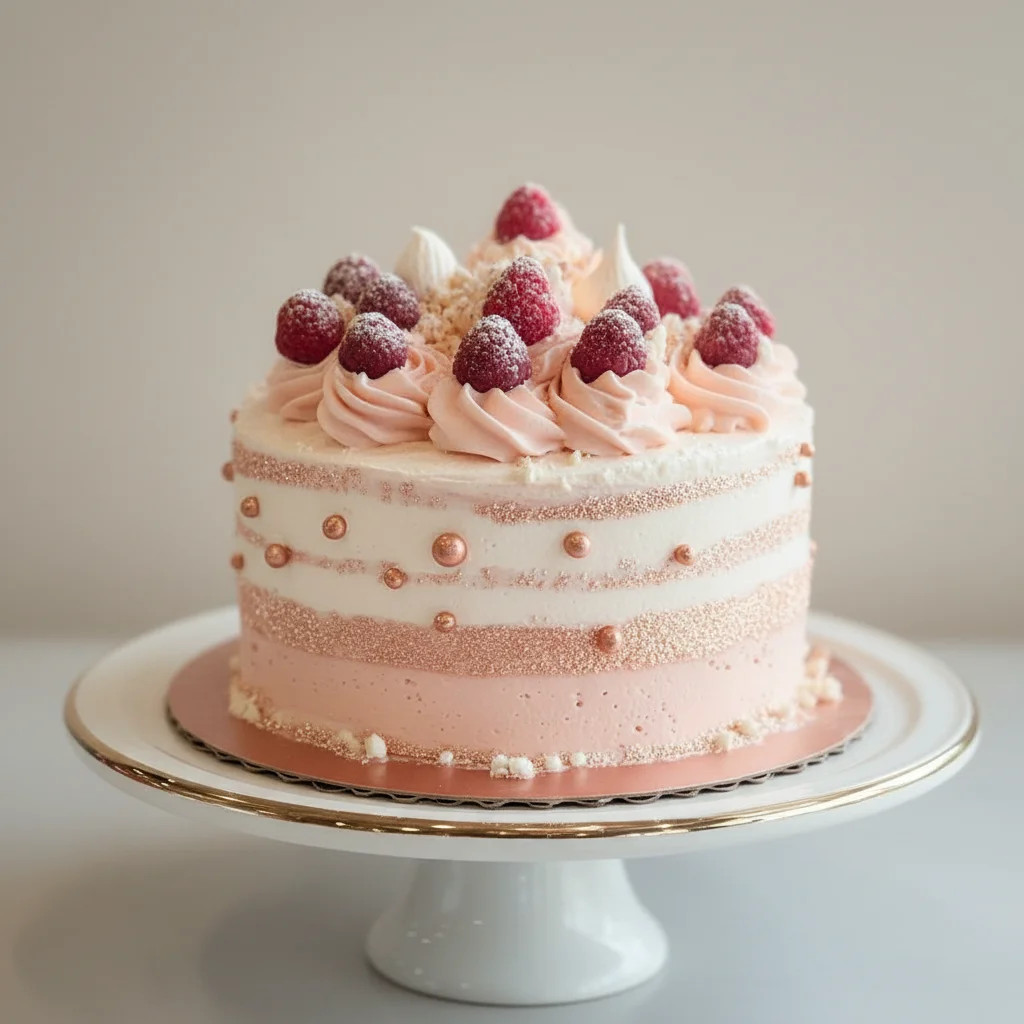
There are some bakes that are simply showstoppers, the kind that make everyone pause and draw a breath when you bring them to the table. This Rose Gold Cake is precisely that. It combines timeless elegance with a modern metallic sheen, creating a dessert that looks as though it belongs in a high-end patisserie window. The inspiration for this particular design came from a beautiful piece of jewellery I saw in a little artisan shop in Brighton; the way the warm metal caught the light was just mesmerising, and I knew I had to try and capture that feeling in a cake.
This isn’t just about looks, though. Beneath that shimmering exterior lies a wonderfully tender vanilla bean sponge, layered with a silky smooth white chocolate buttercream that is rich but not overly sweet. The delicate vanilla flavour provides the perfect canvas for the luxurious buttercream and the signature rose gold drip. It’s the kind of cake we make for life’s special moments—a milestone birthday, an engagement party, or simply when you want to make an occasion feel a little more magical.
In this guide, we’ll walk through creating this elegant cake step-by-step. We’ll cover everything from baking level sponge layers to achieving that perfect, glossy drip. It might look intricate, but I promise the process is methodical and immensely satisfying. Let’s get our aprons on and create something truly special together.
Recipe Overview
This recipe guides you through creating a three-layer vanilla bean cake with a velvety white chocolate Swiss meringue buttercream. The final touch is a stunning rose gold white chocolate ganache drip. When I first tested this, getting the drip consistency right was key; it needs to be fluid enough to run down the sides but thick enough to stop partway down for that classic look. Chilling the cake is essential!
- Prep Time: 45 minutes
- Cook Time: 40 minutes
- Additional Time: 2 hours (for cooling & chilling)
- Total Time: 3 hours 25 minutes
- Servings: 12-16 slices
- Difficulty: Medium
Why You’ll Love This Rose Gold Cake Recipe
- Subtle, Elegant Flavour: The sponge is flecked with real vanilla bean seeds, giving it a deep, aromatic flavour that pairs beautifully with the creamy, subtle sweetness of the white chocolate buttercream. It’s a sophisticated taste that isn’t overpowering.
- A True Centrepiece: This is more than just a cake; it’s a decorative centrepiece. The shimmering rose gold finish is genuinely breathtaking and always gets so many compliments at parties.
- Adaptable Flavours: While we’re using vanilla and white chocolate, the base is incredibly versatile. You could add a layer of raspberry jam between the sponges for a fruity tang or switch the vanilla for almond extract for a different profile.
- Works Beautifully for Special Occasions: This is an ideal cake for significant celebrations like 21st birthdays, anniversaries, bridal showers, or even as a small, elegant wedding cake.
- Family Tested: My niece requested this for her 18th birthday, and her friends were absolutely blown away. It’s a design that feels grown-up and incredibly chic, which they all loved.
Ingredients You’ll Need
For the best results, we’re using high-quality ingredients. Room temperature butter, eggs, and milk are crucial for a smooth batter. I always use Nielsen-Massey vanilla bean paste for its intense, beautiful flavour, but a good quality extract will also work well.
- For the Vanilla Bean Sponge:
- 250g unsalted butter, softened
- 250g caster sugar
- 4 large free-range eggs, at room temperature
- 2 tsp vanilla bean paste
- 250g plain flour
- 2 tsp baking powder
- 1/2 tsp salt
- 60ml whole milk, at room temperature
- For the White Chocolate Buttercream:
- 5 large egg whites
- 250g caster sugar
- 350g unsalted butter, cubed and softened
- 1/2 tsp salt
- 1 tsp vanilla extract
- 200g good quality white chocolate, melted and cooled
- For the Rose Gold Drip & Decoration:
- 150g good quality white chocolate, finely chopped
- 75ml double cream
- 1-2 tsp rose gold lustre dust (edible)
- A few drops of pink or copper food colouring (optional)
- Extra decorations: macarons, fresh flowers (non-toxic), or chocolate shards
Ashley’s Tip: Ensure your butter is properly softened, not melted. It should give way easily when you press it but still hold its shape. This is the key to a light, airy sponge using the creaming method.
How to Make This Rose Gold Cake Recipe
We’ll approach this in stages: baking the cakes, making the buttercream, assembling, and finally, the exciting decorating part. Working methodically is the key to a stress-free experience.
- Prepare the Sponges: Preheat your oven to 180°C (160°C fan). Grease and line the bases of three 20cm (8-inch) round cake tins with parchment paper. In a large bowl or the bowl of a stand mixer, cream the softened butter and caster sugar together for about 5 minutes until pale and fluffy.
- Mix the Batter: Beat in the eggs one at a time, mixing well after each addition. If the mixture starts to curdle, add a tablespoon of your flour. Stir in the vanilla bean paste. In a separate bowl, whisk together the plain flour, baking powder, and salt.
- Combine and Bake: Add half the dry ingredients to the wet ingredients and mix on a low speed until just combined. Pour in the milk, mix again, and then add the remaining dry ingredients. Mix until you have a smooth batter, being careful not to overmix. I used to struggle with this dish until I discovered this technique: weigh the total batter and divide it equally between the three prepared tins for perfectly even layers.
- Bake the Cakes: Bake for 35-40 minutes, or until a skewer inserted into the centre of each cake comes out clean. Let the cakes cool in their tins for 10 minutes before turning them out onto a wire rack to cool completely.
- Make the Buttercream: While the cakes cool, make the Swiss meringue buttercream. Place the egg whites and sugar in a heatproof bowl set over a pan of simmering water (a bain-marie). Whisk continuously until the sugar has completely dissolved (you shouldn’t feel any grains when you rub it between your fingers) and the mixture is hot to the touch.
- Whip the Meringue: Transfer the mixture to the bowl of a stand mixer fitted with a whisk attachment. Whip on high speed for 8-10 minutes until you have a thick, glossy meringue and the outside of the bowl feels cool to the touch.
- Add Butter and Chocolate: Switch to the paddle attachment. With the mixer on low, add the softened butter one cube at a time. The mixture might look split or curdled at some point—this is normal! Just keep mixing, and it will come together into a silky-smooth buttercream. Finally, mix in the salt, vanilla, and the cooled, melted white chocolate.
- Assemble the Cake: Level your cooled cake layers if needed. Place the first layer on a cake stand or serving plate. Spread a generous layer of buttercream over it. Repeat with the second layer, then place the final layer on top. Apply a thin ‘crumb coat’ of buttercream all over the cake to trap any loose crumbs. Chill in the fridge for 30 minutes.
- Final Frosting: Once chilled, apply the remaining buttercream to the top and sides of the cake, using an offset spatula or cake scraper to get a smooth finish. Return the cake to the fridge to chill for at least another hour until the buttercream is firm to the touch. This is critical for a neat drip.
- Create the Rose Gold Drip: Place the chopped white chocolate in a heatproof bowl. Heat the double cream in a small saucepan until it just begins to simmer. Pour the hot cream over the chocolate and let it sit for 2-3 minutes before stirring until smooth. Let the ganache cool for about 10-15 minutes until it’s slightly thickened but still pourable. Stir in the rose gold lustre dust and a drop of food colouring, if using.
- Decorate: Carefully spoon or pour the cooled ganache around the top edge of the chilled cake, encouraging it to drip down the sides. You can use a piping bag for more control. Pour the remaining ganache over the top of the cake and smooth it out. Decorate with your chosen toppings while the drip is still setting.
Tips From My Kitchen
- Room Temperature is Key: For the smoothest batter and buttercream, your eggs, butter, and milk must be at room temperature. Cold ingredients can cause the batter to split and result in a dense cake.
- The Secret Step: Chilling: Do not skip the chilling steps! A cold, firm cake is essential for a clean, professional-looking drip. If the buttercream is soft, the warm ganache will melt it and slide right off. I learned that the hard way!
- Make-Ahead: The cake sponges can be baked a day or two in advance. Wrap them tightly in cling film and store them at room temperature. The buttercream can also be made ahead and stored in an airtight container in the fridge for up to a week (just bring it to room temperature and re-whip it before using).
- Storage: Once assembled, this cake is best stored in the fridge due to the buttercream. It will keep well for up to 4 days. Let it sit at room temperature for about 30 minutes before serving to allow the buttercream to soften. Another great dessert you might enjoy is my Carrot Halwa Recipe Indian Dessert.
Equipment You’ll Need
- Stand mixer or a good quality hand mixer
- Three 20cm (8-inch) round cake tins
- Parchment paper
- Wire cooling rack
- Offset spatula and cake scraper
- Cake turntable (optional, but highly recommended)
Common Mistakes to Avoid
- Overmixing the Batter: Once you add the flour, mix only until it’s just incorporated. Overmixing develops the gluten, which will lead to a tough, dense cake rather than a light and tender one.
- Using Warm Ganache: If your drip ganache is too warm, it will be too thin. It will run all the way to the bottom of the cake and might even melt the buttercream. Let it cool until it’s lukewarm and has the consistency of honey.
- Ignoring Room Temperature Ingredients: Using cold butter for your buttercream will prevent it from whipping up properly, resulting in a lumpy texture. Similarly, cold eggs in the cake batter can cause it to curdle. Patience is a virtue in baking!
Delicious Variations to Try
Once you’ve mastered the basic recipe, feel free to get creative. This cake is a wonderful base for other flavours.
- Lemon & Raspberry: Add the zest of two lemons to the cake batter. Fill the layers with the white chocolate buttercream and a thin layer of raspberry coulis for a bright, tangy contrast.
- Almond & Cherry: Replace the vanilla extract in the cake and buttercream with almond extract. Add a layer of cherry conserve between the sponges. Decorate with flaked almonds.
- Chocolate Rose Gold: For a richer version, try a chocolate sponge. You can adapt a recipe like the one in my Stuffed Peppers With Rice Recipe Dinner post for a similar vibe, but in cake form. The rose gold will look stunning against a dark chocolate buttercream.
What to Serve With This Rose Gold Cake
This elegant cake stands beautifully on its own, but a few simple pairings can enhance the experience.
- A Glass of Bubbly: A crisp Prosecco or a dry Champagne cuts through the richness of the buttercream beautifully. The bubbles provide a lovely textural contrast.
- Fresh Berries: A small bowl of fresh raspberries or strawberries on the side adds a touch of freshness and a slight tartness that complements the sweet cake.
- A Good Cup of Tea: For a classic pairing, a pot of Earl Grey or a light floral tea works wonderfully, cleansing the palate between bites. For a different kind of drink, try my Instant Coffee Iced Coffee Recipe Brew.
Frequently Asked Questions
Rose Gold Cake Recipe
Ingredients
Method
- Prepare the Sponges: Preheat your oven to 180°C (160°C fan). Grease and line the bases of three 20cm (8-inch) round cake tins with parchment paper. In a large bowl or the bowl of a stand mixer, cream the softened butter and caster sugar together for about 5 minutes until pale and fluffy.
- Mix the Batter: Beat in the eggs one at a time, mixing well after each addition. If the mixture starts to curdle, add a tablespoon of your flour. Stir in the vanilla bean paste. In a separate bowl, whisk together the plain flour, baking powder, and salt.
- Combine and Bake: Add half the dry ingredients to the wet ingredients and mix on a low speed until just combined. Pour in the milk, mix again, and then add the remaining dry ingredients. Mix until you have a smooth batter, being careful not to overmix. I used to struggle with this dish until I discovered this technique: weigh the total batter and divide it equally between the three prepared tins for perfectly even layers.
- Bake the Cakes: Bake for 35-40 minutes, or until a skewer inserted into the centre of each cake comes out clean. Let the cakes cool in their tins for 10 minutes before turning them out onto a wire rack to cool completely.
- Make the Buttercream: While the cakes cool, make the Swiss meringue buttercream. Place the egg whites and sugar in a heatproof bowl set over a pan of simmering water (a bain-marie). Whisk continuously until the sugar has completely dissolved (you shouldn't feel any grains when you rub it between your fingers) and the mixture is hot to the touch.
- Whip the Meringue: Transfer the mixture to the bowl of a stand mixer fitted with a whisk attachment. Whip on high speed for 8-10 minutes until you have a thick, glossy meringue and the outside of the bowl feels cool to the touch.
- Add Butter and Chocolate: Switch to the paddle attachment. With the mixer on low, add the softened butter one cube at a time. The mixture might look split or curdled at some point—this is normal! Just keep mixing, and it will come together into a silky-smooth buttercream. Finally, mix in the salt, vanilla, and the cooled, melted white chocolate.
- Assemble the Cake: Level your cooled cake layers if needed. Place the first layer on a cake stand or serving plate. Spread a generous layer of buttercream over it. Repeat with the second layer, then place the final layer on top. Apply a thin ‘crumb coat’ of buttercream all over the cake to trap any loose crumbs. Chill in the fridge for 30 minutes.
- Final Frosting: Once chilled, apply the remaining buttercream to the top and sides of the cake, using an offset spatula or cake scraper to get a smooth finish. Return the cake to the fridge to chill for at least another hour until the buttercream is firm to the touch. This is critical for a neat drip.
- Create the Rose Gold Drip: Place the chopped white chocolate in a heatproof bowl. Heat the double cream in a small saucepan until it just begins to simmer. Pour the hot cream over the chocolate and let it sit for 2-3 minutes before stirring until smooth. Let the ganache cool for about 10-15 minutes until it's slightly thickened but still pourable. Stir in the rose gold lustre dust and a drop of food colouring, if using.
- Decorate: Carefully spoon or pour the cooled ganache around the top edge of the chilled cake, encouraging it to drip down the sides. You can use a piping bag for more control. Pour the remaining ganache over the top of the cake and smooth it out. Decorate with your chosen toppings while the drip is still setting.
Notes
I hope you have as much fun creating this Rose Gold Cake as I do. There’s something so rewarding about slicing into a cake that you’ve built and decorated from scratch, especially one that looks this glamorous. It’s a project bake that is worth every moment. If you try this recipe, I’d love to hear how it went! Please leave a comment below and let me know what occasion you made it for.
Happy baking,
Ashley Rivera