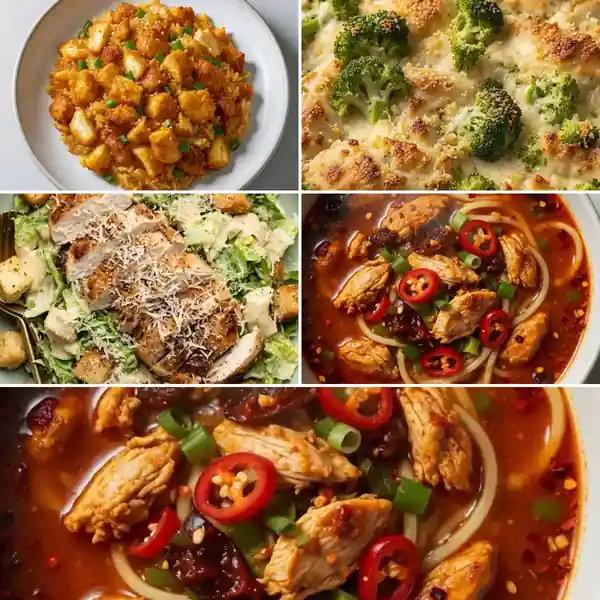
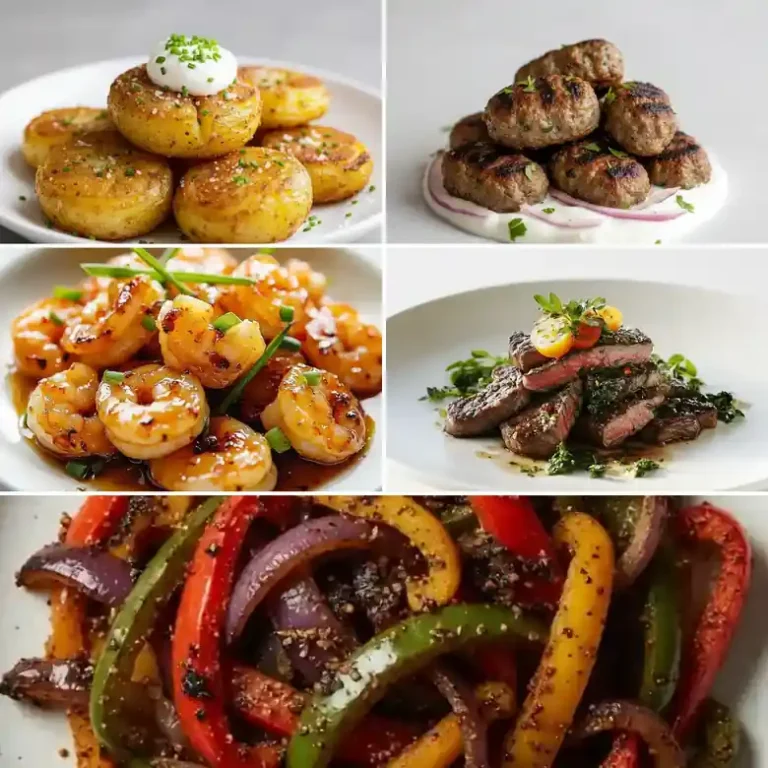
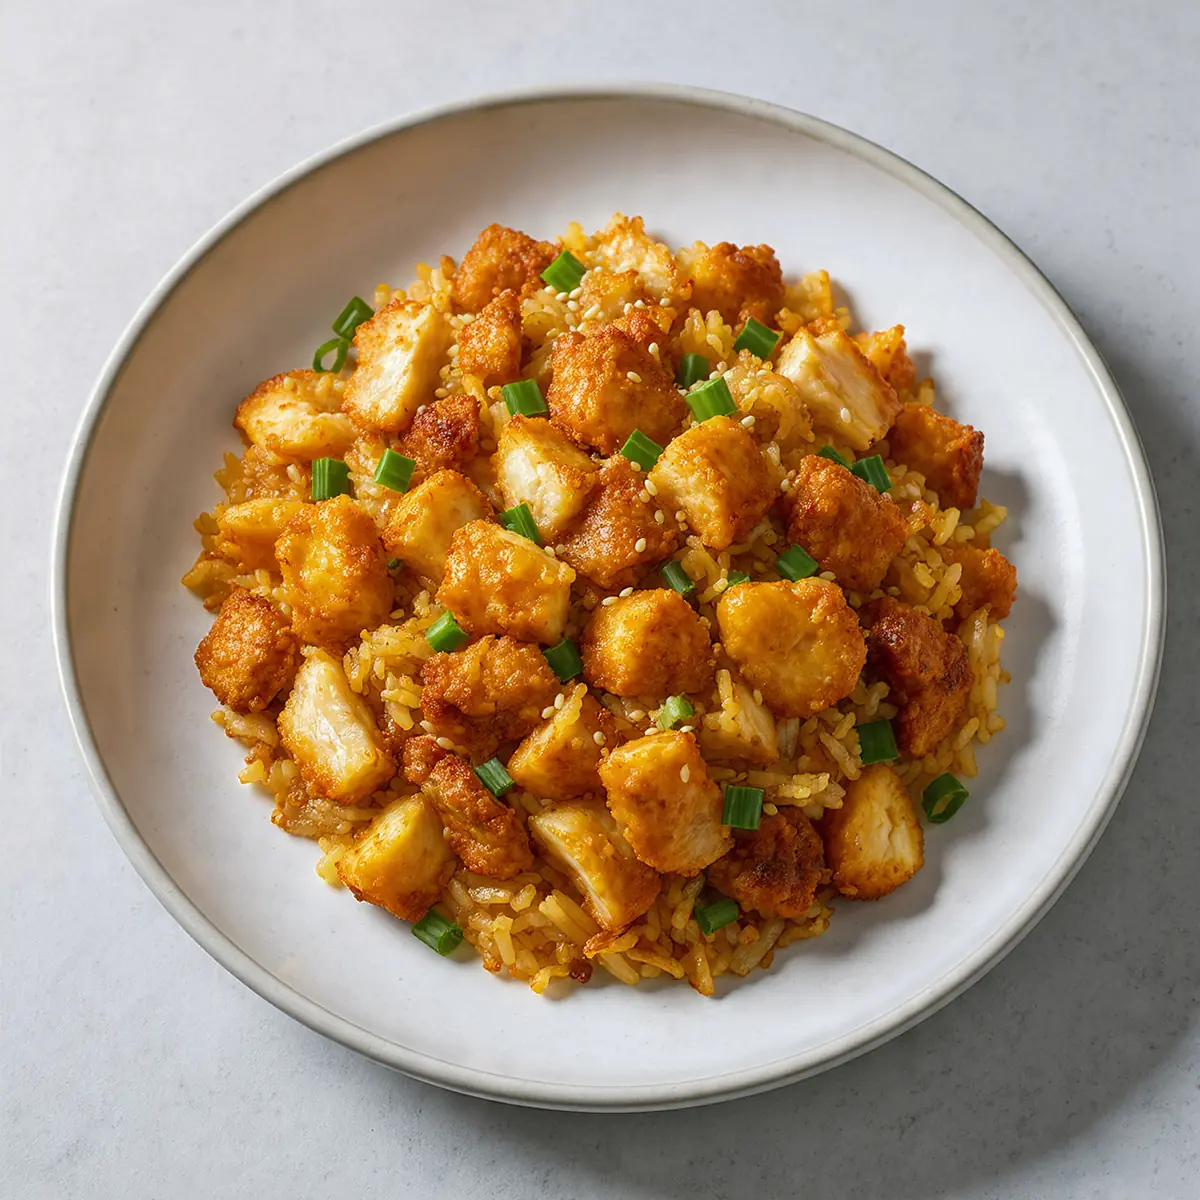
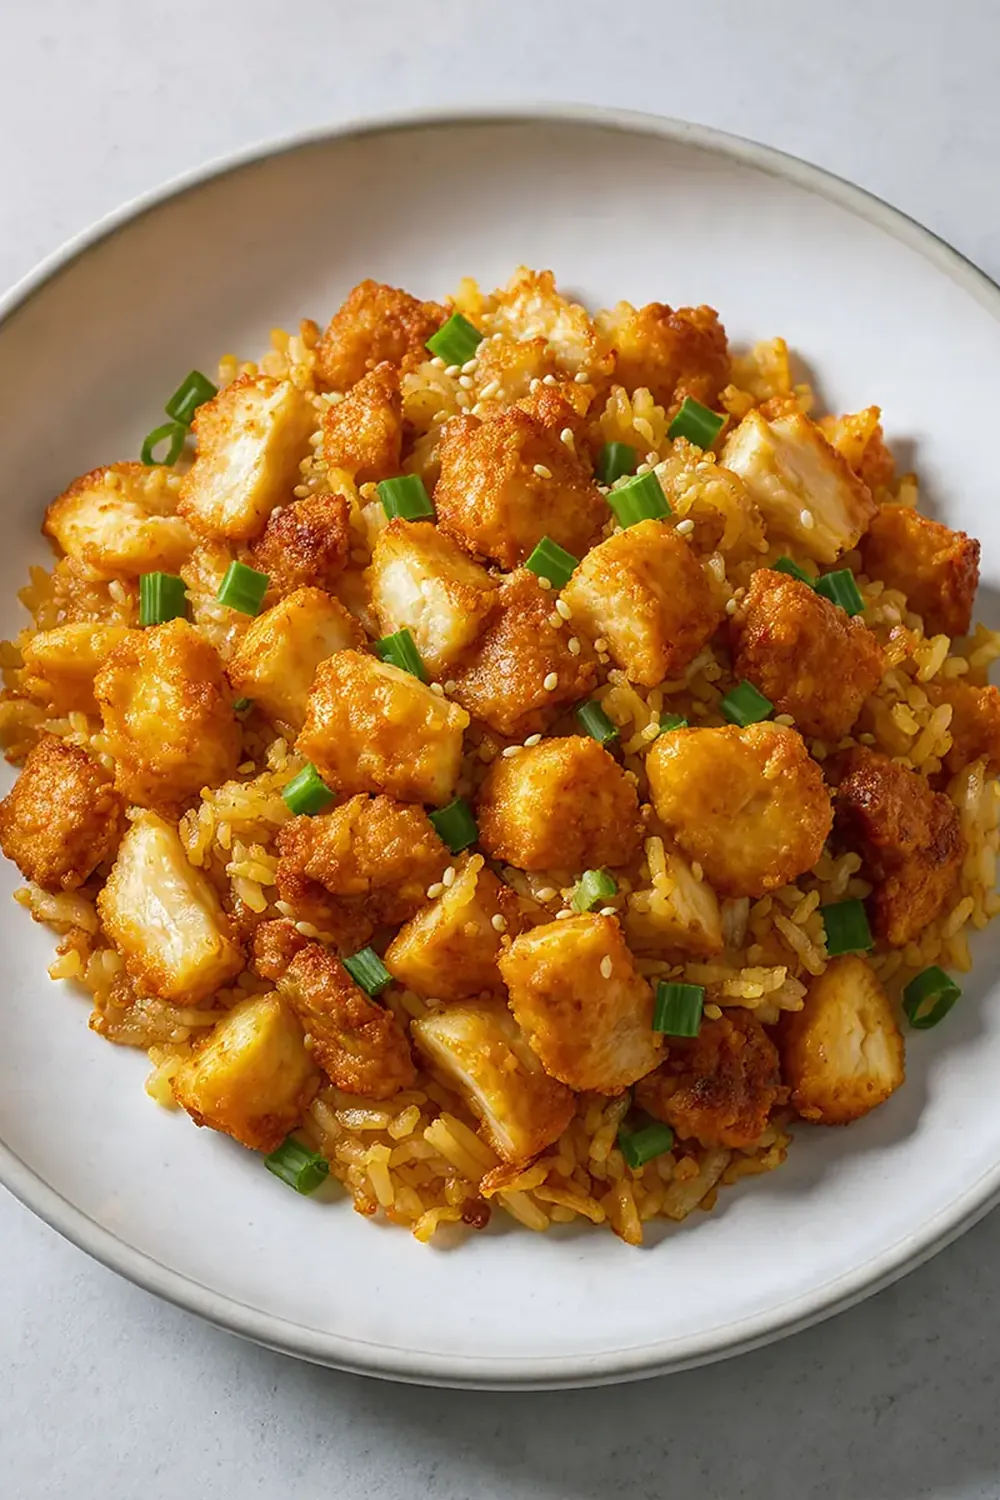
High-Protein Crispy Garlic Chicken Fried Rice
There’s nothing quite like the sizzle and aroma of a truly well-made fried rice, is there? For years, I’ve refined my approach to this classic, aiming for that elusive combination of crispy textures, deep savoury notes, and a satisfying punch of protein. This isn’t just any fried rice; it’s my celebrated High-Protein Crispy Garlic Chicken Fried Rice, a dish that consistently draws compliments and requests for the recipe. I find myself reaching for this recipe when I need something satisfying yet special, without hours in the kitchen, proving that wholesome, delicious food doesn’t have to be complicated.
I remember the first time I truly ‘got’ fried rice. It wasn’t in a bustling restaurant, but after countless attempts in my own kitchen, striving to replicate those incredible textures I adored. The secret, I discovered, lay in a few key techniques: perfectly cooked, chilled rice, high heat, and a confident hand with the seasoning. This recipe brings together succulent, marinated chicken with an abundance of aromatic garlic, creating a vibrant, flavour-packed meal that delivers on both taste and nutrition, much like the fresh ingredients you’d find in 3 Easy Refreshing Summer Salads: Watermelon Feta & Grilled Peach Burrata. Friends always ask me for this recipe after trying it at dinner parties, often surprised by how achievable that restaurant-quality crispiness is at home.
This particular version elevates the humble fried rice to new heights, focusing on robust protein and that irresistible garlicky crisp, much like the delicious options in 12 Crispy Air Fryer Keto Recipes: Zucchini Fries & Parmesan Crisps , or our recipe for Perfectly Juicy Air Fryer Boneless Skinless Chicken Breasts.cookingenious.com/12-crispy-air-fryer-keto-recipes-zucchini-fries-parmesan-crisps/”>12 Crispy Air Fryer Keto Recipes: Zucchini Fries & Parmesan Crisps. We’re not just frying rice; we’re building layers of texture and taste – from the golden-edged chicken to the slightly charred rice grains, each mouthful offers something exciting. It’s a complete meal in itself, packed with goodness, and wonderfully versatile. So, let’s dive into creating a truly memorable dish that will undoubtedly become a staple in your cooking repertoire.
Recipe Overview
- Prep Time: 20 minutes (plus 30 minutes marinating)
- Cook Time: 25-30 minutes
- Total Time: 1 hour 15 minutes (includes marinating)
- Servings: 4
- Difficulty: Moderate
Why You’ll Love This High-Protein Crispy Garlic Chicken Fried Rice
- Exceptional Texture: We focus on achieving that sought-after crispy rice and wonderfully tender, yet slightly caramelised chicken pieces. The contrast in textures makes every bite a joy.
- Rich Umami Depth: A carefully balanced blend of soy sauce, sesame oil, and garlic creates a profound savoury experience that lingers pleasantly on the palate, making it incredibly moreish.
- Nutritionally Balanced: This dish is packed with lean protein from the chicken and wholesome carbohydrates from the rice, along with vibrant vegetables, providing a satisfying and well-rounded meal.
- Versatile and Adaptable: While delicious as is, this recipe is a fantastic base for incorporating other vegetables or even switching up the protein, allowing for endless customisation to suit your preferences or what’s in your fridge.
- Impressive Yet Achievable: Despite its sophisticated flavour profile and restaurant-worthy appearance, the steps are straightforward and designed for home cooks. You’ll be amazed at the quality you can achieve with a little attention to detail.
Ingredients You’ll Need
- 400g boneless, skinless chicken thighs or breast, cut into 1.5cm cubes
- 4 tablespoons light soy sauce, divided
- 1 tablespoon cornflour (cornstarch)
- 1 tablespoon toasted sesame oil, divided
- 3 tablespoons vegetable oil (or other neutral oil), divided
- 4 cloves garlic, minced (approximately 20g)
- 1 small white onion, finely diced (approximately 100g)
- 150g frozen peas, thawed
- 1 large carrot, finely diced (approximately 100g)
- 400g cooked cold day-old rice (preferably long-grain or jasmine)
- 2 large eggs, lightly beaten
- 1 spring onion, thinly sliced, for garnish
- Pinch of white pepper
Tip: Using day-old, chilled rice is absolutely crucial for achieving that characteristic crispy texture. Freshly cooked rice tends to be too moist, leading to a clumpy, soggy fried rice rather than distinct, separate grains.
How to Make High-Protein Crispy Garlic Chicken Fried Rice
- Marinate the Chicken: In a medium bowl, combine the cubed chicken with 2 tablespoons of light soy sauce and the cornflour. Toss until the chicken is evenly coated and the cornflour is absorbed. The chicken will appear slightly pasty and opaque, ready to absorb the flavours. Let this marinate at room temperature for at least 20-30 minutes while you prepare other ingredients.
- Sear the Chicken: Heat 2 tablespoons of vegetable oil in a large frying pan or wok over high heat until it shimmers and a wisp of smoke appears. Add the marinated chicken in a single layer, ensuring not to overcrowd the pan. You should hear a vigorous sizzle as the chicken hits the hot oil. Cook for 3-4 minutes per side, turning with tongs or a spatula, until the chicken pieces are beautifully golden brown and crispy at the edges, and cooked through with no pink visible. Remove the chicken from the pan and set aside, leaving any residual oil and browned bits in the pan.
- Sauté Aromatics and Vegetables: Reduce the heat to medium-high. Add the remaining 1 tablespoon of vegetable oil to the pan. Add the minced garlic and diced white onion. Sauté for 2-3 minutes, stirring constantly, until the garlic becomes fragrant and lightly golden, and the onion softens and turns translucent. A sweet, pungent aroma will fill your kitchen. Add the diced carrot and thawed peas, continuing to cook for another 3-4 minutes until the carrots begin to soften slightly but still retain a bit of their bite and vibrant orange colour.
- Add and Crisp the Rice: Push the vegetables to one side of the pan. Add the cold day-old rice to the empty side, breaking up any clumps with your spatula. Drizzle 1 tablespoon of light soy sauce over the rice. Increase the heat to high and stir-fry the rice for 3-5 minutes, pressing it against the bottom of the pan occasionally to encourage crisping. You’ll hear a gentle crackling sound and see individual grains starting to separate and develop a slight golden hue.
- Incorporate Eggs and Chicken: Create a well in the centre of the rice mixture. Pour the lightly beaten eggs into the well. Scramble the eggs quickly with your spatula until they are just set and fluffy. Then, immediately mix them into the rice and vegetables. Fold in the seared chicken pieces, ensuring everything is well combined and evenly distributed throughout the pan. The colours will be vibrant – golden rice, bright green peas, orange carrots, and rich brown chicken.
- Final Seasoning and Garnish: Add the remaining 1 tablespoon of light soy sauce and the remaining 1 tablespoon of toasted sesame oil to the fried rice. Sprinkle with a pinch of white pepper. Stir everything together for another minute to ensure all the flavours are thoroughly incorporated and the dish is heated through. The rice should smell deeply savoury and aromatic. Serve immediately, garnished generously with fresh spring onion slices, adding a fresh, zesty finish to the dish.
Tips From My Kitchen
- Mastering the Rice: The foundation of exceptional fried rice is, undoubtedly, the rice itself. I always recommend using day-old, chilled rice that has been cooked slightly on the drier side. Why? Freshly cooked, warm rice holds too much moisture, which will steam in the pan rather than fry, resulting in a soggy, clumpy mess. Chilling the rice allows the grains to firm up and dry out, making them less likely to stick together and more prone to developing that glorious crispiness we’re aiming for. If you don’t have day-old rice, cook your rice, spread it thinly on a baking tray, and chill it in the fridge for at least an hour, or even 15-20 minutes in the freezer, to remove excess moisture.
- High Heat is Your Friend: Fried rice thrives on high heat. This is crucial for achieving that characteristic ‘wok hei’ – the smoky, complex flavour imparted by a very hot pan. Cooking on high heat allows the ingredients to sear quickly, caramelising their surfaces and preventing them from stewing. If your pan isn’t hot enough, ingredients will release moisture, lowering the temperature and leading to a less vibrant, less crispy result. Don’t be afraid to let your pan get very hot before adding ingredients, and ensure it recovers its heat between additions.
- Don’t Overcrowd the Pan: This is a common pitfall. When you add too many ingredients to the pan at once, the temperature drops dramatically. This prevents proper searing and leads to steaming, exactly what we want to avoid for crispy chicken and distinct rice grains. If you’re cooking for a larger group, it’s far better to cook the chicken in batches and even the rice in two batches if your pan isn’t exceptionally large. This ensures each component gets the high heat it needs to develop its best texture and flavour.
- The Magic of Cornflour: For the chicken, cornflour (cornstarch) plays a dual role. Firstly, it creates a light, protective coating that helps the chicken retain its moisture during high-heat cooking, ensuring it remains tender. Secondly, and perhaps more importantly for this recipe, it contributes to that irresistible crispy, slightly caramelised exterior on the chicken pieces. It’s a simple trick that makes a significant difference in the final texture of your protein.
- Layering Flavours: While it might seem like a single dish, truly great fried rice is built in layers. Marinating the chicken infuses flavour from the start. Sautéing aromatics like garlic and onion creates a fragrant base. Adding soy sauce at different stages (with the chicken, with the rice, and at the end) ensures the seasoning is evenly distributed and builds depth rather than just being a last-minute addition. The toasted sesame oil, added right at the end, provides a final aromatic flourish that can easily be lost if cooked for too long.
- Sensory Cues are Key: Pay attention to more than just the clock. The sound of sizzling, the aroma of garlic turning golden, the sight of chicken browning, the feel of rice drying out and separating – these are all indicators that your dish is progressing correctly. Trust your senses more than rigid timings, as stove heats and pan types can vary. When the garlic is fragrant and lightly golden, it’s ready. When the rice grains separate and start to crackle, they’re crisping up.
Equipment You’ll Need
- Large frying pan or skillet (a wok is ideal if you have one)
- Sharp knife and cutting board
- Mixing bowls
- Wooden spoon or spatula
Common Mistakes to Avoid
- Overcrowding the pan: As mentioned in my tips, this is a major culprit for soggy fried rice. When you add too many ingredients, the pan’s temperature drops, causing food to steam rather than fry. To avoid this, cook your chicken in batches, ensuring there’s enough space for each piece to brown, and if your pan is smaller, consider cooking the rice in two separate portions.
- Wrong temperature: Frying rice requires consistent high heat. If your heat is too low, your ingredients will release moisture, leading to a steamed, lifeless dish. Ensure your oil is shimmering and your pan is hot before adding anything, and allow the pan to regain its heat between additions of ingredients. Don’t be afraid of a good sizzle!
- Skipping the rest time (for chicken): While not explicitly in the main instructions, allowing your cooked chicken to rest for a few minutes after searing, before adding it back to the rice, is a good habit. This allows the juices to redistribute, resulting in more tender and succulent chicken pieces. Resting prevents the chicken from drying out and ensures a more pleasant eating experience.
Delicious Variations to Try
- Spicy Version: For those who love a bit of heat, you can easily turn up the spice. Add 1-2 teaspoons of finely minced fresh red chilli or a generous pinch of dried chilli flakes along with the garlic and onion. Alternatively, a drizzle of chilli oil at the very end when serving adds a fiery kick without altering the cooking process.
- Vegetarian/Vegan Option: This recipe adapts beautifully for plant-based diets. Simply omit the chicken and eggs. Instead, use firm tofu or tempeh, pressed and cubed, then pan-fried until golden and crispy. For the eggs, you can use a scrambled tofu scramble or a plant-based egg substitute. Increase the quantity of vegetables like mushrooms, bell peppers, or broccoli florets for extra texture and nutrition.
- Different Protein: If chicken isn’t what you fancy, feel free to swap it out. Prawns (shrimp) work wonderfully; add them after the vegetables and cook until pink and opaque. Thinly sliced beef or turkey can also be used, marinated and seared in the same manner as the chicken, providing a different but equally satisfying texture and flavour.
What to Serve With High-Protein Crispy Garlic Chicken Fried Rice
- A refreshing side of Spicy Cucumbers Recipe Asian Salad
- Steamed edamame with a sprinkle of sea salt
- A light, clear vegetable broth
- Crispy spring rolls with a dipping sauce
Frequently Asked Questions
High-Protein Crispy Garlic Chicken Fried Rice
Ingredients
Method
-
Marinate the Chicken: In a medium bowl, combine the cubed chicken with 2 tablespoons of light soy sauce and the cornflour. Toss until the chicken is evenly coated and the cornflour is absorbed. The chicken will appear slightly pasty and opaque, ready to absorb the flavours. Let this marinate at room temperature for at least 20-30 minutes while you prepare other ingredients.
-
Sear the Chicken: Heat 2 tablespoons of vegetable oil in a large frying pan or wok over high heat until it shimmers and a wisp of smoke appears. Add the marinated chicken in a single layer, ensuring not to overcrowd the pan. You should hear a vigorous sizzle as the chicken hits the hot oil. Cook for 3-4 minutes per side, turning with tongs or a spatula, until the chicken pieces are beautifully golden brown and crispy at the edges, and cooked through with no pink visible. Remove the chicken from the pan and set aside, leaving any residual oil and browned bits in the pan.
-
Sauté Aromatics and Vegetables: Reduce the heat to medium-high. Add the remaining 1 tablespoon of vegetable oil to the pan. Add the minced garlic and diced white onion. Sauté for 2-3 minutes, stirring constantly, until the garlic becomes fragrant and lightly golden, and the onion softens and turns translucent. A sweet, pungent aroma will fill your kitchen. Add the diced carrot and thawed peas, continuing to cook for another 3-4 minutes until the carrots begin to soften slightly but still retain a bit of their bite and vibrant orange colour.
-
Add and Crisp the Rice: Push the vegetables to one side of the pan. Add the cold day-old rice to the empty side, breaking up any clumps with your spatula. Drizzle 1 tablespoon of light soy sauce over the rice. Increase the heat to high and stir-fry the rice for 3-5 minutes, pressing it against the bottom of the pan occasionally to encourage crisping. You’ll hear a gentle crackling sound and see individual grains starting to separate and develop a slight golden hue.
-
Incorporate Eggs and Chicken: Create a well in the centre of the rice mixture. Pour the lightly beaten eggs into the well. Scramble the eggs quickly with your spatula until they are just set and fluffy. Then, immediately mix them into the rice and vegetables. Fold in the seared chicken pieces, ensuring everything is well combined and evenly distributed throughout the pan. The colours will be vibrant – golden rice, bright green peas, orange carrots, and rich brown chicken.
-
Final Seasoning and Garnish: Add the remaining 1 tablespoon of light soy sauce and the remaining 1 tablespoon of toasted sesame oil to the fried rice. Sprinkle with a pinch of white pepper. Stir everything together for another minute to ensure all the flavours are thoroughly incorporated and the dish is heated through. The rice should smell deeply savoury and aromatic. Serve immediately, garnished generously with fresh spring onion slices, adding a fresh, zesty finish to the dish.
Notes
I genuinely hope you enjoy creating this High-Protein Crispy Garlic Chicken Fried Rice as much as I do. It’s a recipe that truly delivers on flavour, texture, and satisfaction, making it a firm favourite in my home. Don’t hesitate to share your thoughts, tips, or any creative twists you try in the comments below – I always love hearing from you! Happy cooking!