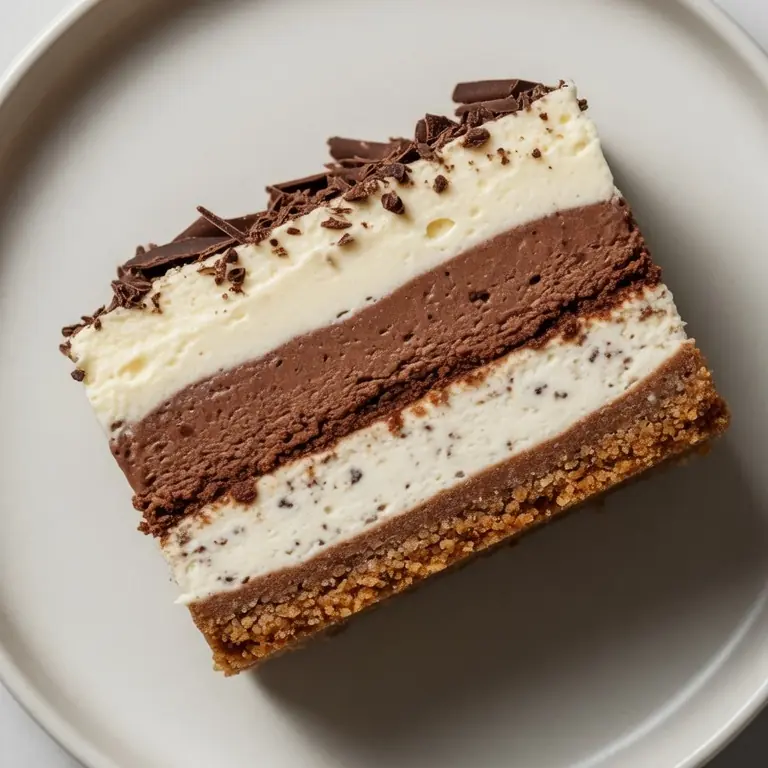
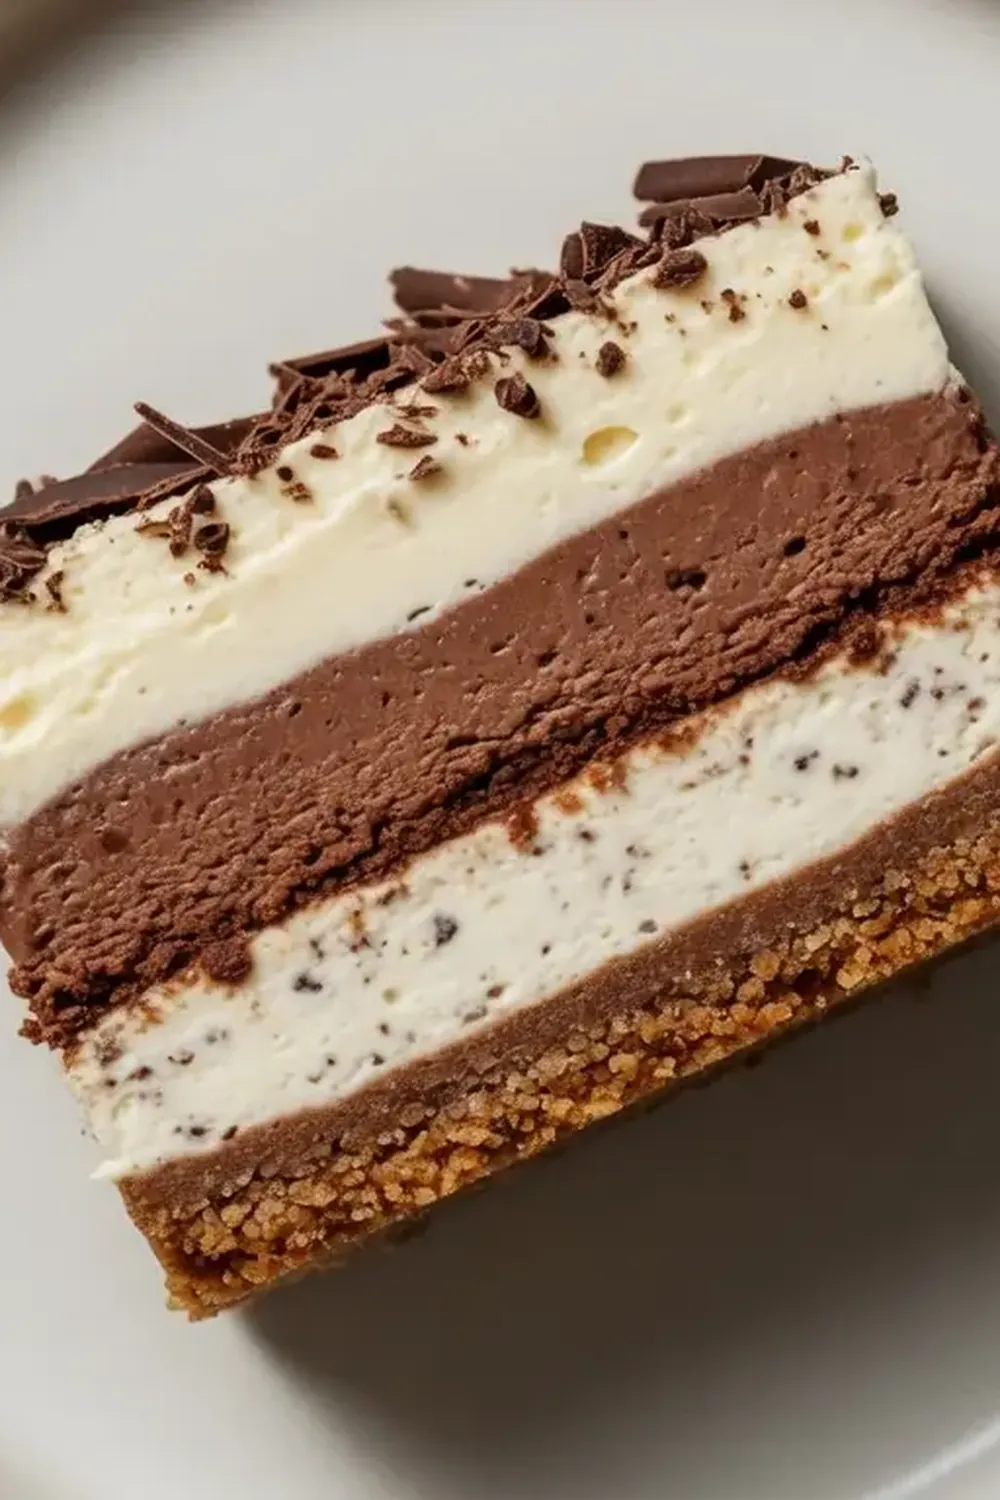
Sugar-Free Keto “Sex In A Pan” Layered Dessert
Welcome back to my kitchen, lovely readers! Today, we’re diving into a truly indulgent creation that proves healthy eating doesn’t mean sacrificing on decadence. Get ready to fall in love with my Sugar-Free Keto “Sex in a Pan” Layered Dessert – a show-stopping treat that perfectly marries rich flavours with a guilt-free profile, making it an absolute must-try for anyone looking to enjoy dessert without the sugar crash.
Recipe Overview
- Prep Time: 35 minutes
- Chill Time: 4-6 hours (or overnight)
- Total Time: 4 hours 35 minutes
- Servings: 10-12 slices
- Difficulty: Moderate
Why You’ll Love This Sugar-Free Keto “Sex in a Pan” Layered Dessert
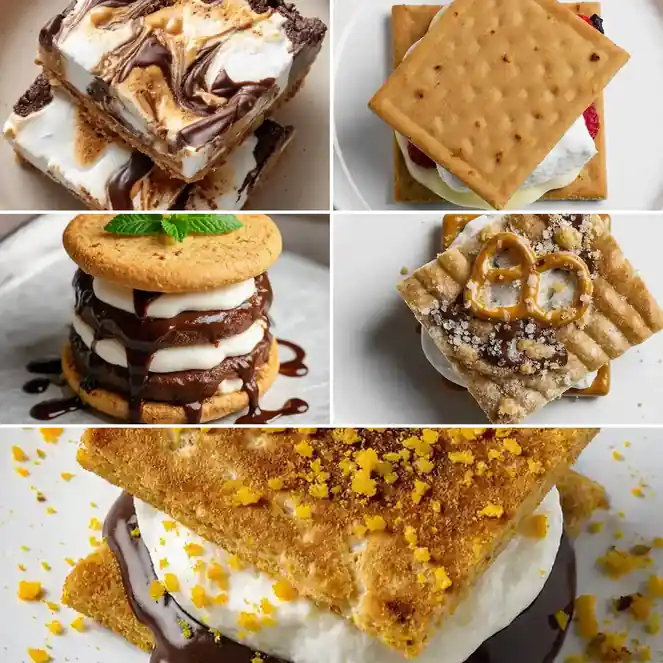
- Guilt-Free Indulgence: This dessert is crafted with carefully selected sugar substitutes and low-carb ingredients, allowing you to enjoy a rich, sweet treat without impacting your blood sugar levels or knocking you out of ketosis, much like you can with savory options from 12 Crispy Air Fryer Keto Recipes: Zucchini Fries & Parmesan Crisps. It’s truly a delicious way to satisfy your sweet cravings responsibly, much like a warm, individual serving of Gooey Air Fryer Brookies (Brownie & Cookie In A Ramekin) or even exploring 25 Easy Authentic Mexican Dessert Recipes: Flan for another delightful sweet treat.cookingenious.com/gooey-air-fryer-brookies-brownie-cookie-in-a-ramekin/”>Gooey Air Fryer Brookies (Brownie & Cookie In A Ramekin).
- Layers of Delightful Textures: From the crunchy almond flour crust to the silky cream cheese filling, the creamy chocolate pudding layer, and the light whipped topping, each forkful offers a symphony of textures that keeps every bite exciting and satisfying. It’s a culinary journey in itself.
- Impressive & Beautiful Presentation: With its distinct, beautifully defined layers, this dessert is an absolute stunner on any table. It looks far more complicated than it actually is to assemble, making it an ideal choice for special occasions or when you simply want to impress your guests.
- Customisable Flavours: While chocolate and vanilla are the stars here, the base recipe is incredibly versatile. You can easily adapt the flavours with different extracts, sugar-free syrups, or even a sprinkle of espresso powder to tailor it to your personal preferences.
- Make-Ahead Convenience: This dessert requires a good chilling period, making it an excellent option for preparing in advance. You can assemble it the day before your event, freeing up your time on the day itself and allowing the flavours to meld beautifully.
Ingredients You’ll Need
- For the Crust:
- 180g finely ground almond flour
- 60g unsalted butter, melted
- 2 tablespoons granulated erythritol or xylitol (ensure xylitol is kept away from pets)
- 1/2 teaspoon vanilla extract
- For the Cream Cheese Layer:
- 225g full-fat cream cheese, softened
- 120g unsalted butter, softened
- 120g powdered erythritol or xylitol
- 1 teaspoon vanilla extract
- 60ml heavy cream (double cream in the UK)
- For the Chocolate Pudding Layer:
- 120g sugar-free chocolate chips (keto-friendly)
- 60g unsweetened cocoa powder
- 500ml unsweetened almond milk
- 120g granulated erythritol or xylitol
- 2 large egg yolks
- 2 tablespoons gelatin powder (ensure it’s halal certified if required)
- 1 teaspoon vanilla extract
- Pinch of salt
- For the Whipped Topping:
- 480ml heavy cream (double cream in the UK), very cold
- 60g powdered erythritol or xylitol
- 1 teaspoon vanilla extract
- For Garnish (Optional):
- Sugar-free chocolate shavings or a dusting of cocoa powder
Tip: Always ensure your cream cheese and butter are properly softened for the cream cheese layer. This is absolutely crucial for achieving that wonderfully smooth, lump-free texture that makes this layer so delightful. Take them out of the fridge at least an hour before you plan to start baking.
How to Make Sugar-Free Keto “Sex in a Pan” Layered Dessert
- Prepare the Crust: Preheat your oven to 160°C (325°F). In a medium bowl, combine the almond flour, melted butter, granulated erythritol, and vanilla extract. Mix until the mixture resembles coarse, moist sand and comes together when pressed. Press this mixture evenly into the bottom of a 23x33cm (9×13-inch) baking dish. The crust should feel firm and look slightly golden around the edges after baking. Bake for 10-12 minutes, or until lightly golden brown. Once baked, remove from the oven and let it cool completely on a wire rack.
- Whip the Cream Cheese Layer: In a large mixing bowl, using an electric mixer, beat the softened cream cheese and softened butter together on medium speed until the mixture is light, fluffy, and a pale cream colour, about 2-3 minutes. Gradually add the powdered erythritol and vanilla extract, continuing to beat until fully incorporated and smooth. In a separate small bowl, whisk the 60ml of heavy cream until it forms soft peaks, then gently fold this into the cream cheese mixture until just combined. Spread this creamy, smooth layer evenly over the cooled crust. Place the dish in the refrigerator while you prepare the next layer.
- Make the Chocolate Pudding Layer: In a medium saucepan, whisk together the sugar-free chocolate chips, cocoa powder, almond milk, granulated erythritol, egg yolks, and a pinch of salt. Place the saucepan over medium-low heat, whisking continuously. In a small bowl, sprinkle the gelatin powder over 2 tablespoons of cold water and let it bloom for 5 minutes; it will become thick and jelly-like. Once the pudding mixture in the saucepan begins to thicken and coats the back of a spoon – it should be a rich, dark brown colour and noticeably denser – remove it from the heat. Stir in the bloomed gelatin and vanilla extract until completely dissolved and the pudding is glossy. Allow the pudding to cool for about 15-20 minutes, stirring occasionally, until it’s warm but not hot, and slightly more viscous.
- Assemble the Pudding Layer: Carefully pour the slightly cooled chocolate pudding mixture over the chilled cream cheese layer in the baking dish. Spread it gently with a spatula to ensure an even, smooth layer. The surface should look uniformly dark and inviting. Return the dish to the refrigerator for at least 2-3 hours, or until the chocolate pudding layer is fully set and firm to the touch. This step is crucial for distinct layers; rushing it will result in a messy dessert.
- Prepare the Whipped Topping: In a very cold large mixing bowl, add the very cold heavy cream, powdered erythritol, and vanilla extract. Using an electric mixer, beat on high speed until stiff peaks form. The cream will transform from a liquid to a thick, snowy white cloud that holds its shape beautifully. Be careful not to overbeat, or it will become grainy.
- Final Assembly and Chill: Spread the whipped topping evenly over the set chocolate pudding layer. For a decorative touch, you can create swirls or peaks using the back of a spoon. If desired, sprinkle with sugar-free chocolate shavings or a dusting of cocoa powder. Cover the dish loosely with cling film and refrigerate for a minimum of 4-6 hours, or ideally overnight, to allow all the layers to firm up and the flavours to meld beautifully. When ready to serve, the dessert should feel solid and stable, making clean slices effortless.
Tips From My Kitchen
- Ensure Ingredients are at the Right Temperature: This might sound obvious, but it makes a world of difference, particularly for the cream cheese layer. Softened cream cheese and butter blend seamlessly, creating a velvety smooth texture without any lumps. If they’re too cold, you’ll end up with a clumpy mixture that won’t spread beautifully. I used to struggle with this dish until I discovered this technique of letting them sit out for at least an hour or two. For the whipped cream, however, the colder the better! Cold cream whips up faster and holds its shape longer.
- Don’t Skimp on Chilling Time: This dessert is all about distinct, firm layers, and proper chilling is the secret to achieving that. Rushing the chilling process between layers, especially for the chocolate pudding, will lead to layers bleeding into each other and a less appealing, softer consistency overall. Think of it as a patient art; each layer needs its time to set firm before the next is added. This patience ensures clean, beautiful slices.
- Bloom Your Gelatin Properly: Gelatin is what gives our chocolate pudding its structure. To use it effectively, always sprinkle it over cold liquid (in this case, water) and let it sit for 5 minutes. This process, called blooming, allows the gelatin granules to absorb water and swell, preventing lumps when you add it to your warm pudding mixture. If you add unbloomed gelatin directly to a hot liquid, it might not dissolve evenly and could result in a gritty texture.
- Taste and Adjust Sweetness: Palates vary, especially when using sugar substitutes. While my recipe provides a balanced sweetness level, I always recommend tasting the cream cheese and pudding mixtures before they set. You can carefully add a little more powdered or granulated erythritol if you prefer it sweeter. Remember, it’s easier to add more than to take away!
- Use Fine Almond Flour for the Crust: The quality of your almond flour directly impacts the crust’s texture. Opt for finely ground almond flour, sometimes labelled ‘blanched almond flour,’ as it creates a much smoother, more uniform, and less crumbly crust compared to coarser almond meal. A finer grind ensures a delicate crunch rather than a grainy one, providing the perfect base for our decadent layers.
Common Mistakes to Avoid
- Overcrowding the pan: While not a typical “overcrowding” issue like with baking, using a pan that is too small for this recipe can lead to overly thick layers that are difficult to set and slice neatly. Conversely, a pan that is too large might result in layers that are too thin, losing the satisfying textural contrast. Stick to the specified 23x33cm (9×13-inch) dish to ensure optimal layer thickness and even chilling.
- Wrong temperature for ingredients: This is particularly crucial for the cream cheese and butter. Using cold cream cheese and butter will make your cream cheese layer lumpy and difficult to spread smoothly. For the whipped topping, however, very cold heavy cream is essential for achieving stiff peaks. Always pay attention to the temperature recommendations for each ingredient to ensure successful results.
- Skipping the rest time: The various chilling and rest times throughout this recipe are not optional; they are vital for the structure and stability of the layered dessert. Skipping these steps, especially the final overnight chill, will result in a dessert that is too soft, messy, and difficult to cut into clean slices. Allowing the dessert to fully set ensures each layer is firm and distinct, making for a much more enjoyable experience.
Delicious Variations to Try
- Mint Chocolate Version: For a refreshing twist, add 1/2 teaspoon of sugar-free peppermint extract to the chocolate pudding layer. You could also sprinkle some finely chopped sugar-free mint chocolate chips over the whipped topping for an extra burst of minty flavour and texture.
- Nut-Free Option: If you have nut allergies, you can substitute the almond flour in the crust with finely ground sunflower seed meal (sunflower seeds processed into a flour-like consistency). Ensure you also use a nut-free milk alternative like coconut milk (from a carton, not canned) or oat milk for the pudding layer.
- Coffee Infusion: Add 1-2 teaspoons of instant espresso powder (sugar-free) to the chocolate pudding layer for a rich mocha flavour. This deepens the chocolate notes beautifully. Alternatively, you could lightly brush the cooled crust with a little cooled, strong brewed coffee before adding the cream cheese layer.
What to Serve With Sugar-Free Keto “Sex in a Pan” Layered Dessert
- A cup of freshly brewed black coffee or a delicate herbal tea.
- A small handful of fresh, lightly sweetened berries like raspberries or strawberries.
- A dollop of extra sugar-free whipped cream, if you’re feeling extra indulgent.
- A sprinkle of finely chopped toasted pecans or walnuts for added crunch.
Frequently Asked Questions
Sugar-Free Keto “Sex in a Pan” Layered Dessert
Ingredients
Method
-
Prepare the Crust: Preheat your oven to 160°C (325°F). In a medium bowl, combine the almond flour, melted butter, granulated erythritol, and vanilla extract. Mix until the mixture resembles coarse, moist sand and comes together when pressed. Press this mixture evenly into the bottom of a 23x33cm (9×13-inch) baking dish. The crust should feel firm and look slightly golden around the edges after baking. Bake for 10-12 minutes, or until lightly golden brown. Once baked, remove from the oven and let it cool completely on a wire rack.
-
Whip the Cream Cheese Layer: In a large mixing bowl, using an electric mixer, beat the softened cream cheese and softened butter together on medium speed until the mixture is light, fluffy, and a pale cream colour, about 2-3 minutes. Gradually add the powdered erythritol and vanilla extract, continuing to beat until fully incorporated and smooth. In a separate small bowl, whisk the 60ml of heavy cream until it forms soft peaks, then gently fold this into the cream cheese mixture until just combined. Spread this creamy, smooth layer evenly over the cooled crust. Place the dish in the refrigerator while you prepare the next layer.
-
Make the Chocolate Pudding Layer: In a medium saucepan, whisk together the sugar-free chocolate chips, cocoa powder, almond milk, granulated erythritol, egg yolks, and a pinch of salt. Place the saucepan over medium-low heat, whisking continuously. In a small bowl, sprinkle the gelatin powder over 2 tablespoons of cold water and let it bloom for 5 minutes; it will become thick and jelly-like. Once the pudding mixture in the saucepan begins to thicken and coats the back of a spoon – it should be a rich, dark brown colour and noticeably denser – remove it from the heat. Stir in the bloomed gelatin and vanilla extract until completely dissolved and the pudding is glossy. Allow the pudding to cool for about 15-20 minutes, stirring occasionally, until it’s warm but not hot, and slightly more viscous.
-
Assemble the Pudding Layer: Carefully pour the slightly cooled chocolate pudding mixture over the chilled cream cheese layer in the baking dish. Spread it gently with a spatula to ensure an even, smooth layer. The surface should look uniformly dark and inviting. Return the dish to the refrigerator for at least 2-3 hours, or until the chocolate pudding layer is fully set and firm to the touch. This step is crucial for distinct layers; rushing it will result in a messy dessert.
-
Prepare the Whipped Topping: In a very cold large mixing bowl, add the very cold heavy cream, powdered erythritol, and vanilla extract. Using an electric mixer, beat on high speed until stiff peaks form. The cream will transform from a liquid to a thick, snowy white cloud that holds its shape beautifully. Be careful not to overbeat, or it will become grainy.
-
Final Assembly and Chill: Spread the whipped topping evenly over the set chocolate pudding layer. For a decorative touch, you can create swirls or peaks using the back of a spoon. If desired, sprinkle with sugar-free chocolate shavings or a dusting of cocoa powder. Cover the dish loosely with cling film and refrigerate for a minimum of 4-6 hours, or ideally overnight, to allow all the layers to firm up and the flavours to meld beautifully. When ready to serve, the dessert should feel solid and stable, making clean slices effortless.
Notes
There you have it, a truly magnificent Sugar-Free Keto “Sex in a Pan” Layered Dessert that promises to satisfy every craving without the sugar guilt. My husband, who’s usually picky, asked for seconds! I genuinely hope you enjoy creating and, more importantly, devouring this sensational treat. Please do let me know in the comments below if you tried it and what you thought – I love hearing from you! Happy baking, everyone!