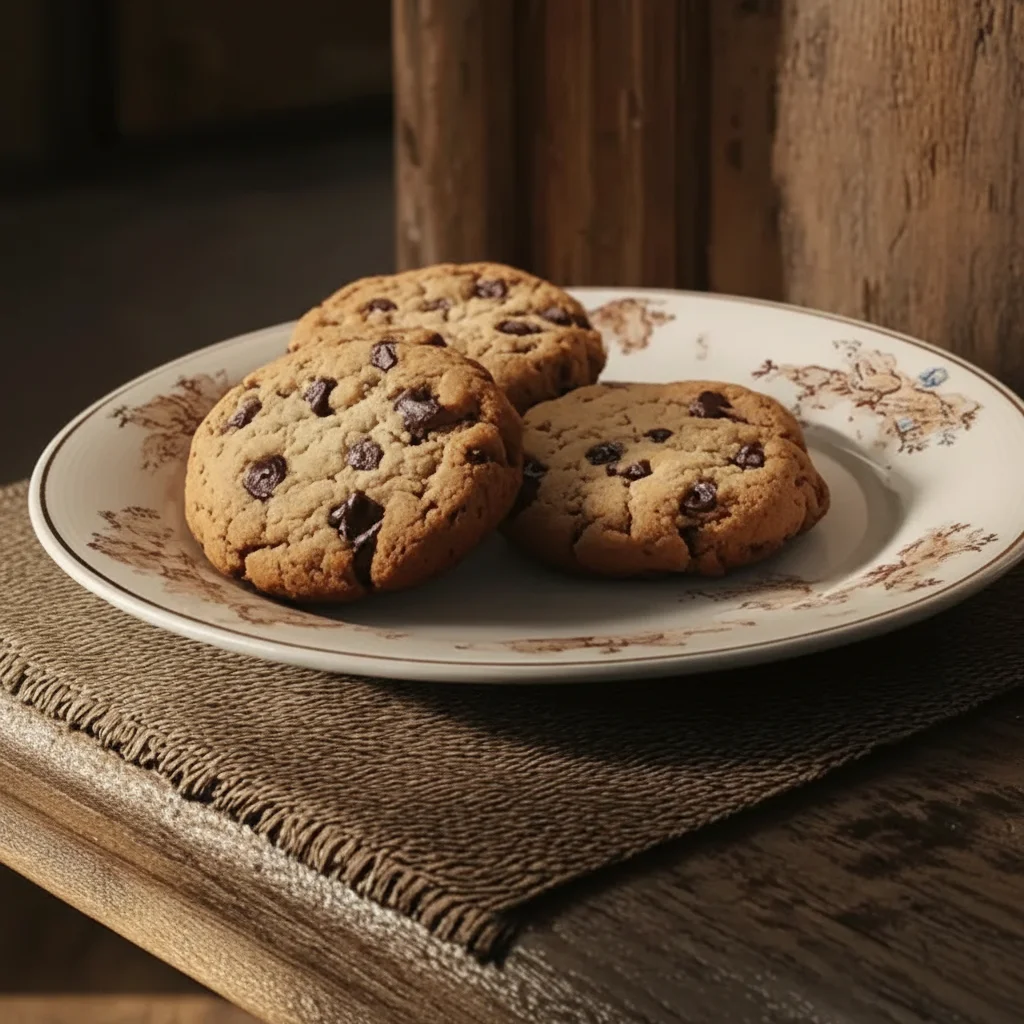
Festive Lucky Treat Cookies
There’s a special kind of magic that happens in the kitchen when you’re baking for an occasion. The scent of butter and sugar melting together, the quiet hum of the oven, and the anticipation of sharing something you’ve made with love. That’s the feeling I get every time I make these Lucky Treat Cookies. They’re more than just a baking treat; they are little tokens of good fortune, ideal for sharing when someone needs a bit of encouragement or for celebrating a festive moment. This is my go-to recipe when I need something that looks impressive but is genuinely straightforward to prepare.
What makes these cookies stand out is their wonderfully crisp, shortbread-like texture that practically melts in your mouth. We achieve this with a precise butter-to-flour ratio and a hint of cornflour, our little secret for that signature ‘snap’. The flavour is a delicate balance of rich, creamy butter, sweet vanilla, and a whisper of cool peppermint that lingers pleasantly on the palate. Topped with a simple, sweet icing and a scattering of festive sprinkles, they look as good as they taste.
This cookie recipe is brilliant for St. Patrick’s Day, but we also make them for friends sitting exams or starting new jobs. They’re a lovely way to say “I’m thinking of you and wishing you the best.” Children adore getting involved with the decorating, and the dough itself is very forgiving for little hands. If you’re looking for a reliable, delightful, and charmingly festive cookie, you’ve certainly found it.
Recipe Overview
These Lucky Treat Cookies are a delightful vanilla-mint shortbread biscuit with a crisp, buttery bite. The dough comes together smoothly, bakes to a pale golden hue without spreading, and provides the perfect canvas for simple icing and your favourite sprinkles. After testing this recipe five times, I finally got the peppermint balance just right—it’s present enough to be refreshing but doesn’t overwhelm the buttery flavour of the cookie itself.
- Prep Time: 20 minutes (plus 30 minutes chilling)
- Cook Time: 12-15 minutes
- Total Time: 1 hour 5 minutes
- Servings: Makes approximately 24 cookies
- Difficulty: Easy
Why You’ll Love This Lucky Treat Cookies Recipe
- Subtle, Buttery Flavour: We use real, unsalted butter which gives these cookies a rich, authentic taste. The vanilla is warm and comforting, while the hint of peppermint extract adds a clean, fresh finish that makes them feel special.
- Ready to Decorate in Under an Hour: From starting the dough to having cooled cookies ready for icing, the entire process takes just over an hour. It’s a very manageable project for a weekend afternoon.
- A Truly Flexible Recipe: Not a fan of mint? Simply swap it for almond or lemon extract. You can use any cookie cutter shape you like and change the sprinkle colours to suit any holiday, from Christmas to Easter.
- Works Wonderfully for Gifting: These cookies are sturdy enough to be packed into cellophane bags or tins, making them ideal for school bake sales, party favours, or as a thoughtful homemade gift. They always get compliments.
- Family Tested and Approved: My two children have declared these their favourite for decorating. The dough is easy for them to roll and cut, and they love being in charge of the sprinkles! It’s a fantastic way to spend time together.
Ingredients You’ll Need
For the best results, we’ll be using simple, high-quality ingredients. The star is the butter, so I always recommend using a good quality unsalted block butter, such as Lurpak or a supermarket’s own premium version. It makes a noticeable difference to the final texture and flavour.
- 250g unsalted butter, softened to room temperature
- 140g caster sugar
- 1 large egg yolk
- 1 tsp vanilla extract
- 1/4 tsp peppermint extract
- 300g plain flour, plus extra for dusting
- 50g cornflour
- A pinch of salt
- For the Icing:
- 200g icing sugar, sifted
- 3-4 tbsp milk or water
- A few drops of green food colouring (optional)
- Festive sprinkles, to decorate
Ashley’s Tip: Make sure your butter is properly at room temperature. It should be soft enough to indent with your finger but not greasy or melting. This is crucial for the creaming process, which creates the light texture of the cookies.
How to Make Lucky Treat Cookies
The method for making these festive cookies is quite straightforward. We start by creaming the butter and sugar to create a light, airy base, then carefully mix in the dry ingredients before chilling the dough—a vital step for perfect, sharp-edged cookies.
- Cream the Butter and Sugar: In a large bowl using a stand mixer or an electric hand mixer, beat the 250g of softened butter and 140g of caster sugar together on medium speed for about 3-4 minutes. The mixture should become pale, light, and fluffy. Scrape down the sides of the bowl halfway through.
- Add Wet Ingredients: Add the egg yolk, 1 tsp vanilla extract, and 1/4 tsp peppermint extract. Beat again for another minute until everything is well combined.
- Combine Dry Ingredients: In a separate bowl, whisk together the 300g plain flour, 50g cornflour, and a pinch of salt. This helps distribute everything evenly.
- Form the Dough: Gradually add the dry ingredients to the wet mixture in three additions, mixing on a low speed until just combined. Be careful not to overmix. The dough will look a bit crumbly at first. Use your hands to bring it together into a smooth ball.
- Chill the Dough: Flatten the dough into a disc, wrap it tightly in cling film, and place it in the refrigerator to chill for at least 30 minutes. This step is essential to prevent the cookies from spreading while baking.
- Roll and Cut: Preheat your oven to 180°C (160°C fan) and line two large baking trays with parchment paper. Lightly flour your work surface and rolling pin. Roll the chilled dough out to a thickness of about 5mm (the thickness of a £1 coin). Use a shamrock or round cookie cutter to cut out your shapes, placing them on the prepared trays with a little space between each one.
- Bake the Cookies: Bake for 12-15 minutes, or until the edges are just beginning to turn a very pale golden colour. I find that they are ready when the surface looks matte and dry. They will still be soft when you take them out but will firm up as they cool.
- Cool Completely: Let the cookies cool on the baking trays for 5 minutes before carefully transferring them to a wire rack to cool completely. They must be totally cool before you attempt to ice them.
- Prepare the Icing: Sift the 200g of icing sugar into a bowl. Add 3 tablespoons of milk and mix until smooth. If it’s too thick, add a little more milk, one teaspoon at a time, until you have a smooth, spreadable consistency. If you’re using it, stir in a few drops of green food colouring.
- Decorate: Once the cookies are cool, you can either dip the tops into the icing or use a small spoon to spread it over them. Immediately add your sprinkles before the icing sets. Let them sit at room temperature for about an hour for the icing to harden completely.
Tips From My Kitchen
- Mind Your Butter Temperature: Using butter that is too soft or melted will result in greasy cookies that spread too much in the oven. Properly softened, room temperature butter is key to the perfect texture.
- The Double-Chill Secret: I learned that for exceptionally sharp edges, you can perform a second chill. After cutting your cookies and placing them on the baking tray, pop the entire tray into the fridge for 10 minutes before baking. This solidifies the butter again, guaranteeing minimal spread.
- Make-Ahead Dough: The cookie dough can be made up to 3 days in advance and kept well-wrapped in the fridge. You can also freeze the dough disc for up to 3 months. Just thaw it in the fridge overnight before rolling.
- Storing Your Cookies: Once the icing is fully set, store the cookies in an airtight container at room temperature. They will stay fresh and crisp for up to 5 days.
Equipment You’ll Need
- Stand mixer or electric hand mixer
- Large baking trays
- Parchment paper
- Wire cooling rack
- Rolling pin
- Cookie cutters (e.g., shamrock or round)
Common Mistakes to Avoid
- Overcrowding the Baking Tray: Always leave at least an inch of space between cookies. Even with chilling, they will expand slightly. Overcrowding traps steam and can cause the cookies to bake unevenly. Bake in batches if you need to.
- Baking at the Wrong Temperature: An oven that’s too hot will brown the edges before the centre is cooked. An oven that’s too cool will cause the butter to melt slowly, leading to more spread. An oven thermometer is a baker’s best friend!
- Skipping the Chilling Time: I know it’s tempting to rush, but chilling the dough is non-negotiable for this recipe. It solidifies the fat, which is what prevents the cookies from turning into thin, crispy puddles in the oven.
Delicious Variations to Try
One of the best things about this cookie recipe is how easily it can be adapted. If you’re looking for a change, here are a few ideas that we love in my house.
- Chocolate Mint Cookies: Add 2 tablespoons of high-quality, unsweetened cocoa powder to the dry ingredients and a handful of finely chopped dark chocolate or mini chocolate chips to the dough at the very end.
- Citrus Twist: Omit the peppermint extract and add the finely grated zest of one large lemon or orange to the butter and sugar mixture. It creates a wonderfully fresh, zesty cookie that’s lovely in the spring.
- Spiced Cookies: For a warmer flavour profile, especially around autumn, omit the mint and add 1 tsp of mixed spice or cinnamon to the flour. This version is a fantastic base for decorating with autumnal colours, just like you might for a Rose Gold Cake Recipe Elegant Dessert.
–
–
What to Serve With Lucky Treat Cookies
These festive cookies are delightful on their own, but they also pair beautifully with a few simple accompaniments.
- A Glass of Cold Milk: The classic pairing for a reason! The creaminess of the milk is a perfect counterpoint to the crisp, sweet cookie.
- Hot Chocolate or Tea: For a cosy afternoon baking treat, nothing beats a cup of tea or a rich hot chocolate.
- An Iced Coffee: On a warmer day, these cookies are fantastic alongside a refreshing Instant Coffee Iced Coffee Recipe Brew for a mid-afternoon pick-me-up.
Frequently Asked Questions
Lucky Treat Cookies
Ingredients
Method
- Cream the Butter and Sugar: In a large bowl using a stand mixer or an electric hand mixer, beat the 250g of softened butter and 140g of caster sugar together on medium speed for about 3-4 minutes. The mixture should become pale, light, and fluffy. Scrape down the sides of the bowl halfway through.
- Add Wet Ingredients: Add the egg yolk, 1 tsp vanilla extract, and 1/4 tsp peppermint extract. Beat again for another minute until everything is well combined.
- Combine Dry Ingredients: In a separate bowl, whisk together the 300g plain flour, 50g cornflour, and a pinch of salt. This helps distribute everything evenly.
- Form the Dough: Gradually add the dry ingredients to the wet mixture in three additions, mixing on a low speed until just combined. Be careful not to overmix. The dough will look a bit crumbly at first. Use your hands to bring it together into a smooth ball.
- Chill the Dough: Flatten the dough into a disc, wrap it tightly in cling film, and place it in the refrigerator to chill for at least 30 minutes. This step is essential to prevent the cookies from spreading while baking.
- Roll and Cut: Preheat your oven to 180°C (160°C fan) and line two large baking trays with parchment paper. Lightly flour your work surface and rolling pin. Roll the chilled dough out to a thickness of about 5mm (the thickness of a £1 coin). Use a shamrock or round cookie cutter to cut out your shapes, placing them on the prepared trays with a little space between each one.
- Bake the Cookies: Bake for 12-15 minutes, or until the edges are just beginning to turn a very pale golden colour. I find that they are ready when the surface looks matte and dry. They will still be soft when you take them out but will firm up as they cool.
- Cool Completely: Let the cookies cool on the baking trays for 5 minutes before carefully transferring them to a wire rack to cool completely. They must be totally cool before you attempt to ice them.
- Prepare the Icing: Sift the 200g of icing sugar into a bowl. Add 3 tablespoons of milk and mix until smooth. If it's too thick, add a little more milk, one teaspoon at a time, until you have a smooth, spreadable consistency. If you're using it, stir in a few drops of green food colouring.
- Decorate: Once the cookies are cool, you can either dip the tops into the icing or use a small spoon to spread it over them. Immediately add your sprinkles before the icing sets. Let them sit at room temperature for about an hour for the icing to harden completely.
Notes
I truly hope you enjoy making these Lucky Treat Cookies as much as my family and I do. They are a simple joy to bake and an even greater joy to share. There’s nothing better than seeing someone’s face light up when you give them a little homemade treat. If you try this cookie recipe, please let me know how it turned out in the comments below. Happy baking!
– Ashley