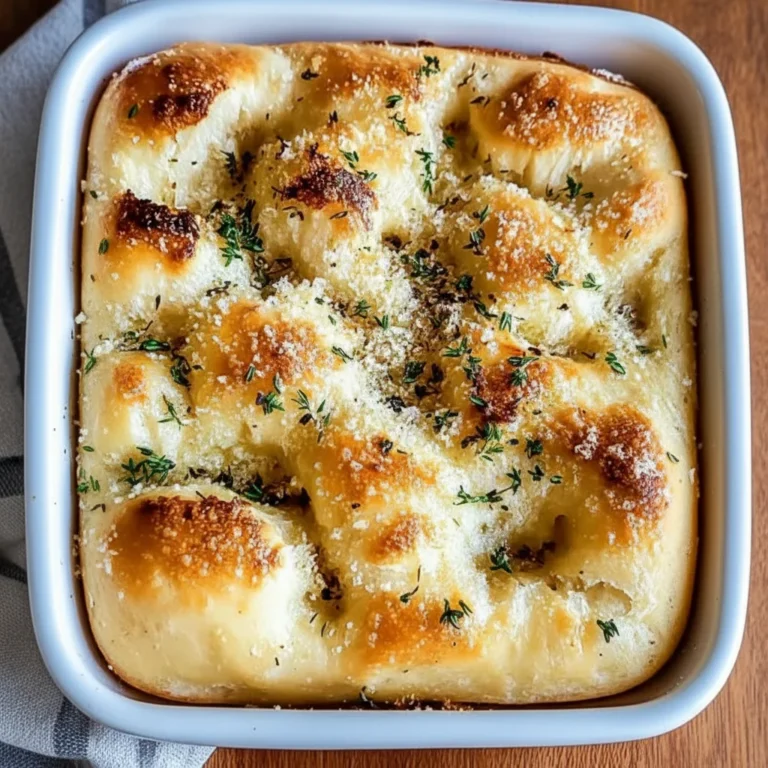
Garlic Parmesan Cheeseburger Bombs

There are some recipes that just feel like a celebration, and these Garlic Parmesan Cheeseburger Bombs are exactly that. Imagine all the satisfying, savoury goodness of a classic cheeseburger—the seasoned beef mince, the gloriously melty cheddar—all wrapped up in a soft, pillowy dough parcel. Then, just to take things to a whole new level, we brush them with a garlic and parmesan butter that bakes into an irresistible golden crust. This is my go-to recipe when I need something that feels special but comes together without a fuss.
The first time I made these, it was for a casual Saturday film night with the family. I wanted something more exciting than popcorn, a handheld treat that felt indulgent and fun. The result was these incredible burger bites, which disappeared from the plate in minutes. They deliver all the robust flavour of a burger but in a format that’s brilliant for sharing. We’re talking about a bite-sized appetizer that always gets compliments and requests for the recipe.
These cheeseburger bombs are ideal for game day gatherings, kids’ parties, or simply when you fancy a dinner that’s a little bit different. They transform simple ingredients into something genuinely impressive, proving that you don’t need complex techniques to create food that makes people happy. If you enjoy stuffed dough recipes, you might also like my take on Stuffed Peppers With Rice, which is another family favourite.
Recipe Overview
These Garlic Parmesan Cheeseburger Bombs are essentially miniature cheeseburgers baked inside a soft dough shell. The filling is a rich, savoury mixture of beef mince seasoned with classic burger flavours like mustard and Worcestershire sauce, with a pocket of melted cheddar cheese in the centre. The exterior is brushed with a fragrant garlic and parmesan butter, giving it a golden, slightly crisp finish. After testing this recipe five times, I finally got it just right—the key is ensuring the filling has cooled and the dough is sealed tightly to prevent any leaks.
- Prep Time: 20 minutes
- Cook Time: 15 minutes
- Total Time: 35 minutes
- Servings: Makes 16 bombs (serves 4-6)
- Difficulty: Easy
Why You’ll Love This Garlic Parmesan Cheeseburger Bombs Recipe
- Intensely Savoury Flavour: The combination of well-seasoned beef mince, sharp mature cheddar, and the rich, umami-packed garlic parmesan butter creates a deeply satisfying taste in every single bite.
- Ready in About 35 Minutes: From browning the mince to pulling these golden beauties from the oven, the entire process is straightforward and fits easily into a busy evening.
- A Truly Flexible Recipe: You can easily adapt the filling to your taste. Add some finely chopped bacon for a smoky note, diced jalapeños for a kick of heat, or swap the cheddar for spicy Monterey Jack.
- Great for Social Gatherings: These burger bites are wonderful for feeding a group. They’re easy to eat, require no cutlery, and are always a talking point at parties or family get-togethers.
- Family Tested and Approved: My entire family adores these. The kids love the surprise cheese centre, and they are one of the few things that everyone agrees on for dinner!

Ingredients You’ll Need
For this recipe, we rely on a few pantry staples and some good-quality fresh ingredients. I always opt for 20% fat beef mince, as the fat provides essential flavour and moisture to the filling. For the dough, a tube of ready-made refrigerated biscuit or scone dough (like the ones from Jus-Rol) is a fantastic time-saver and works beautifully here.
- 500g beef mince (20% fat is best)
- 1 medium onion, finely chopped
- 2 cloves garlic, minced, plus 2 more for the topping
- 1 tbsp Worcestershire sauce
- 2 tbsp tomato ketchup
- 1 tsp American mustard
- 1/2 tsp salt
- 1/4 tsp black pepper
- 150g mature cheddar cheese, cut into 16 small cubes
- 1 tube (approx. 460g) ready-made refrigerated scone or biscuit dough
- 60g unsalted butter, melted
- 30g Parmesan cheese, finely grated
- 1 tbsp fresh parsley, chopped
- 1 tsp sesame seeds (optional)
Ashley’s Tip: Don’t be tempted to use pre-grated cheese. Cubing a block of good-quality mature cheddar ensures you get that wonderful, distinct pocket of gloriously melty cheese in the centre of each bomb, which you just don’t get with shredded varieties.
How to Make Garlic Parmesan Cheeseburger Bombs
The process for making these cheeseburger bombs is quite methodical and simple to follow. The most important part is allowing the filling to cool a little and ensuring you get a good seal on the dough to keep all that deliciousness inside while it bakes.
- Preheat and Prepare: First things first, preheat your oven to 190°C (170°C fan). Line a large baking tray with parchment paper to prevent sticking.
- Cook the Filling: Heat a large frying pan over medium-high heat. Add the beef mince and chopped onion, breaking the mince up with a spoon. Cook for 5-7 minutes, until the mince is browned and the onion has softened. For the best flavour, you want to get a nice brown crust on the meat, a process explained well in this guide to browning mince.
- Drain and Season: Carefully drain off any excess fat from the pan. Return it to the heat and stir in 2 minced garlic cloves, the Worcestershire sauce, ketchup, mustard, salt, and pepper. Cook for another minute until fragrant. Remove from the heat and set aside to cool for at least 10 minutes. According to the Food Standards Agency, cooling cooked food promptly is key for safety.
- Prepare the Dough: While the filling cools, open the tube of dough and separate the individual biscuits. Gently flatten each one with your palm to create a circle about 8-10cm in diameter.
- Assemble the Bombs: Place a generous spoonful (about 1.5 tablespoons) of the cooled beef mixture into the centre of a dough circle. Press one cube of cheddar cheese into the middle of the filling.
- Seal Securely: This is the crucial step! Carefully pull the edges of the dough up and over the filling, pinching them together firmly at the top to create a sealed ball. What works best for me is rolling it gently in my palms to smooth the seam. Place the bomb seam-side down on your prepared baking tray. Repeat with the remaining dough and filling.
- Prepare the Topping: In a small bowl, mix together the melted butter, the remaining 2 minced garlic cloves, and the grated Parmesan cheese.
- Bake to Golden Perfection: Brush the tops and sides of each bomb with about half of the garlic parmesan butter mixture. Bake for 12-15 minutes, or until they are a deep golden brown and cooked through.
- Final Touches: As soon as they come out of the oven, brush the hot bombs with the remaining garlic parmesan butter. Garnish with a sprinkle of fresh parsley and sesame seeds, if using. Let them rest for 5 minutes before serving, as the cheese inside will be molten hot.
Tips From My Kitchen
- Temperature Control is Key: It’s vital to let the beef filling cool down before you start assembling. If the filling is too hot, it will warm up the dough, making it sticky and very difficult to seal properly. A mere 10 minutes on the side is usually enough.
- The Secret to a Perfect Crust: The double-brushing technique is a game-changer. I learned that brushing the bombs with the garlic butter *before* they go into the oven helps them brown beautifully, while a second brush as soon as they come out allows them to soak up even more of that delicious, savoury flavour.
- Make-Ahead Magic: You can prepare the beef filling up to two days in advance and keep it in an airtight container in the fridge. This makes assembly on the day you want to serve them much quicker. You can also fully assemble the bombs, cover them, and refrigerate for up to 4 hours before baking.
- Storing and Reheating: Leftovers can be stored in an airtight container in the fridge for up to 3 days. To reheat, I recommend popping them in the oven or an air fryer at 180°C for 5-8 minutes until warmed through. This brings back the slight crispness of the exterior much better than a microwave.
Equipment You’ll Need
You don’t need any fancy gadgets for this recipe, just some basic kitchen essentials.
- Large frying pan or skillet
- Baking tray
- Parchment paper
- Mixing bowls
- Pastry brush
- Wooden spoon or spatula
Common Mistakes to Avoid
- Overcrowding the Pan: When you’re browning the mince, make sure it has enough space in the pan. If the pan is too crowded, the mince will steam instead of browning, which results in a greyish colour and less flavour. If your pan isn’t large enough, it’s better to brown the meat in two batches.
- An Oven That’s Not Hot Enough: A properly preheated oven is essential. If the temperature is too low, the dough won’t rise properly and will end up pale and slightly doughy inside. Use an oven thermometer if you’re unsure about your oven’s accuracy.
- Overfilling the Bombs: It’s tempting to pack in as much filling as possible, but this is the main cause of leaks. A generous spoonful is plenty. If you overfill, you won’t be able to get a secure seal, and the cheese will ooze out during baking.
Delicious Variations to Try
One of the best things about this recipe is how easy it is to customise. Here are a few ideas to get you started:
- Spicy Cheeseburger Bombs: Add half a teaspoon of red pepper flakes or some finely chopped fresh jalapeños to the beef mixture along with the garlic for a fiery kick.
- Bacon Cheeseburger Bombs: Cook 4-5 strips of streaky bacon until crisp, crumble them, and stir them into the beef filling before assembling.
- Vegetarian ‘Cheeseburger’ Bombs: Swap the beef mince for a plant-based alternative like Quorn or lentils. Just ensure you use a vegetarian-friendly Worcestershire sauce, as the traditional version contains anchovies.
- Different Proteins: For a leaner option, this recipe works very well with turkey or chicken mince. Just be sure to season it well.
What to Serve With Garlic Parmesan Cheeseburger Bombs
While these are fantastic on their own, they also pair wonderfully with a few simple sides to make a more complete meal.
- Dipping Sauces: A classic burger sauce (a mix of mayo, ketchup, and relish) is a natural fit. For something a bit different, the coolness of my Authentic Tzatziki Sauce provides a lovely, fresh contrast.
- Simple Salad: A crisp green salad with a sharp vinaigrette helps to cut through the richness of the bombs.
- Coleslaw: A creamy, crunchy coleslaw is a classic burger companion and works just as well here.
- Drink Pairing: A cold, crisp lager or a hoppy pale ale complements the savoury flavours perfectly. For the kids, a fun and creamy Creamy Peanut Butter Smoothie would make for an extra special treat.
Frequently Asked Questions
Garlic Parmesan Cheeseburger Bombs
Ingredients
Method
- Preheat and Prepare: First things first, preheat your oven to 190°C (170°C fan). Line a large baking tray with parchment paper to prevent sticking.
- Cook the Filling: Heat a large frying pan over medium-high heat. Add the beef mince and chopped onion, breaking the mince up with a spoon. Cook for 5-7 minutes, until the mince is browned and the onion has softened. For the best flavour, you want to get a nice brown crust on the meat, a process explained well in this guide to browning mince.
- Drain and Season: Carefully drain off any excess fat from the pan. Return it to the heat and stir in 2 minced garlic cloves, the Worcestershire sauce, ketchup, mustard, salt, and pepper. Cook for another minute until fragrant. Remove from the heat and set aside to cool for at least 10 minutes. According to the Food Standards Agency, cooling cooked food promptly is key for safety.
- Prepare the Dough: While the filling cools, open the tube of dough and separate the individual biscuits. Gently flatten each one with your palm to create a circle about 8-10cm in diameter.
- Assemble the Bombs: Place a generous spoonful (about 1.5 tablespoons) of the cooled beef mixture into the centre of a dough circle. Press one cube of cheddar cheese into the middle of the filling.
- Seal Securely: This is the crucial step! Carefully pull the edges of the dough up and over the filling, pinching them together firmly at the top to create a sealed ball. What works best for me is rolling it gently in my palms to smooth the seam. Place the bomb seam-side down on your prepared baking tray. Repeat with the remaining dough and filling.
- Prepare the Topping: In a small bowl, mix together the melted butter, the remaining 2 minced garlic cloves, and the grated Parmesan cheese.
- Bake to Golden Perfection: Brush the tops and sides of each bomb with about half of the garlic parmesan butter mixture. Bake for 12-15 minutes, or until they are a deep golden brown and cooked through.
- Final Touches: As soon as they come out of the oven, brush the hot bombs with the remaining garlic parmesan butter. Garnish with a sprinkle of fresh parsley and sesame seeds, if using. Let them rest for 5 minutes before serving, as the cheese inside will be molten hot.
Notes
I really hope you give these Garlic Parmesan Cheeseburger Bombs a try. They are such a fun and satisfying recipe to make, and they never fail to get rave reviews whenever I serve them. It’s the kind of food that brings a smile to everyone’s face. If you do make them, I’d love to hear how they turned out for you, so please leave a comment below!
Happy cooking,
Ashley