Classic Vegetarian Chili Recipe
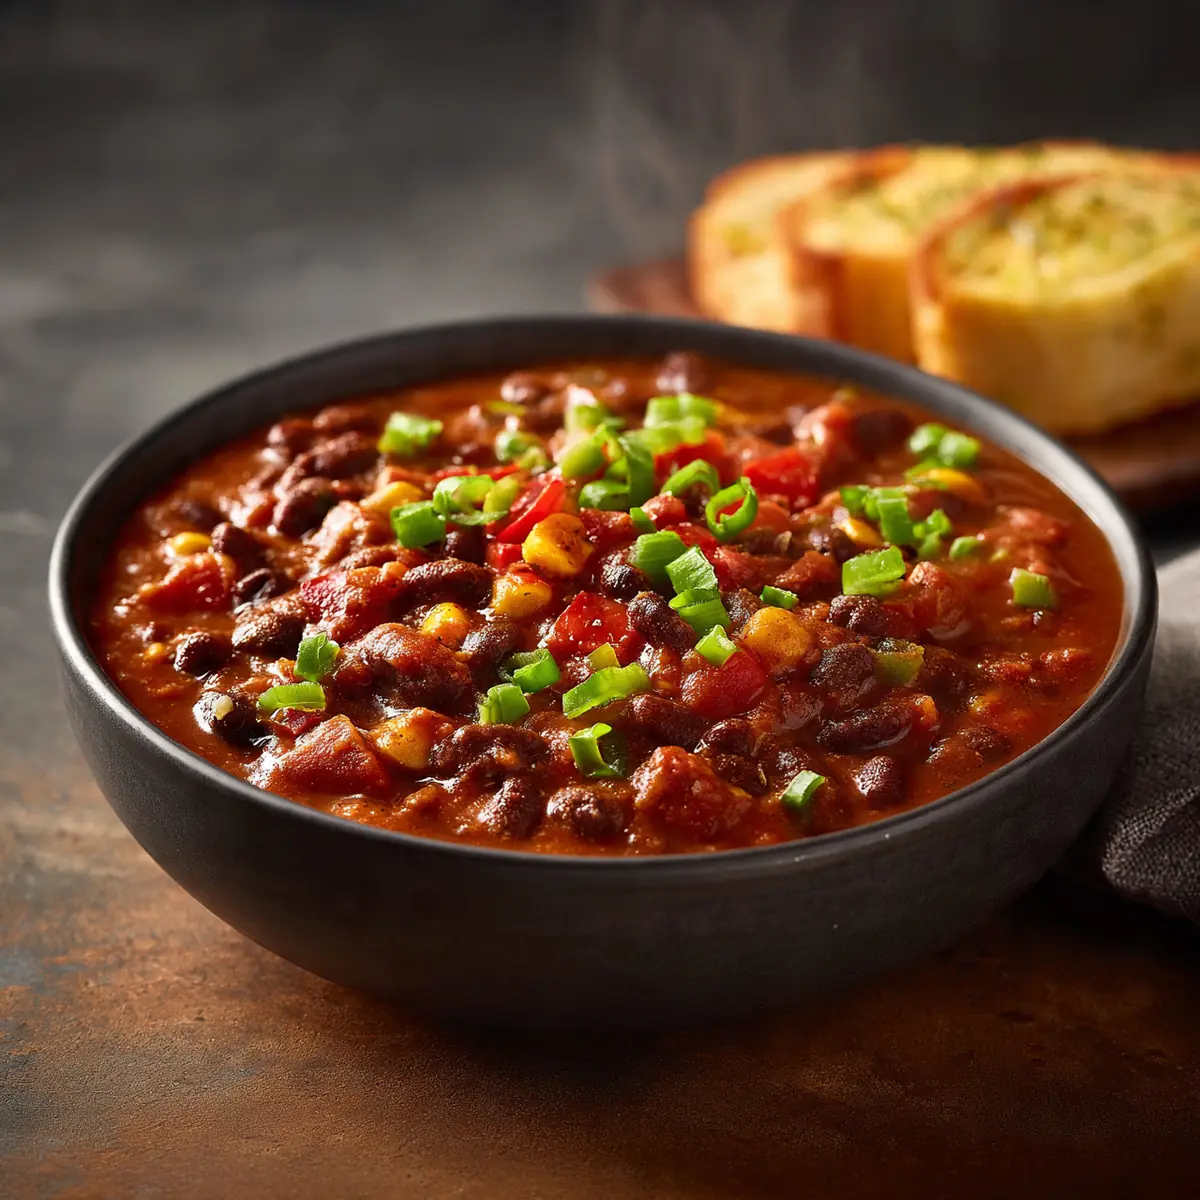
When I first started making this classic vegetarian chili recipe, I’ll admit, I was sceptical about how a dish without meat could ever be considered ‘impressive’ enough for a dinner party. But then I served it in deep, warm bowls, topped with a swirl of cool crème fraîche and a scattering of fresh coriander, and watched my guests’ eyes light up. This, right here, is the recipe that changed my mind about vegetarian cooking.
Recipe Overview
- Prep Time: 20 minutes
- Cook Time: 45 minutes
- Total Time: 1 hour 5 minutes
- Servings: 6 generous portions
- Difficulty: Easy
Why You’ll Love This Classic Vegetarian Chili Recipe
- Restaurant-Quality Presentation: We focus on the small details—from the perfect garnish to the right bowl—that transform a simple stew into a stunning centrepiece.
- Deep, Complex Flavour Without Meat: Through careful layering of spices and a long, gentle simmer, we build a richness that rivals any beef chilli you’ve ever had.
- Make-Ahead Magic: This is my go-to recipe when I need something quick but impressive. The flavours actually improve after a day in the fridge, making it perfect for stress-free entertaining.
- Naturally Vegan and Gluten-Free: It’s a dish that caters to almost every dietary requirement without anyone feeling like they’re missing out.
- Friends Always Ask for It: Friends always ask me for this recipe after trying it at dinner parties. It has become my signature dish, and I’m thrilled to share the exact method with you.

Ingredients You’ll Need
- 2 tablespoons olive oil
- 2 large onions, finely diced
- 4 cloves garlic, minced
- 2 red bell peppers, diced into 1cm pieces
- 2 large carrots, peeled and finely diced
- 2 celery sticks, finely diced
- 3 tablespoons tomato purée
- 400g can chopped tomatoes
- 400g can kidney beans, drained and rinsed
- 400g can black beans, drained and rinsed
- 300ml vegetable stock (low-salt is best)
- 2 tablespoons smoked paprika
- 1 tablespoon ground cumin
- 1 teaspoon dried oregano
- ½ teaspoon cayenne pepper (optional, for heat)
- Salt and freshly ground black pepper, to taste
- Juice of 1 lime
- Small bunch of fresh coriander, roughly chopped, plus extra for garnish
Tip: For the most visually stunning result, dice your vegetables uniformly. This isn’t just about aesthetics—even cooking ensures every spoonful has a balanced texture.
How to Make Classic Vegetarian Chili Recipe
- Sweat the Aromatics: Heat the olive oil in a large, heavy-bottomed pot over a medium heat. Add the diced onions and a pinch of salt. Cook for 5–7 minutes, stirring occasionally, until the onions become translucent and soft, and you can smell their sweet, mellow aroma. They should not be browning at this stage.
- Build the Vegetable Base: Add the minced garlic, diced red peppers, carrots, and celery. Stir everything together. Cook for another 8–10 minutes. The carrots should begin to soften, and the peppers will release a slightly sweet, grassy scent. The vegetables will look glossy and have reduced in volume by about a third.
- Toast the Spices: Push the vegetables to one side of the pot. Add the smoked paprika, ground cumin, dried oregano, and cayenne pepper (if using) directly to the hot oil. Stir the spices for 30–60 seconds until they become incredibly fragrant. You will smell a deep, smoky, warm aroma—this is the crucial moment for building flavour.
- Deepen with Tomato Purée: Stir in the tomato purée and cook for 2 minutes, stirring constantly. The purée will darken from a bright red to a deep, rusty brick colour. This step removes the raw, acidic taste and adds a rich umami note.
- Simmer the Chili: Pour in the chopped tomatoes and vegetable stock. Stir well, scraping the bottom of the pot to release any browned bits. Add the drained kidney beans and black beans. Bring the chili to a gentle boil—you will see lazy bubbles breaking the surface. Then, reduce the heat to low, cover, and let it simmer gently for 30 minutes. The kitchen will fill with a warm, smoky, and earthy fragrance.
- Finish and Season: After 30 minutes, remove the lid. The chili should have thickened noticeably; the liquid will have reduced, and the beans will look tender and plump. Stir in the lime juice and half the chopped coriander. Taste and adjust the seasoning with salt and pepper. The final flavour should be savoury, slightly smoky, and bright from the lime.
- Rest Before Serving: This is a non-negotiable step for presentation. Turn off the heat and let the chili rest, covered, for 10 minutes. This allows the flavours to meld and the texture to become even more luxurious. The chili will look glossy and deeply coloured.
Tips From My Kitchen
- Use a Heavy-Bottomed Pot: A good-quality Dutch oven or heavy-based saucepan distributes heat evenly, preventing the bottom from scorching before the rest of the chili is cooked. Thin pans create hot spots that can burn the spices, ruining their delicate flavour.
- Don’t Rush the Sauté: Taking your time to properly sweat the onions and vegetables is the single most important step. The slow, gentle heat draws out their natural sugars, creating a sweet, savoury foundation that makes the chili taste like it has been simmering for hours.
- Toast Your Spices in Oil: Adding dried spices to hot oil (rather than to liquid) unlocks their volatile oils, intensifying their flavour dramatically. This is a trick used by top chefs to get maximum impact from pantry staples.
- Season in Layers: Add salt at the beginning with the onions, not just at the end. Salting early helps draw moisture from the vegetables, allowing them to soften and caramelise properly. Adding salt only at the end results in a flat, one-dimensional flavour.
- Plate for Impact: To make this feel restaurant-quality, serve the chili in wide, shallow bowls rather than deep soup bowls. Use a ladle to create a neat mound in the centre. Finish with a dollop of crème fraîche or thick yoghurt, a sprinkle of fresh coriander, and a wedge of lime on the rim. The visual contrast is stunning.
Equipment You’ll Need
- Large, heavy-bottomed pot or Dutch oven (5-litre capacity)
- Sharp chef’s knife and sturdy cutting board
- Wooden spoon or silicone spatula
- Measuring spoons
- Can opener
- Fine-mesh sieve (for rinsing beans)
- Deep serving bowls
Common Mistakes to Avoid
- Overcrowding the pan: Adding too many vegetables at once lowers the pan’s temperature, causing them to steam instead of sauté. This results in a watery, bland chili. Cook the aromatics in batches if necessary, or use a pot wide enough that the vegetables sit in a single layer.
- Wrong temperature: Simmering the chili at a rolling boil will break down the beans into mush and cause the liquid to evaporate too quickly, leaving you with a dry, pasty mess. The ideal simmer is a gentle bubble, where only a few small bubbles break the surface at a time.
- Skipping the rest time: Serving the chili immediately after cooking is a missed opportunity. The resting period allows the starches from the beans to thicken the liquid naturally, and the flavours to marry together. A chili that has rested for 10 minutes will taste significantly more cohesive than one served straight from the boil.
Delicious Variations to Try
- Spicy Version: For a significant kick, add one finely chopped chipotle pepper in adobo sauce along with the tomato purée. The smoky heat from the chipotle complements the paprika beautifully without overwhelming the dish.
- Vegetarian/Vegan Option: This recipe is already vegetarian. To make it fully vegan, simply omit the crème fraîche or yoghurt topping, or replace it with a dollop of cashew cream or a simple avocado salsa.
- Different Protein: For a heartier texture, stir in 200g of cooked, crumbled Quorn mince or a plant-based beef substitute after you add the beans. This is a brilliant way to appeal to those who miss the texture of meat in their chili.
What to Serve With Classic Vegetarian Chili Recipe
- Fluffy white rice or cilantro-lime rice
- Warm cornbread with a honey butter
- Crispy tortilla chips for scooping
- A simple side salad with a tangy vinaigrette
- A dollop of Authentic Tzatziki Sauce Recipe Dip for a cool, creamy contrast
Frequently Asked Questions
Classic Vegetarian Chili Recipe
Ingredients
Method
- Sweat the Aromatics: Heat the olive oil in a large, heavy-bottomed pot over a medium heat. Add the diced onions and a pinch of salt. Cook for 5–7 minutes, stirring occasionally, until the onions become translucent and soft, and you can smell their sweet, mellow aroma. They should not be browning at this stage.
- Build the Vegetable Base: Add the minced garlic, diced red peppers, carrots, and celery. Stir everything together. Cook for another 8–10 minutes. The carrots should begin to soften, and the peppers will release a slightly sweet, grassy scent. The vegetables will look glossy and have reduced in volume by about a third.
- Toast the Spices: Push the vegetables to one side of the pot. Add the smoked paprika, ground cumin, dried oregano, and cayenne pepper (if using) directly to the hot oil. Stir the spices for 30–60 seconds until they become incredibly fragrant. You will smell a deep, smoky, warm aroma—this is the crucial moment for building flavour.
- Deepen with Tomato Purée: Stir in the tomato purée and cook for 2 minutes, stirring constantly. The purée will darken from a bright red to a deep, rusty brick colour. This step removes the raw, acidic taste and adds a rich umami note.
- Simmer the Chili: Pour in the chopped tomatoes and vegetable stock. Stir well, scraping the bottom of the pot to release any browned bits. Add the drained kidney beans and black beans. Bring the chili to a gentle boil—you will see lazy bubbles breaking the surface. Then, reduce the heat to low, cover, and let it simmer gently for 30 minutes. The kitchen will fill with a warm, smoky, and earthy fragrance.
- Finish and Season: After 30 minutes, remove the lid. The chili should have thickened noticeably; the liquid will have reduced, and the beans will look tender and plump. Stir in the lime juice and half the chopped coriander. Taste and adjust the seasoning with salt and pepper. The final flavour should be savoury, slightly smoky, and bright from the lime.
- Rest Before Serving: This is a non-negotiable step for presentation. Turn off the heat and let the chili rest, covered, for 10 minutes. This allows the flavours to meld and the texture to become even more luxurious. The chili will look glossy and deeply coloured.
Notes
I truly believe this classic vegetarian chili recipe is more than just a weeknight meal—it’s a statement dish that proves plant-based cooking can be both elegant and deeply satisfying. I’d love to hear how you get on with it. Do you have a favourite garnish or a secret twist you add to your chili? Please share your thoughts and experiences in the comments below. And if you’re looking for another show-stopping dish to serve alongside this, my Honey Garlic Chicken Wings Recipe makes a brilliant starter before the chili takes centre stage.