The Ultimate Air Fryer Whole Roasted Chicken Recipe
Oh, the majestic whole roasted chicken! For years, I chased that elusive perfectly crispy skin and succulent, juicy interior. After countless experiments, I’ve finally cracked the code to achieving it consistently, and believe me, it’s a game-changer for weeknight dinners and special occasions alike.
My kitchen journey has seen many attempts at roasting a whole chicken, from traditional oven methods to slow cookers, but none have delivered the sheer joy and consistent results of the air fryer. It truly transforms a humble bird into a culinary masterpiece with minimal fuss. I make this at least once a week – it’s become a firm family favourite, always met with eager anticipation and empty plates.
This recipe isn’t just about cooking a chicken; it’s about elevating your home cooking with a method that saves time, energy, and delivers on flavour every single time. Get ready to impress yourself and your loved ones with The Ultimate Air Fryer Whole Roasted Chicken Recipe that promises golden-brown perfection and meat that practically melts in your mouth.
Recipe Overview
- Prep Time: 15 minutes
- Cook Time: 60-75 minutes
- Total Time: 75-90 minutes
- Servings: 4-6
- Difficulty: Easy to Moderate
Why You’ll Love This The Ultimate Air Fryer Whole Roasted Chicken Recipe
- Unbeatable Crispy Skin: The air fryer’s circulating hot air creates an incredibly crunchy, golden skin that’s simply irresistible, far superior to many oven methods.
- Consistently Juicy Meat: Despite the crispy exterior, the chicken remains wonderfully moist and tender inside, thanks to the even cooking and shorter cooking time.
- Energy Efficient: Using an air fryer typically consumes less energy than a conventional oven, making it a more economical choice for your household.
- Quicker Cooking Time: A whole chicken cooks significantly faster in an fryer compared to a traditional oven, getting a delicious meal on the table in less time.
- Minimal Cleanup: With a well-lined air fryer basket or tray, cleanup is often a breeze, leaving you more time to enjoy your culinary creation.
Ingredients You’ll Need
- 1 whole chicken (approximately 1.5-2 kg)
- 2 tablespoons olive oil
- 1 teaspoon smoked paprika
- 1 teaspoon garlic powder
- 1 teaspoon onion powder
- 1 teaspoon dried mixed herbs (e.g., oregano, thyme, rosemary)
- ½ teaspoon black pepper
- 1 teaspoon salt (or to taste)
- 1 lemon, halved
- 2-3 sprigs fresh rosemary or thyme (optional, for cavity)
- 1 medium onion, quartered (optional, for cavity)
- 250 ml chicken stock (for gravy, optional)
- 1 tablespoon cornflour (for gravy, optional)
Tip: Always bring your chicken to room temperature for about 30 minutes before cooking. This helps it cook more evenly and prevents the outside from drying out while the inside struggles to catch up.
How to Make The Ultimate Air Fryer Whole Roasted Chicken Recipe
- Prepare the Chicken: Remove the chicken from its packaging and pat it thoroughly dry with kitchen paper. This step is crucial for achieving that wonderfully crispy skin. Feel the skin become noticeably drier to the touch.
- Season Generously: In a small bowl, combine the olive oil, smoked paprika, garlic powder, onion powder, dried mixed herbs, salt, and black pepper. Rub this mixture all over the chicken, ensuring every crevice is coated. You should see the chicken transform, taking on a vibrant, earthy red hue from the paprika.
- Stuff and Arrange: Place the lemon halves, onion quarters, and fresh herb sprigs into the chicken cavity. Tie the legs together with kitchen string if desired – this helps the chicken cook more uniformly. Carefully place the chicken, breast-side up, into your air fryer basket or on the rack.
- Initial Air Fry: Preheat your air fryer to 180°C (350°F). Once heated, cook the chicken for 30 minutes. As it cooks, you’ll start to hear a gentle sizzling sound and a delicious aroma of roasted chicken and herbs will begin to fill your kitchen. The skin will start to brown lightly.
- Flip and Continue Cooking: After 30 minutes, carefully flip the chicken over onto its breast side. Continue to air fry for another 20-25 minutes. This ensures the underside also gets a chance to crisp up and cook evenly. You’ll notice the skin on the back now turning a rich, golden colour.
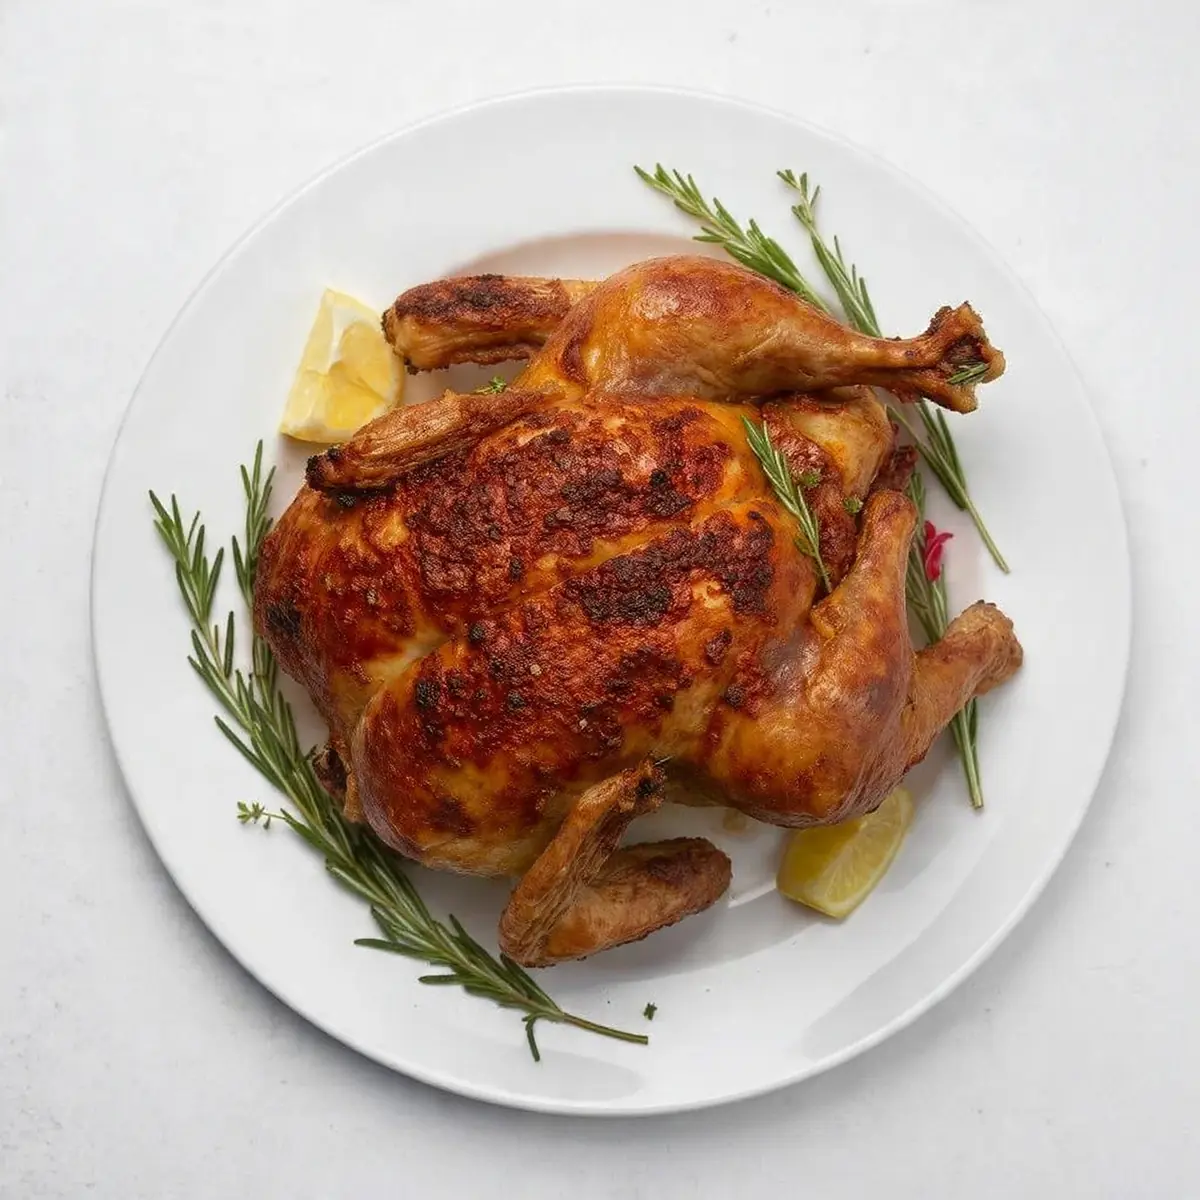
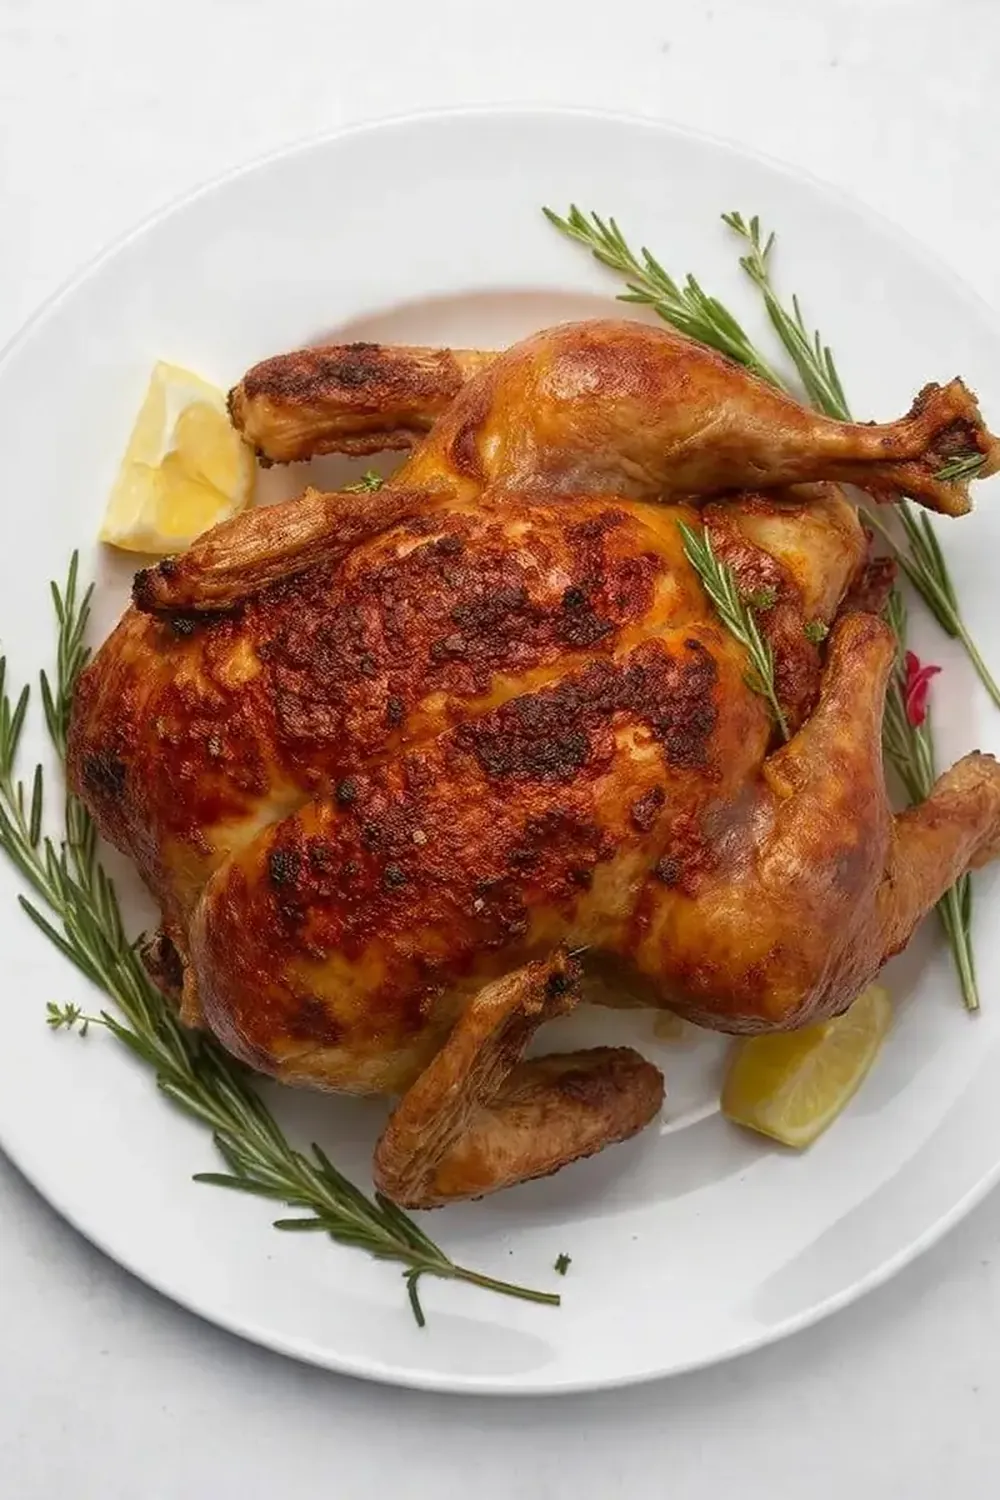
- Final Crisp and Check: Flip the chicken back to breast-side up. Increase the air fryer temperature to 200°C (390°F) and cook for a final 10-15 minutes, or until the internal temperature reaches 74°C (165°F) in the thickest part of the thigh, away from the bone. The skin will develop a deep, inviting golden-brown colour and a firm, crackling texture when gently pressed.
- Rest the Chicken: Carefully remove the chicken from the air fryer and transfer it to a carving board. Loosely tent it with foil and let it rest for at least 10-15 minutes. This vital step allows the juices to redistribute, ensuring every slice of meat is incredibly succulent. You’ll hear the gentle crackle of the cooling skin as it rests, preserving its crispness.
- Make Gravy (Optional): While the chicken rests, if you wish, you can make a simple gravy. Carefully pour any drippings from the air fryer basket into a small saucepan. Add the chicken stock and bring to a simmer. In a small bowl, whisk the cornflour with a tablespoon of cold water to create a slurry. Stir the slurry into the simmering stock, whisking continuously until the gravy thickens to your desired consistency. It should coat the back of a spoon and have a rich, savoury aroma.
Tips From My Kitchen
- Pat Your Chicken Dry – Really Dry: This is probably the most overlooked step, but it’s absolutely fundamental for crispy skin. Moisture on the skin creates steam, which prevents browning and crisping. Imagine frying anything wet – it splutters and steams, right? The same principle applies here. Use plenty of kitchen paper and get into every nook and cranny.
- Don’t Skip the Rest Time: I used to rush this step, eager to carve and eat, but I quickly learned my lesson. Resting the chicken for at least 10-15 minutes after cooking allows the muscle fibres to relax and reabsorb the juices that have been pushed to the centre during cooking. If you cut it too soon, those precious juices will run out onto your board, leaving you with drier meat.
- Size Matters for Air Fryers: Your air fryer’s capacity is key. A typical 1.5-2 kg chicken is ideal for most standard air fryers (around 5-6 litres). If your chicken is too large, it won’t allow for proper air circulation around it, leading to uneven cooking and less crispiness. Think of it like a small oven – you need space for the hot air to do its job.
- Use a Meat Thermometer: This is your best friend for perfectly cooked chicken. Visual cues are great, but a thermometer ensures food safety and optimal tenderness. Chicken is safely cooked when it reaches an internal temperature of 74°C (165°F) in the thickest part of the thigh, away from the bone. This prevents overcooking and drying out.
- Experiment with Seasonings: While my basic blend is a fantastic starting point, don’t be afraid to make it your own. Consider adding a pinch of cayenne pepper for a subtle kick, or dried oregano for a more Mediterranean flavour. A little dried ginger can also add a delightful warmth. Think about what spices you love and how they might complement the rich chicken flavour.
- Check for Hot Spots: All air fryers can have slightly different heating patterns. If you notice one side browning faster than the other during the initial cook, gently rotate the chicken or the basket to ensure even exposure to the heat. This proactive approach ensures a uniformly golden and crispy result.
Equipment You’ll Need
- Air fryer (suitable for whole chicken, typically 5L+)
- Sharp knife and cutting board
- Mixing bowls
- Kitchen paper
- Meat thermometer
- Kitchen string (optional)
- Small saucepan (for gravy, optional)
- Whisk (for gravy, optional)
Common Mistakes to Avoid
- Overcrowding the air fryer: If your chicken is too big for the air fryer basket, or if you try to squeeze in vegetables alongside it, you’ll inhibit the crucial air circulation. This leads to steaming rather than roasting, resulting in soggy skin and unevenly cooked meat. Ensure there’s at least an inch or two of space around all sides of the chicken.
- Wrong temperature: Cooking at too low a temperature will extend cooking time, potentially drying out the chicken before the skin crisps. Too high, and the skin might burn before the inside is fully cooked. Stick to the recommended temperatures, adjusting only slightly based on your specific air fryer’s quirks, and always verify with a meat thermometer.
- Skipping the rest time: As mentioned in my tips, allowing the chicken to rest is not just a suggestion; it’s a necessity for juicy meat. Cutting into the chicken immediately after cooking causes all the delicious juices to escape, leaving you with dry, stringy chicken. Patience truly pays off here.
Delicious Variations to Try
- Spicy Version: To add a fiery kick, simply mix a teaspoon of cayenne pepper or chilli flakes into your dry rub. You could also finely chop a fresh red chilli and add it to the cavity with the lemon and onion for a more aromatic heat.
- Vegetarian/Vegan Option: While this recipe is for chicken, you can achieve a similar crispy exterior and flavour profile by air frying a whole cauliflower or large portobello mushrooms. Season generously with the same herb and spice blend, and air fry until tender and deeply golden.
- Different Protein: This seasoning and air frying method works beautifully with other proteins too. For example, a smaller turkey breast or even a substantial grilled lamb chops recipe could benefit from this approach, though cooking times and temperatures would need adjustment.
What to Serve With The Ultimate Air Fryer Whole Roasted Chicken Recipe
- Fluffy mashed potatoes or creamy potato gratin
- Steamed green beans or roasted asparagus
- A vibrant garden salad with a light vinaigrette
- A generous serving of Rice Pilaf Recipe Fluffy Side
- Crusty bread to soak up any juices
Frequently Asked Questions
The Ultimate Air Fryer Whole Roasted Chicken Recipe
Ingredients
Method
- Prepare the Chicken: Remove the chicken from its packaging and pat it thoroughly dry with kitchen paper. This step is crucial for achieving that wonderfully crispy skin. Feel the skin become noticeably drier to the touch.
- Season Generously: In a small bowl, combine the olive oil, smoked paprika, garlic powder, onion powder, dried mixed herbs, salt, and black pepper. Rub this mixture all over the chicken, ensuring every crevice is coated. You should see the chicken transform, taking on a vibrant, earthy red hue from the paprika.
- Stuff and Arrange: Place the lemon halves, onion quarters, and fresh herb sprigs into the chicken cavity. Tie the legs together with kitchen string if desired – this helps the chicken cook more uniformly. Carefully place the chicken, breast-side up, into your air fryer basket or on the rack.
- Initial Air Fry: Preheat your air fryer to 180°C (350°F). Once heated, cook the chicken for 30 minutes. As it cooks, you'll start to hear a gentle sizzling sound and a delicious aroma of roasted chicken and herbs will begin to fill your kitchen. The skin will start to brown lightly.
- Flip and Continue Cooking: After 30 minutes, carefully flip the chicken over onto its breast side. Continue to air fry for another 20-25 minutes. This ensures the underside also gets a chance to crisp up and cook evenly. You'll notice the skin on the back now turning a rich, golden colour.
- Final Crisp and Check: Flip the chicken back to breast-side up. Increase the air fryer temperature to 200°C (390°F) and cook for a final 10-15 minutes, or until the internal temperature reaches 74°C (165°F) in the thickest part of the thigh, away from the bone. The skin will develop a deep, inviting golden-brown colour and a firm, crackling texture when gently pressed.
- Rest the Chicken: Carefully remove the chicken from the air fryer and transfer it to a carving board. Loosely tent it with foil and let it rest for at least 10-15 minutes. This vital step allows the juices to redistribute, ensuring every slice of meat is incredibly succulent. You'll hear the gentle crackle of the cooling skin as it rests, preserving its crispness.
- Make Gravy (Optional): While the chicken rests, if you wish, you can make a simple gravy. Carefully pour any drippings from the air fryer basket into a small saucepan. Add the chicken stock and bring to a simmer. In a small bowl, whisk the cornflour with a tablespoon of cold water to create a slurry. Stir the slurry into the simmering stock, whisking continuously until the gravy thickens to your desired consistency. It should coat the back of a spoon and have a rich, savoury aroma.
Notes
There you have it – my ultimate guide to creating a truly spectacular air fryer whole roasted chicken. It’s a dish that brings warmth and satisfaction to any meal, and I truly believe once you try this method, you won’t look back. Don’t be shy; give it a go and let me know how it turns out in the comments below! Happy cooking!